This project was built and designed by Nick from Rocky River Woodworks.
It’s a quick, beginner-friendly build that turns a block of scrap wood into a compact, customizable tic-tac-toe game—ideal for gifts, craft fairs, or small product lines.
With a clean layout, pivoting closure, and marble game pieces, this 1-hour project delivers strong resale potential with minimal material costs.
It’s also an approachable weekend build for newer woodworkers looking for fun, low-pressure shop time.
Watch the full video and subscribe to Nick’s channel:
Why This Project Works
Nick’s design focuses on simplicity and repeatability. The entire build relies on common shop tools like the table saw and drill press, so there’s no need for advanced joinery or elaborate finishing techniques.
By combining a minimal footprint with a thoughtful design, the final product is both functional and attractive.
Makers can easily personalize the board with different finishes, colors, or engraving, making it a great product to batch out and sell.
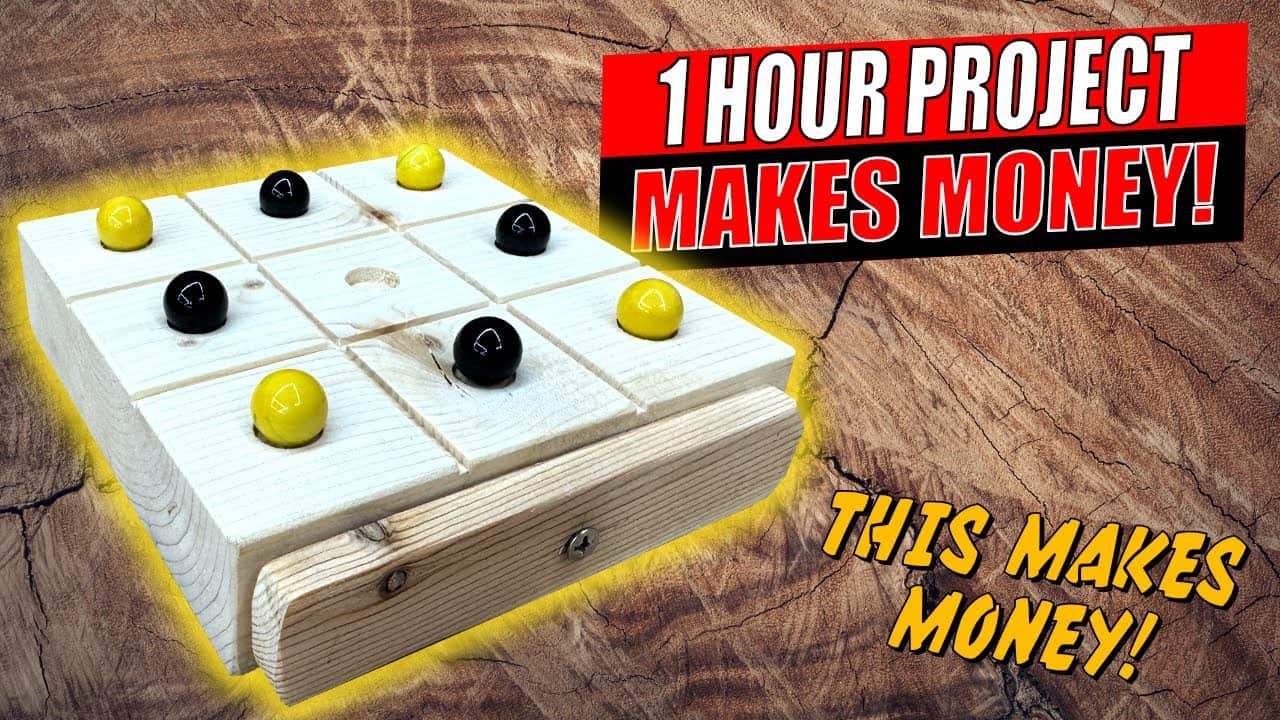
What the Finished Piece Looks Like
The game board is a square block with a 3×3 grid cut lightly into the surface. In the center of each square, a shallow well is drilled to hold marbles or small game tokens.
A thin strip of wood on one edge acts as a rotating closure to cover the storage wells. It’s held in place with a single screw, making it easy to open and close for travel or storage.
The overall aesthetic is clean and compact, with a rustic finish that invites customization. Sanding is minimal, and stain or paint is optional depending on the desired final look.
Tools and Materials
Nick builds the board entirely from scrap, but the essential materials include:
- A flat block of hardwood or softwood, roughly hand-sized
- A small handful of marbles or round tokens
- A thin wood strip for the rotating closure
- A small screw for the pivot point
Tools include a table saw, drill press, Forstner or brad-point bits, sanding supplies, and a screwdriver or drill for hardware installation.
Preparing the Board
Start by squaring up your scrap block on the table saw to form a flat, even square. One edge should be jointed or straight enough to ride safely against the fence.
With the block squared, Nick makes shallow saw cuts across the face to visually define the 3×3 grid.
These cuts are for layout only and don’t penetrate the board—they serve as visual guides for well placement.
Careful alignment here ensures the board looks clean and symmetrical once finished. If producing multiples, a paper template or simple jig can help speed up layout.
Drilling the Wells
Each square in the grid receives a centered well, which is drilled shallow enough to cradle a marble. A Forstner bit is ideal for creating clean, flat-bottomed wells that keep the marbles from rolling.
To mark the centers, Nick uses a ruler and pencil to divide each square evenly, followed by a center punch to prevent bit wandering. This makes drill press work more accurate and efficient.
Depth control is important—the marble should sit recessed but still be easily removable. For edge storage wells (if included), go slightly deeper to allow all pieces to nest securely.
Making the Closure
Nick attaches a thin pivoting strip to one side of the board, which rotates to hold the marbles in place during transport. A single small screw acts as a pivot, tightened just enough to hold position but still rotate freely.
To avoid splitting, pilot holes are drilled into both the board and the strip. Edges are sanded or rounded to improve the feel and appearance.
The pivoting strip is simple but effective—it keeps the marbles secure and adds a touch of character to the finished piece.
Finishing and Customizing
Sanding is kept to a minimum, just enough to break sharp edges and smooth any rough spots.
Nick encourages woodworkers to personalize the final board with stain, paint, or engraving if desired.
Some ideas for variation include:
- Sports team colors and marble sets
- Laser-engraved initials or logos
- Painted checkerboard-style patterns
- Wooden or resin token alternatives instead of marbles
Leaving the board unfinished is also an option—especially for sellers, as it invites buyers to customize it themselves.
Profit Potential and Selling Tips
Because of its fast build time and low material cost, this project is well suited for small-scale production. Nick notes that once the setup is dialed in, multiple boards can be made in an hour.
These game boards appeal to a wide range of buyers—families, gift shoppers, and fans of nostalgic or handmade games. Custom finishes and themes allow woodworkers to price accordingly and reach different markets.
Plans and Templates
To help with layout, Nick offers a printable one-page template available via the Rocky River Woodworks website or the video description. It includes grid lines and drill centers for quick transfer, especially helpful if batching out sets.
Using a template ensures consistency and speeds up both layout and drilling—key when building for sale.
A Quick, Fun, and Sellable Project
This tic-tac-toe board is a great example of how small shop projects can turn into money-makers. It’s easy to build, requires little material, and appeals to a broad audience.
Nick’s approach is relaxed and efficient, making this a perfect weekend project with real business potential.
Whether you’re building one for fun or 20 for a market, this design is worth your time.
Please support Nick by visiting his website here: https://www.rockyriverwoodworks.com/.

Matt’s Take
These are my personal thoughts and tips based on my own experience in the shop. This section is not written, reviewed, or endorsed by the original creator of this project.
This is exactly the kind of project that makes great sense in the shop — simple enough that you’re not wrestling with complex joinery, but thoughtful enough that the end result actually looks intentional. The beauty is in the execution of the basics: square cuts, consistent drilling, and clean sanding. When you nail those fundamentals, even a simple block of wood becomes something people want to pick up and play with.
One thing I really appreciate about Nick’s approach is the emphasis on drilling depth consistency. It’s easy to get careless with the drill press when you’re making shallow wells, but having marbles that sit at different depths immediately screams “amateur hour.” Take your time setting up a depth stop, and check it with a test piece first. Also worth noting — if you’re batch-producing these, a simple drilling jig can save you tons of layout time and ensure every board comes out identical.
The pivoting closure is clever because it solves a real problem without overcomplicating things. Nobody wants marbles rolling around loose in a bag or drawer. Just remember to drill your pilot holes for that pivot screw — it’s the kind of detail that separates a $5 craft fair item from something you can confidently charge $20 for. Small hinges work too if you want to get fancy, but the simplicity of Nick’s approach is part of what makes this scalable.
For finishing, I’d lean toward keeping things natural or going with a simple wipe-on poly if you want protection. The rustic, handmade appeal is part of the charm here, and over-finishing can actually work against you. Plus, if you’re selling these, neutral finishes appeal to more buyers than highly specific color schemes.