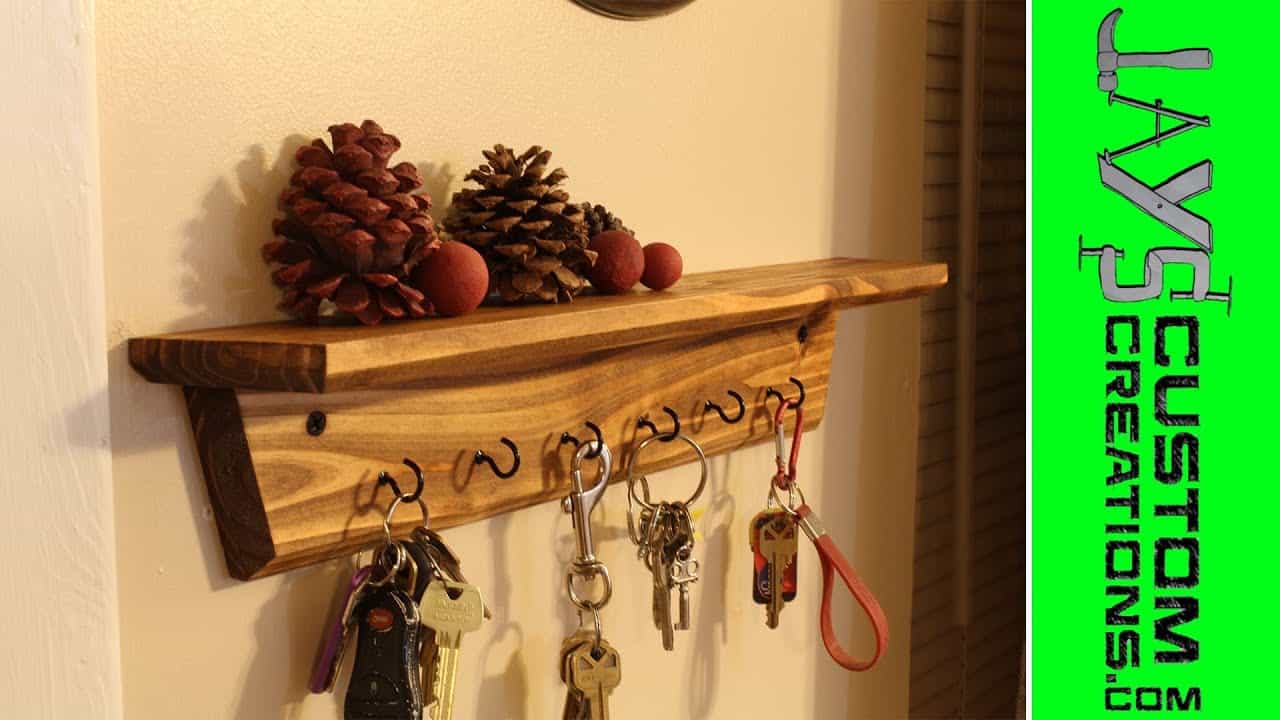
This project was built and designed by Jay Bates. It’s a quick and functional wall shelf with hooks for keys, made entirely from leftover 2×4 lumber.
Jay turns scrap wood into a practical household accessory in just about an hour. This simple design offers a smart way to keep your entryway organized while putting offcuts to good use.
Watch the full video and subscribe to Jay’s channel:
Why a Key Holder Shelf is a Great Project
Quick builds like this one are ideal for both beginners and experienced woodworkers looking for a productive hour in the shop. It uses minimal materials, requires only basic tools, and leaves you with something functional you’ll actually use.
What sets this project apart is its balance of simplicity and style. A few design touches—like angled cuts and a routed chamfer—give it a polished look without adding complexity.
Using Scrap Wood for a Cleaner Build
Rather than buying new boards, Jay uses 2x4s leftover from previous builds. These are ripped down to about 3 inches wide to remove the factory-rounded corners and make the pieces easier to work with.
Once ripped, the boards are cut in half, yielding multiple usable sections. This approach keeps costs low and supports sustainable woodworking habits by making use of what would otherwise be waste.
Customizing Hardware to Fit Your Style
Finding the right hardware to match your build can be tricky. In this case, Jay uses standard brass cup hooks and wall mounting hardware—but to better match a darker aesthetic, he gives the pieces a coat of black epoxy spray paint.
This little customization step makes a big difference in the final appearance. Matching the hook color to your interior design helps the project blend into your space or stand out intentionally.
Angled Cuts and Clean Assembly
The wall piece and shelf both get 15-degree cuts at the ends, which add a subtle, refined detail to the finished look. The wall piece ends up measuring approximately 17 ¾ inches long, while the shelf extends slightly further at about 19 ½ inches.
A chamfer detail is routed along the bottom edge of the shelf and the front of the wall piece. This gives the shelf just enough visual interest without overcomplicating the build—perfect for those who want a clean, modern appearance.
Hook Placement and Layout Tips
Jay uses a story stick to lay out six evenly spaced hooks. By marking one stick with the correct spacing, you can quickly transfer those same marks across multiple pieces without remeasuring every time.
Each hook is spaced roughly 2 ¼ inches apart, centered along a guideline 1 ⅛ inches from the bottom of the wall piece. This ensures consistent placement across all hooks, which is especially helpful if you’re batching out multiple shelves.
In addition to the hook layout, Jay drills two symmetrical counterbore holes to mount the shelf to the wall. He also adds a few pocket holes to the back of the wall piece for attaching the shelf itself.
Small Project, Big Satisfaction
This project checks a lot of boxes—fast, simple, useful, and a great way to clean up your scrap pile. It’s also highly customizable, whether you want to adjust the size, color, or number of hooks.
If you’re new to woodworking, it’s a low-risk project that introduces you to angled cuts, layout techniques, and small joinery like pocket holes. If you’re more experienced, it’s an efficient build you can knock out quickly and even gift or sell.
Final Finish and Styling
Jay leans toward darker finishes for this piece, making it stand out against lighter wall colors. You could stain it, paint it, or leave it natural, depending on your style.
Regardless of the finish, it’s a great small project that looks clean and intentional on any wall. Plus, it keeps keys, leashes, or other small items right where you need them.
Please support Jay by purchasing his plans here: Jay’s Custom Creations.

Matt’s Take
These are my personal thoughts and tips based on my own experience in the shop. This section is not written, reviewed, or endorsed by the original creator of this project.
What I love about projects like this is how they solve a real problem while using up materials that might otherwise end up in the burn pile. Those 2×4 offcuts from larger builds are perfect for quick, functional pieces that actually get used every day.
The story stick approach for hook spacing is one of those simple techniques that makes a huge difference in the final result. Getting consistent spacing by eye is surprisingly difficult, and taking that extra minute to mark a reference stick saves time and frustration later. It’s also worth mentioning that pre-drilling pilot holes for those cup hooks will prevent splitting, especially if you’re working near the ends of the boards.
Those 15-degree angle cuts might seem like a small detail, but they really do elevate the whole piece. If you don’t have a miter saw, a circular saw with a speed square works just fine for cuts like these. Just take your time with the setup and make sure your blade is sharp for clean results.
The customization potential here is endless too. You could easily scale it up or down, add more hooks for a larger family, or even build a whole series of them for different rooms. Sometimes the best projects are the ones that get finished in an afternoon and immediately earn their place in your daily routine.