
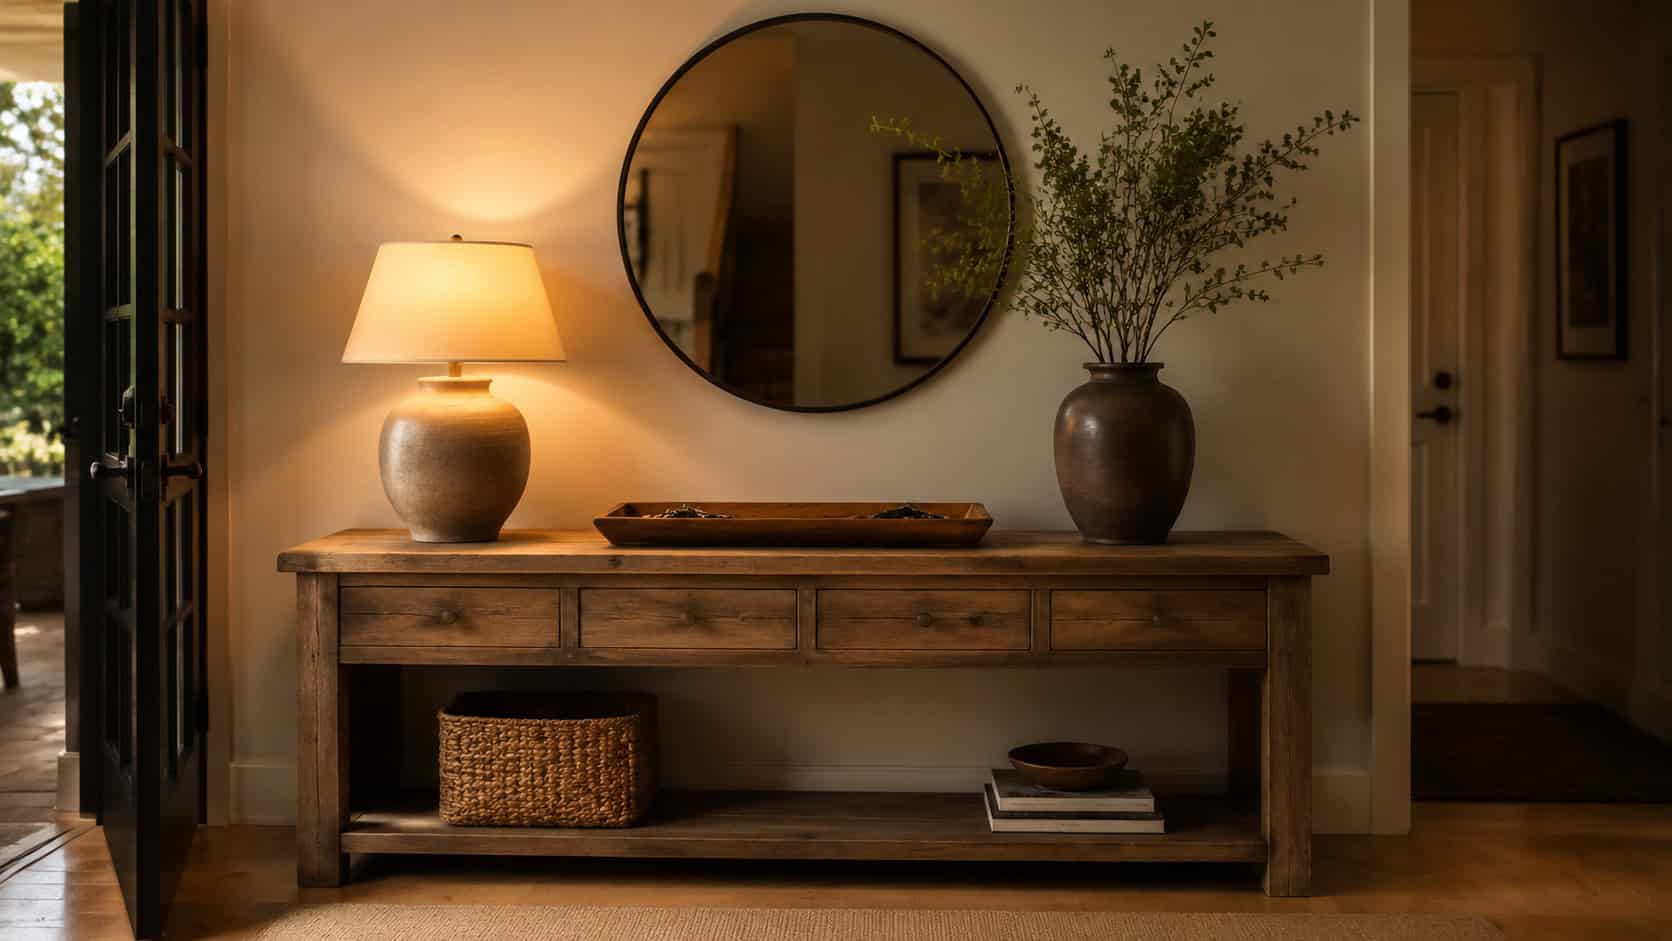
This project was built and designed by Taylor from Designed by Taylor. It’s a beautiful rustic TV stand that brings both function and charm to your living space.
With clean lines, solid joinery, and a timeless design, this piece can serve as a TV stand, media console, or display unit. The project is approachable for most woodworkers and delivers a finished product you’ll want to showcase.
Watch the full video and subscribe to Taylor’s channel:
Getting Started
Taylor begins by preparing and marking the wood for accurate cuts. A marking knife is used instead of a pencil to create fine lines that guide the blade more precisely.
When cutting, it’s important to account for the kerf—the thickness of the blade—to avoid inaccuracies. After the straight cuts are made, angled cuts are handled by adjusting the miter saw to the correct angles.
These cuts need to be clean and accurate to ensure the final structure comes together smoothly. Careful prep at this stage saves time later in the build.
Creating Joinery with Notches
Notches are cut into the wood to allow for clean, overlapping joints. Taylor sets the depth stop on the saw and makes repeatable passes until the desired depth is reached.
Once cut, the notches are checked for fit and adjusted as needed. This step helps ensure that the parts fit tightly and that the base will be solid and square.
Assembling the Legs
With notches and cuts completed, Taylor assembles the legs using pocket holes. This method allows for strong connections while keeping the hardware hidden.
Glue is added along with the screws to reinforce the joints further. Clamps are used to hold everything square as it dries.
Building the Frame
Next, the horizontal support boards are cut and attached to connect the two leg assemblies. Pocket holes are used again to keep the joints strong and clean.
Taylor uses spacer blocks to help align the boards at the correct height and maintain even spacing. This approach helps keep the frame level from end to end.
Installing the Shelves
Once the outer frame is secure, Taylor moves on to installing the shelves. Pocket holes are drilled into the 2×6 shelf boards to anchor them to the structure.
Each board is measured and placed carefully to ensure the shelves are straight and evenly spaced. This process is repeated for the bottom shelf as well.
Preparing the Top
The final piece of the structure is the tabletop. Pocket holes are drilled along the frame to secure the top from underneath.
Before attaching it, Taylor sands the entire unit using multiple grits for a smooth surface. A pencil is lightly drawn across the surface between sanding passes to check for low spots.
Applying the Finish
Once sanding is complete, the bottom of the stand is painted for contrast. The top is treated with a pre-stain conditioner to help the stain absorb evenly.
Taylor applies a dark walnut stain to highlight the wood grain and add warmth. After it dries fully, the top is secured to the base for final assembly.
Final Thoughts
The completed TV stand combines rustic character with practical function. It’s sturdy enough for heavy electronics and stylish enough to stand out in any room.
This project is a great opportunity to build your skills while creating something useful and long-lasting. Taylor’s thoughtful design makes this a standout piece for any woodworking enthusiast.
Want to See the Full Build?
Please support Taylor by visiting his website here: https://www.designedbytaylor.ca/.

Matt’s Take
These are my personal thoughts and tips based on my own experience in the shop. This section is not written, reviewed, or endorsed by the original creator of this project.
The marking knife technique Taylor uses here is a game-changer for accuracy. That fine line really does guide your blade better than pencil marks, especially on crosscuts where precision matters. It’s one of those old-school methods that’s worth adopting if you haven’t already.
Pocket holes are perfect for this type of furniture build – they give you solid mechanical strength while keeping everything looking clean. The key is getting your depth settings dialed in correctly for your material thickness. Too shallow and you won’t get good bite, too deep and you risk blowout on the other side.
That contrast between the painted base and stained top is a nice touch. Pre-stain conditioner is especially important on pine and other softwoods since they can get blotchy without it. Dark walnut is forgiving, but taking that extra step really pays off in the final appearance.
This style of TV stand hits a sweet spot – rustic enough to have character but clean enough to work in most spaces. The open design keeps electronics from overheating too, which is something you don’t always think about until your cable box starts acting up.