This project was built and designed by Rob from Make Things.
This article describes a compact Raspberry Pi camera housed in a purpose-built hardwood box intended for a dusty woodworking shop.
The design focuses on protecting the lens, keeping the camera rigid, and letting the electronics quietly do time-lapse and remote viewing without constant babysitting.
Watch the full video and subscribe to Rob’s channel:
Design
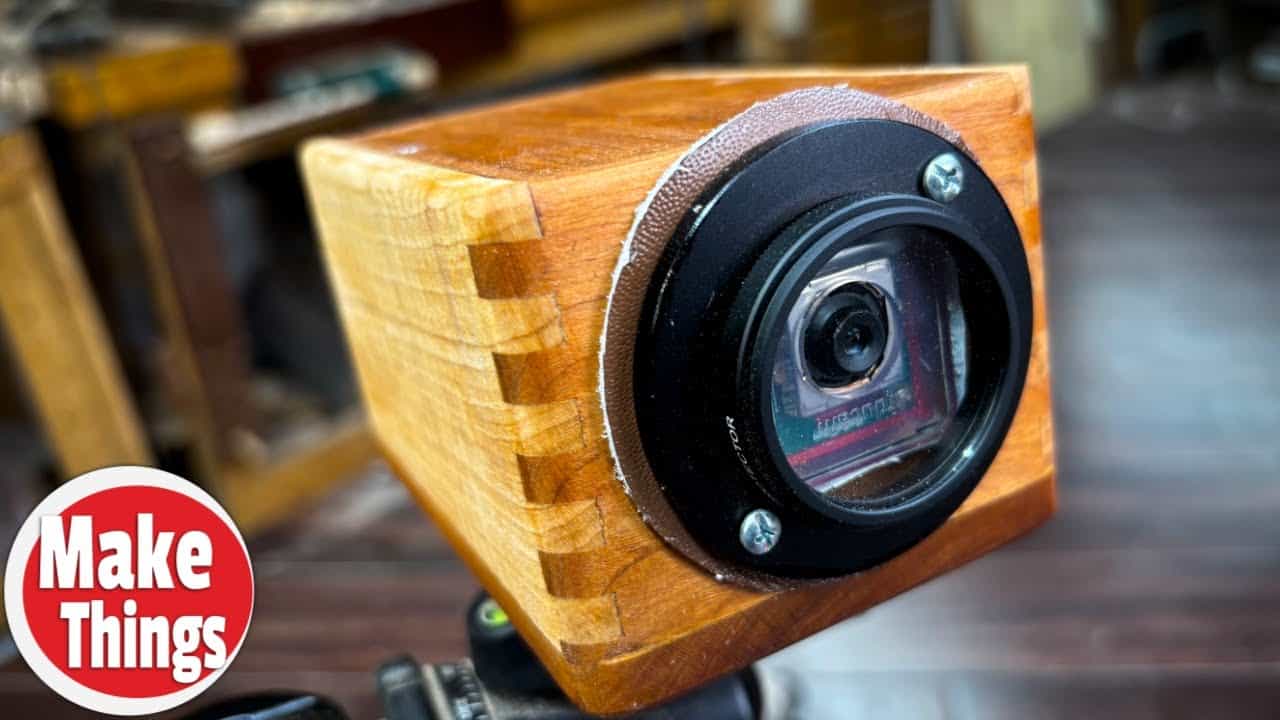
The enclosure pairs cherry and curly maple for a balance of aesthetics and shop durability, keeping the camera protected while looking deliberate on a workbench. The box integrates a removable lid with internal ledges to control dust ingress while allowing the wood to move naturally.
The front opening is designed to accept a step-up ring and protective glass so the lens can be shielded without sacrificing optical access. A leather gasket around the lens creates a soft seal against fine dust, a small detail that preserves image clarity over time.
Lumber Prep
All parts were milled to consistent thicknesses to simplify joinery and ensure the box sits square once assembled. Attention to grain and color pairing keeps the finished piece cohesive and gives the small object visual presence in the shop.
Allowing boards to stabilize before final cutting reduces the risk of gaps or warps later on, especially when using hardwoods that respond to humidity. Using matched stock and labeling parts during layout helps maintain grain flow across corners and edges.
Joinery and Assembly
Quarter-inch box joints were used for strength and repeatability, cut efficiently with a dado stack to keep the teeth consistent. This type of joinery locks the box together without complicated mechanical fasteners and reads like craftsmanship when fitted cleanly.
Small shop tricks—like using a straw to scrape excess glue from tight joints—save cleanup time and protect joinery edges during assembly. Internal ledges are glued and clamped before final lid fitting so the lid can register accurately while still allowing seasonal movement.
Camera Mounting and Electronics
The camera board sits on a routed and chiseled pocket so the imaging element is precisely positioned behind the protective glass and step-up ring. A mounting plate with larger fastener holes replaces undersized factory holes to ensure the camera is held securely and square to the opening.
Vibration control and serviceability are addressed with a threaded insert for tripod-style mounts and a small anti-shake plate under the camera; these measures reduce blur and keep the unit rigid. Wiring is routed cleanly into the base where the Pi and power supply live, and a simple web interface allows phone access for framing and capture.
Shaping and Finishing
Edges are chamfered and eased to make the box comfortable to handle while avoiding thin ledges that can snag or split; rounding and sanding are done carefully to prevent burn marks on figured woods. Card scraping brings out the grain and produces a tactile surface ready for finish.
A restrained finish protects the wood in a shop environment without hiding the natural figure of the cherry and maple. Multiple light passes of finish build durability and keep the small box looking intentional rather than overworked.
Lessons and Adaptations
This build shows how combining straightforward woodworking with modest electronics produces a useful shop tool that solves a specific problem: protecting a delicate camera in a dusty environment. Choices like a removable protective glass, leather gasket, and robust mounting make the design adaptable to different camera modules and shop conditions.
Techniques used here—box joints for strength, routed pockets for precise alignment, and ledges to balance dust control with wood movement—can be applied to other small enclosures or instrument housings. The project emphasizes practical problem solving: when an off-the-shelf solution is lacking, a purpose-built approach can be simple, repeatable, and beautiful.
Support Rob by visiting his site: https://makethingswithrob.com/.

Matt’s Take
These are my personal thoughts and tips based on my own experience in the shop. This section is not written, reviewed, or endorsed by the original creator of this project.
Box joints on a small project like this are a great choice — they’re strong, look intentional, and actually easier to cut accurately than trying to route tiny dadoes or rabbets on small stock. That dado stack approach Rob used gives you consistent, clean cuts without the tearout you might get from a regular blade. When you’re working with pieces this size, even small inconsistencies become really obvious, so taking the time to get your setup dialed in pays off.
The leather gasket detail caught my attention — that’s smart thinking for a shop environment. Dust is everywhere in our spaces, and fine particles can wreak havoc on camera sensors over time. Using leather gives you a soft seal that won’t scratch the glass while still keeping most of the crud out. Plus it’s easy to replace if it gets worn or compressed.
One thing I appreciate about this build is how Rob thought through the serviceability. That threaded insert for tripod mounting and the larger holes for the camera mounting screws show good planning. Electronics fail, cameras get upgraded, and having a box that can adapt to changes means this project stays useful instead of becoming shop decoration. The routed pocket approach also gives you precise positioning without having to fiddle with shims or spacers during assembly.