This project was built and designed by Tim from Casual Builds. It’s a smart and simple way to use the vertical space in your garage to keep storage bins off the floor and your workspace clear.
With just a few basic materials and tools, Tim shows how to build sturdy overhead shelves that make use of unused ceiling space. It’s an ideal weekend project for anyone looking to cut clutter and gain back some room in their garage.
Watch the full video and subscribe to Tim’s channel:
Why Build Overhead Storage?
Overhead shelves help maximize space in garages with tall ceilings. By lifting storage bins up and off the floor, you create more working room and make your garage easier to keep clean and organized.
Unlike attic storage, overhead shelving offers quick access without climbing a ladder. Tim’s build is designed to be easy to follow and quick to complete, making it ideal for a Saturday or Sunday afternoon project.
Planning the Project
The build starts with planning your layout and taking accurate measurements. Tim recommends checking the height between your ceiling and where the top of the shelving will sit. For his build, he sets the shelf height about 35 inches below the ceiling—enough to comfortably fit two stacked bins.
You’ll also want to measure wall width and spacing between ceiling joists. Tim highlights the importance of locating studs and joists early so you can anchor the frame securely.
Tools and Materials
This project uses common framing lumber—primarily 2x4s for the structure and plywood for the shelf surface. It’s an affordable material list with strong results.
The tool list is short and includes a miter or circular saw, a drill, a stud finder, a straightedge, and screws. Optional tools like a track saw and Forstner bit make the job easier but aren’t required.
Marking and Measuring
Once you’ve planned your build, the next step is marking the layout on the garage wall. Tim measures and marks the upper edge of the shelves using a level and a pencil line, making sure to account for bin height and ceiling clearance.
He also marks where each wall stud is located so he can screw into solid framing when mounting the shelf. Accurate marking at this stage prevents problems later during assembly.
Cutting and Framing
Tim cuts all the frame components from 2x4s, using a stop block to keep lengths consistent. This helps ensure the shelves go together square and level without gaps or adjustments during install.
He then pre-drills and countersinks screw holes in the frame pieces. This keeps the wood from splitting and speeds up final assembly by giving every screw a clean, easy start.
Improvising Around the Ceiling Joists
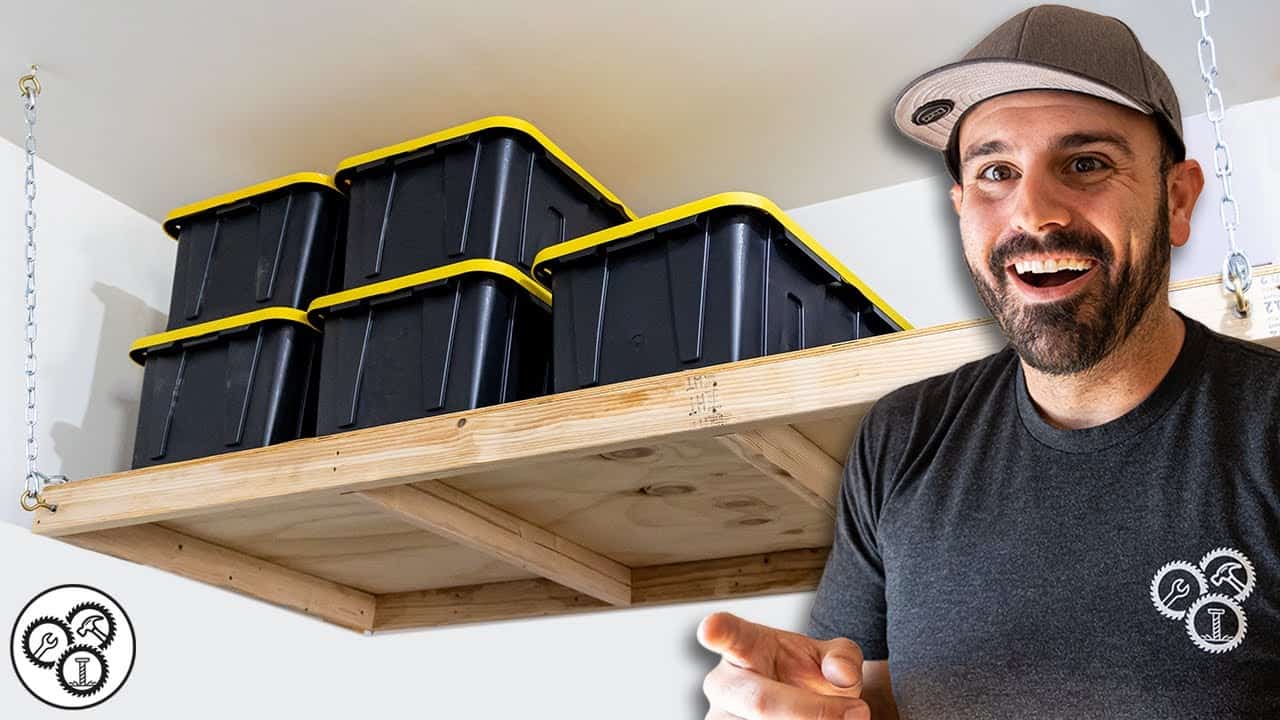
During the build, Tim ran into a problem—his ceiling joists weren’t aligned with his shelf design. Instead of starting over, he adapted by supporting the shelf from above using chains and eye bolts.
This clever solution provided even better vertical support and made the shelf feel more solid. It’s a great example of how adapting mid-project can lead to a better outcome.
Wall Mounting and Support
The frame is mounted directly to the garage wall, anchored into studs for support. For added strength and to compensate for the ceiling joist issue, Tim runs chains up to eye bolts for suspension support.
Before tightening everything, he checks that the frame is level. Making adjustments here helps prevent a slope that could cause bins to shift or slide once stored.
Installing the Plywood Shelf
After mounting the frame, Tim cuts plywood sheets to fit across the top. Using a circular saw with a straight edge or a track saw helps produce clean, square edges.
He sands the plywood edges to remove splinters and pre-drills the corners before securing the sheets with screws. It’s important to countersink the screw heads so that nothing sticks up and catches on bins.
Final Touches and Storage Setup
With everything assembled, Tim checks for level one more time and begins loading bins onto the new shelves. The result is a clean, open garage floor and easy access to stored items.
By keeping everything off the ground, this system also helps protect items from moisture and allows for easier cleaning underneath the shelves.
A Quick Win With Big Impact
This build is more than just a place to put your bins. It improves the function of your garage, adds organization, and helps free up valuable space—all in a single weekend.
It’s a great project for homeowners who want to start building more but aren’t ready for complex joinery or advanced tools. With basic materials and a bit of planning, this storage solution delivers professional results.
Please support Tim by visiting his website: https://www.casualbuilds.com/.

Matt’s Take
These are my personal thoughts and tips based on my own experience in the shop. This section is not written, reviewed, or endorsed by the original creator of this project.
Overhead storage is one of those projects that pays dividends every time you walk into your garage. The key to success is really in the planning phase—taking time to locate your ceiling joists and wall studs accurately will save you headaches later. A good stud finder is worth the investment, and I always recommend marking stud locations with painter’s tape so you don’t lose them during the build.
Tim’s adaptation with the chains is a perfect example of problem-solving in the shop. When your original plan hits a snag, sometimes the workaround ends up being stronger than what you initially designed. Those chains provide excellent vertical support and actually distribute the load better than rigid mounting alone. Just make sure your eye bolts are rated for the weight you’re planning to store.
Safety-wise, take your time with the overhead work and use a sturdy ladder or scaffolding. It’s tempting to overreach, but moving the ladder frequently is much safer than stretching for that last screw. Also consider the weight capacity when loading these shelves—seasonal decorations and camping gear are perfect, but avoid storing your collection of anvils up there. The beauty of this system is how it transforms your garage workflow while keeping everything visible and accessible.