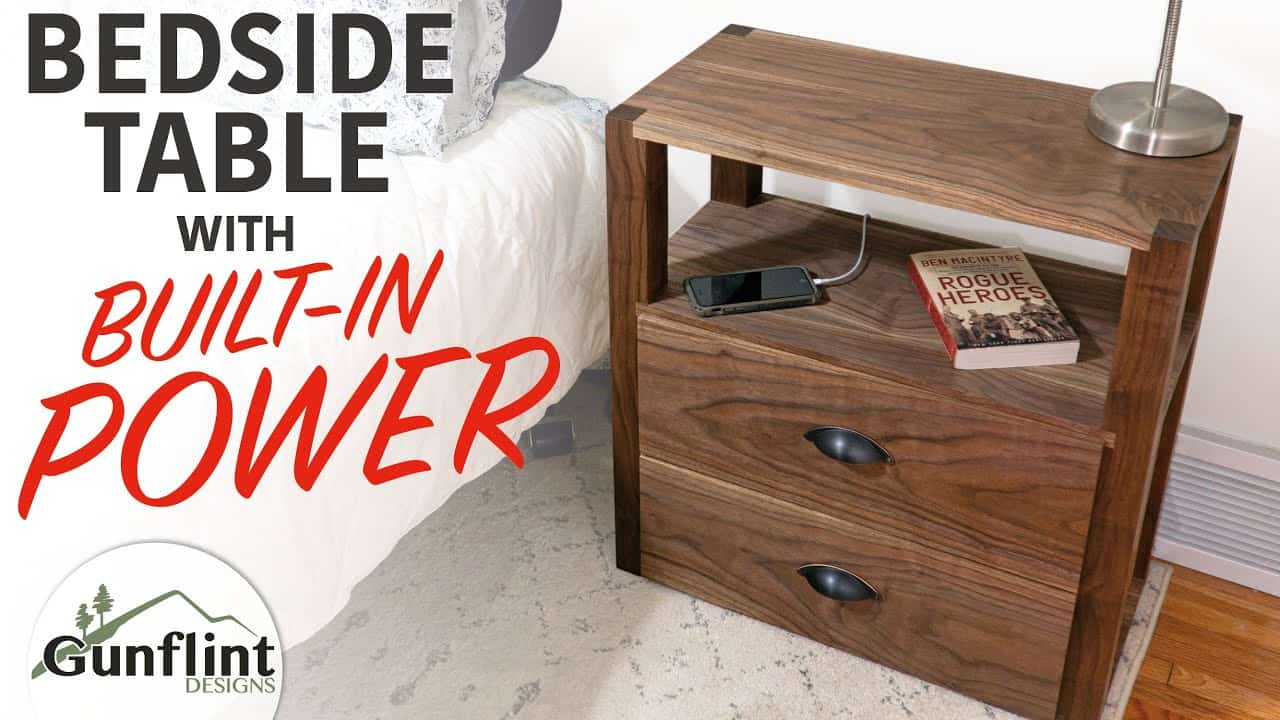
This project was built and designed by Mark from Gunflint Designs. It’s a practical nightstand with a clean design and a built-in power strip for charging devices without the usual cord clutter.
The build was completed without strict modeling or detailed plans, giving it a more fluid and intuitive process. Mark approached the design with a time constraint in mind, focusing on simplicity and function.
Watch the full video and subscribe to Mark’s channel:
Starting the Frame
The build starts with dimensioning rough lumber to create the main structure. Thicker solid wood was used for visible areas, while oak plywood was reserved for hidden sections.
This mix of materials kept the build efficient and minimized the number of glue-ups. It also provided enough contrast between structural and secondary elements.
Shaping the Structure
Legs were cut to the intended height and dadoes were made to fit the side panels snugly. These dados locked the panels into position and created a stable framework for the nightstand.
The middle shelf was installed with the help of stop blocks, keeping it square and evenly positioned between the legs. Careful alignment here helped everything else fall into place later.
Assembly Process
To avoid alignment issues, Mark broke the assembly into manageable stages. He started by gluing up the shelves and legs first, then moved on to the side and back panels.
Band clamps were used to keep corners tight during the glue-up. This method provided control and made the structure solid as each section was added.
Drawer Construction
The drawer boxes were built with plywood and trimmed with walnut strips to conceal the edges. These thin accents added contrast and gave the drawers a more polished appearance.
Half-lap joints were cut for strength, and dados were used to set the drawer slides. Everything was glued up for a clean finish without exposed fasteners.
Installing the Slides
A simple jig made it easy to mount the drawer slides in perfect alignment. This ensured the drawers opened and closed smoothly and fit properly within the frame.
Drawer hardware was also installed using a jig to guide the screw placement. This helped prevent mistakes and kept the process quick and repeatable.
Power Strip Integration
To include a power feature, Mark notched the back panel to allow the cord from a power strip to pass through. The power strip was installed inside the nightstand, keeping outlets within reach but hidden from view.
This made charging phones or other bedside devices much easier without the usual cable mess. It also added modern functionality to a classic woodworking build.
Applying the Finish
After everything was assembled, the nightstand was sanded and prepared for finishing. Mark used General Finishes Arm-R-Seal, applying multiple coats for a smooth and protective finish.
The result was a subtle sheen that brought out the wood grain without making the piece overly glossy. This finish works well in bedroom furniture where durability and appearance both matter.
Final Fit and Lessons Learned
The drawer fronts were installed last, completing the build. Mark noted a small issue with drawer depth that would be addressed in future versions, but it didn’t affect function.
Overall, the nightstand delivered on both style and practicality. It’s a simple yet thoughtful piece that adds convenience to the bedside space.
Want to See the Full Build?
You can see all of Mark’s plans here: https://www.gunflintdesigns.com/project-plans.

Matt’s Take
These are my personal thoughts and tips based on my own experience in the shop. This section is not written, reviewed, or endorsed by the original creator of this project.
This kind of mixed-material approach really makes sense for furniture like this. Using solid wood where it shows and plywood for the hidden structure keeps costs reasonable while still getting that quality look. It’s also a great way to manage wood movement — plywood stays more stable than solid wood panels in changing humidity.
The power strip integration is brilliant and something more furniture makers should consider. Running that cord through a notched back panel keeps everything clean while adding real functionality. Just make sure to use a quality power strip with surge protection, and consider the heat buildup if you’re planning to charge multiple devices regularly.
Those drawer slide jigs are absolute game-changers. Even a simple shop-made version saves so much time and prevents the frustration of misaligned slides. If you’re building multiples or just want consistent results, spending a few minutes making a jig pays off immediately. The half-lap joints on the drawer boxes are a nice touch too — stronger than simple butt joints and they help keep everything square during assembly.
Building without detailed plans like Mark did here takes confidence, but it’s a great way to develop your woodworking instincts. Sometimes the best solutions come from working through problems as they arise rather than following rigid plans.