This custom guitar stand was built and designed by Drew Fisher from Fisher’s Shop. It’s a great example of blending woodworking skill with thoughtful design to create something both useful and visually appealing.
Watch the full video and subscribe to Drew’s channel:
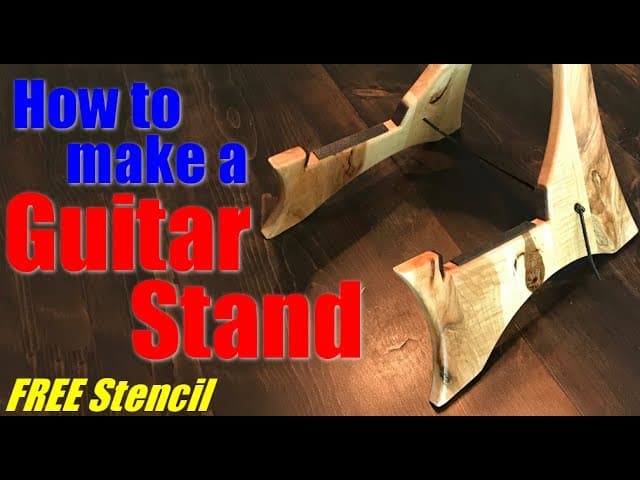
Why Build a Custom Guitar Stand?
For musicians, a reliable stand is essential to keep instruments safe and easily accessible. Building your own allows you to tailor the size, materials, and aesthetics to fit your space and style.
This particular design is foldable and portable, making it ideal for home studios, jam sessions, or travel. It also makes for a thoughtful handmade gift for any guitar player.
Designing the Stand
Drew started by experimenting with different design ideas in SketchUp. After testing several shapes and proportions, he settled on a design featuring dramatic arcs that provided both stability and a modern look.
The final shape not only looked great but was engineered to support a guitar securely. The visual flow of the arcs gave the project a professional appearance despite its simple construction.
Selecting and Preparing the Materials
To make this build unique, Drew used knotty maple boards salvaged from a cabinet shop’s scrap pile. The boards had distinctive character, with knots and grain patterns that added visual interest.
He glued the boards together into panels, taking care to align grain direction for both strength and appearance. Once the glue dried, the panels were planed flat and trimmed to size.
Shaping the Panels
Drew created a paper template for the stand’s profile and used spray adhesive to attach it to one of the panels. He then cut the shape on a bandsaw, staying close to the line for accuracy and reducing the need for heavy sanding.
After rough cutting, he refined the curves with a wood file to create smooth, flowing lines. The second panel was shaped using a flush trim bit at the router table, ensuring both sides matched perfectly.
Assembling the Stand
With the two panels shaped, Drew installed a small brass hinge at the top to allow the stand to fold flat. He carefully marked and drilled pilot holes to avoid splitting the wood during installation.
To maintain the correct angle when open, he drilled small holes on each panel and threaded a leather cord between them. Tied-off knots on each side kept the cord in place and prevented the stand from collapsing during use.
Finishing Details
To protect both the stand and the guitar, Drew added felt padding to the contact points. This prevents any chance of scratching the instrument while it’s in use.
He also added non-slip cushions to the feet for extra stability. Rubber bumpers were installed underneath to keep the stand from sliding around on smooth surfaces.
The Finished Guitar Stand
The end result is a stylish and functional guitar stand that folds flat for easy storage. Its natural woodgrain and handmade details make it as much a decorative piece as a practical one.
Drew’s design balances form and function in a way that’s accessible to beginner and intermediate woodworkers. With minimal tools and careful execution, this is a great weekend project.
Want to See the Full Build?

Matt’s Take
These are my personal thoughts and tips based on my own experience in the shop. This section is not written, reviewed, or endorsed by the original creator of this project.
Drew’s approach to this project really highlights how a simple concept can become something special with thoughtful execution. The knotty maple choice was smart — those character marks that might be flaws in other projects actually add personality here. When working with figured wood like this, I always remind folks to take extra care during glue-up since those knots can create weak spots if the grain runs wild.
The hinge placement is critical for this type of folding stand. Getting it positioned correctly so the stand opens to the right angle takes some trial fitting, but it’s worth the extra time. That leather cord solution is clever too — it’s adjustable, looks great, and won’t mar the wood like a chain might. Just make sure to use quality leather that won’t stretch out over time.
Safety-wise, always double-check your bandsaw setup when cutting those flowing curves. Sharp blade, proper tension, and steady feed rate will give you cleaner cuts and less cleanup work. The flush trim bit technique for matching the second panel is spot-on — it’s one of those router operations that makes you look like a pro even if you’re still learning.
For anyone considering this build, the felt padding isn’t optional. Guitar finishes are surprisingly delicate, and even smooth wood can leave marks. A few dollars worth of adhesive felt saves you from an expensive refinish job down the road.