This project was built and designed by Mark from Gunflint Designs. He walks through three different methods to create a custom magnetic knife holder, each using a different tool set and approach.
Whether you have a CNC machine, router table, or just a drill press, one of these methods will work for your setup. Each version results in a sleek, functional piece that keeps your kitchen knives organized and accessible.
Watch the full video and subscribe to Mark’s channel:
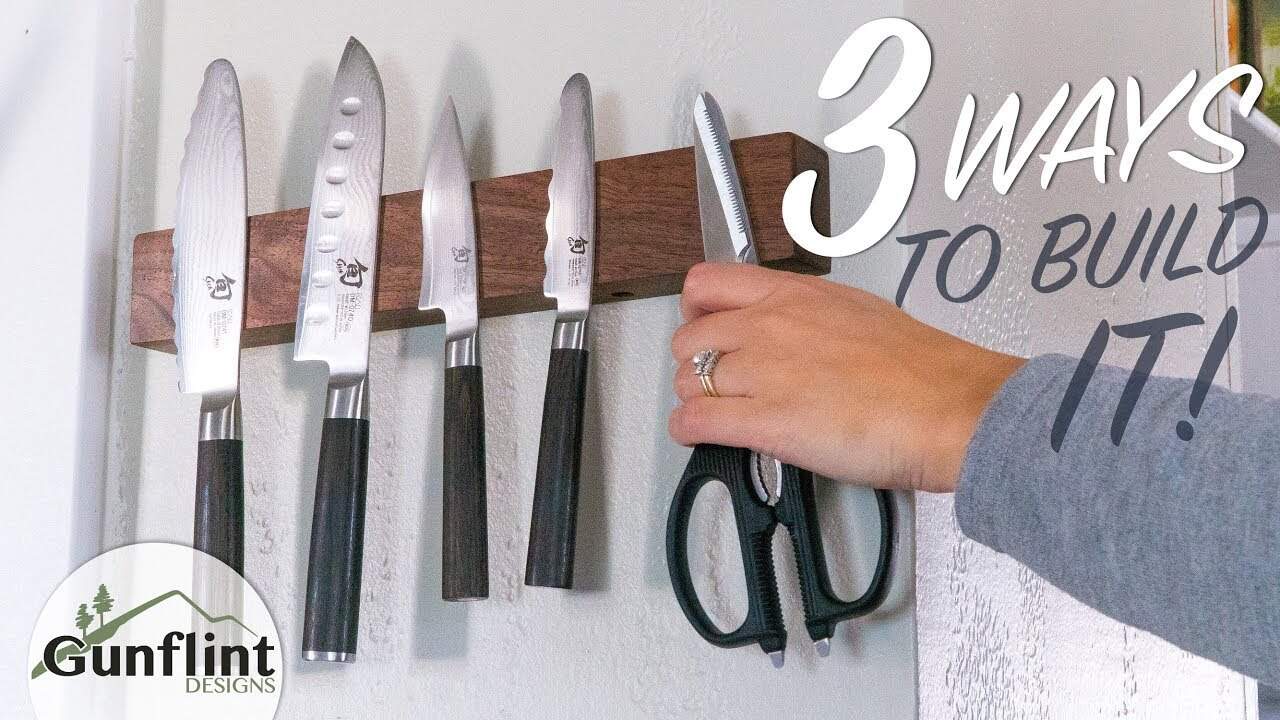
Why a Magnetic Knife Holder?
A magnetic knife holder frees up counter space while putting your tools on display. It also makes knife storage safer and easier, keeping blades out of drawers and within easy reach.
Mark designed three methods so woodworkers at any level or shop setup can build one. Each version offers a slightly different look and feel, while following the same overall goal.
Method 1: CNC Machine Approach
In the first method, Mark uses a CNC machine to carve out a black walnut knife holder. The piece of walnut came from a previous project and was repurposed for this build.
After squaring and sizing the workpiece, he uses a Z probe to calibrate the cutting depth. Tabs are added during the CNC run to keep the piece stable while cutting.
Once the machine work is complete, Mark removes the tabs and cleans up the edges using a belt sander. The magnet pockets are squared off by hand with a chisel to ensure a tight fit.
Epoxy is applied to secure the bar magnets in place. After drying, the piece is sanded smooth and finished with tung oil for a clean, natural look.
Method 2: Router Table Groove
The second method involves cutting a groove into the wood using a router table. Mark starts by drilling two guide holes at the beginning and end of the groove to help position the router bit.
The router table is adjusted to cut the groove to the right depth for the magnets. The board is held securely in place throughout the cut to maintain control and precision.
After the groove is routed, epoxy is applied and magnets are carefully set into place. Since there are no dividers between the magnets in this version, Mark takes care to prevent them from snapping together.
Once the epoxy has cured, the board is sanded and finished just like the first version. The result is a clean, streamlined knife holder made with simple tools.
Method 3: Drill Press Technique
This final method is designed for those working with a drill press and no CNC or router table. Mark begins by cutting a thin face piece from the front of the workpiece, which will be glued back later.
He then uses a Forstner bit to drill holes along the back face where the magnets will go. The holes are spaced evenly, and the drilling depth is checked often to avoid going too deep.
To ensure precision, Mark leapfrogs the Forstner bit so it’s always cutting into fresh material. This helps avoid wandering and keeps the holes aligned.
The magnets are glued into place and the thin face piece is reattached using wood glue. This creates a seamless finish with the magnets hidden inside.
Mounting and Customizing the Knife Holder
All three versions of the knife holder are mounted using a simple cleat system on the back. A wooden strip fits into a recessed groove and is secured to the wall with screws.
This approach makes the holder easy to level and remove if needed. You can also customize the size, wood species, or finish to match your kitchen style.
Why These Methods Work
Each technique offers a different path to the same goal—a magnetic knife holder that blends function with craftsmanship. Whether you have a CNC machine or just a drill press, Mark shows how to adapt the process to your setup.
The final results are visually appealing and built to last. They make great additions to a kitchen or even thoughtful gifts for others.
Want to See the Full Build?
You can see all of Mark’s plans here: https://www.gunflintdesigns.com/project-plans.

Matt’s Take
These are my personal thoughts and tips based on my own experience in the shop. This section is not written, reviewed, or endorsed by the original creator of this project.
What I love about Mark’s approach here is how he’s made this project accessible regardless of your shop setup. Too often we see builds that assume everyone has the same tools, but this shows there’s usually more than one way to solve a woodworking problem. The key insight is understanding that all three methods are really just different ways to create recessed pockets for the magnets while maintaining a clean face.
One thing worth keeping in mind with any magnetic knife holder is magnet strength and placement. Bar magnets or neodymium magnets work best since they provide strong, even pull along the blade. When spacing multiple magnets, test your heaviest knife first to make sure the magnetic force is distributed well enough to support it securely.
The cleat mounting system Mark uses is smart for a few reasons. It distributes the weight evenly across the wall, makes leveling much easier, and gives you the flexibility to adjust or remove the holder later. For kitchen applications, I’d suggest sealing the wood well since it’ll be exposed to moisture and temperature changes from cooking.
Safety-wise, remember that rare earth magnets can snap together with surprising force and potentially pinch fingers. Keep them separated during installation, and if you’re working with kids around, store loose magnets safely out of reach.