This project was built and designed by Marcus from Salty Woodworking.
It features a set of custom floating shelves made from live-edge slabs, complete with epoxy-filled voids, hidden brackets, and integrated LED lighting for a clean, modern finish.
The build blends traditional woodworking techniques with modern lighting and electronics. It’s a great example of how to add a subtle but dramatic upgrade to a room using wood, epoxy, and addressable LED strips.
Watch the full video and subscribe to Marcus’s channel:
Turning a Slab Into a Shelf
Marcus started with a live-edge slab that he cut down into two shelf-sized pieces. Each piece was flattened and squared to ensure clean references for later steps, especially when mounting to a wall or cabinet.
When working with live-edge wood, the edge itself often has curves, voids, or bark inclusions. Marcus focused on stabilizing and preserving those features while making sure the rest of the shelf could sit flat and straight.
Cleaning and Stabilizing the Live Edge
Before any finish or lighting could be added, the slab needed to be cleaned and stabilized. The live edge had insect holes and compacted sawdust—common issues with natural slabs.
Marcus used small picks and wire brushes to clear out debris. For tougher spots, a nylon brush in a drill worked well without damaging the texture. Once clean, pigmented black epoxy was poured into the voids to strengthen the edges and enhance the natural lines in the wood.
Flattening and Refining the Surface
After the epoxy cured, Marcus passed the boards through a planer to flatten the surface and remove excess epoxy. This left a smooth, level blank for routing, finishing, and mounting.
Smaller pinholes were filled with CA glue as needed. The result was a fully prepped slab ready for mounting hardware, LED channels, and a protective finish.
Creating the Floating Shelf Mount
Each shelf was mounted with a hidden bracket system using commercial floating shelf brackets. These consist of heavy steel rods that are screwed into wall studs. Matching holes are drilled into the back of the shelf so it slides cleanly over the rods and stays secure.
To align the shelf holes with the wall brackets, Marcus placed the shelf against its future position and traced the bracket layout directly onto the wood. This simple method avoids complex measuring and ensures accurate alignment.
In one installation, he secured the shelf with an extra screw through the face of a cabinet for added stability. This is a smart move in areas where shelves might flex over time or carry heavier loads.
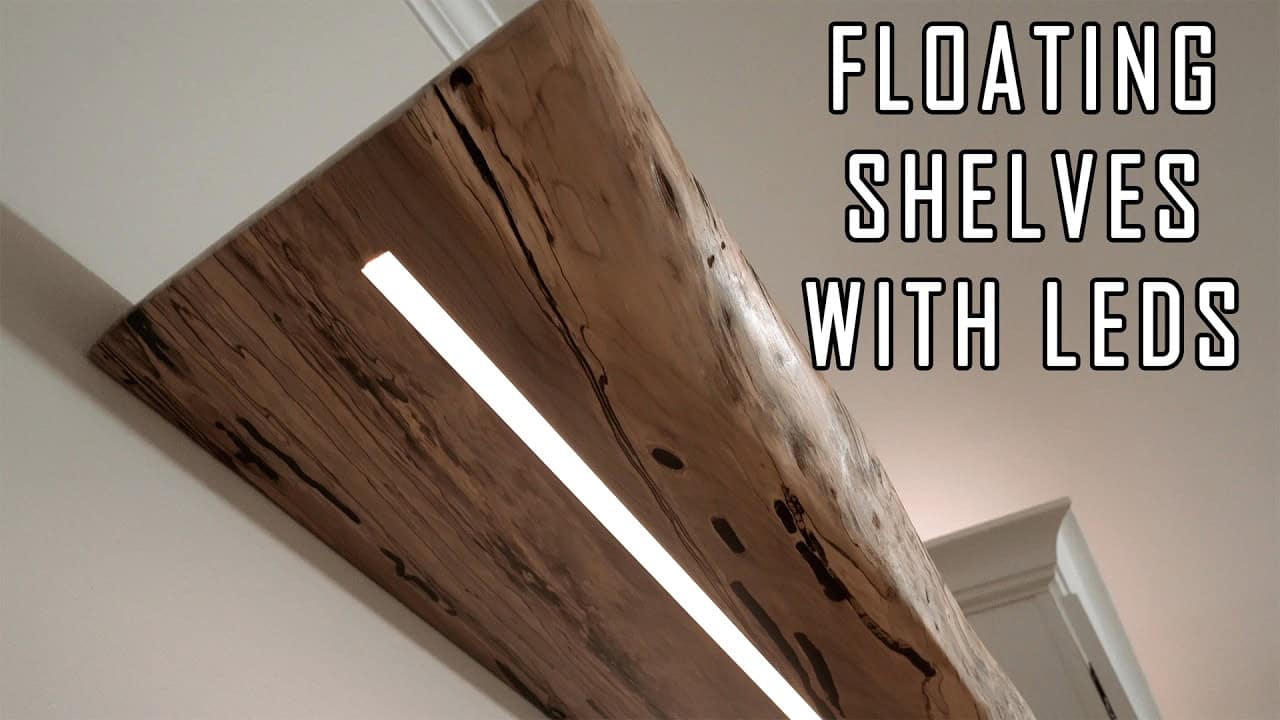
Routing a Channel for LEDs
To install LED lighting, a shallow channel was routed along the bottom face of the shelf. Marcus positioned it toward the front to shine light forward and down, helping highlight anything placed on the shelf while avoiding harsh wall reflections.
The channel was routed using a simple straight bit setup. Square corners were cleaned up by hand. Once routed, a plastic diffuser strip snapped into the groove to hide the LED strip and soften the light.
Choosing the Right LEDs
Marcus chose RGBW addressable LED strips for this build. These strips include separate white LEDs in addition to RGB channels, producing truer whites for better everyday lighting.
The lights are individually addressable, meaning each diode can be programmed for unique colors or effects. Controlled by a small board running WLED firmware, the LEDs can be synced to Wi-Fi and customized via phone or smart home integration.
For wiring, the basic setup involves connecting power, ground, and a data signal from the controller to the strip. If multiple shelves are connected on one circuit, power injection may be needed to prevent voltage drop across long runs.
Managing Wiring and Power Supply
All wiring was routed through the back of the shelf and hidden inside a cabinet. Planning for wire placement early in the process made final installation cleaner and safer.
The LED controller board was configured to Marcus’s home network, allowing him to change brightness, colors, and patterns directly from his phone. Testing and adjustments were done after everything was mounted and connected.
Finishing With a Clear Spray Coat
Once the shelves were fully prepped, Marcus applied a sprayed clear coat for protection and clarity. Spraying offers a smoother finish than brushing and avoids streaks or brush marks.
Multiple light coats were applied with sanding in between, resulting in a glassy surface that highlights the contrast between wood grain and black epoxy. Proper ventilation and safety gear were used during spraying to ensure a safe and clean process.
Installing and Lighting Up the Shelves
With the shelves mounted and wiring complete, the LED strips were lit and tuned for brightness and color balance. The diffuser helped soften the light, and the clear finish reflected just enough glow to add depth to the slab’s figure.
Once installed, the floating shelves acted as both storage and ambient lighting. Whether displaying books, decor, or everyday items, the shelves became a functional centerpiece in the space.
Why This Project Works
Floating shelves are already popular, but integrating LED lighting and using a live-edge slab gives them a custom, high-end feel. The project combines woodworking, epoxy work, and beginner-friendly electronics in a way that’s achievable but still impressive.
Even if a live-edge slab isn’t available, the same routing and LED steps can be applied to standard hardwood shelves. This makes the project accessible to anyone with basic tools and a bit of patience.
Watch the full video and subscribe to Marcus’s channel:

Matt’s Take
These are my personal thoughts and tips based on my own experience in the shop. This section is not written, reviewed, or endorsed by the original creator of this project.
Live-edge slabs can be tricky to work with, but they’re worth the effort for projects like this. When you’re cleaning out those natural voids and insect holes, take your time — rushing this step usually means dealing with loose debris later when you’re trying to get a smooth finish. That drill-mounted nylon brush technique is solid for getting into tight spots without gouging the wood.
The floating bracket approach is my go-to for heavy shelves. Those steel rods can handle serious weight when they’re properly anchored into studs. Just make sure your drill bit matches the rod diameter exactly — too loose and the shelf will wobble, too tight and you’ll crack the wood trying to force it on. A test hole in scrap wood saves headaches.
For the LED routing, that front-facing channel placement is smart. It gives you good downward light without blasting the wall behind the shelf. When working with addressable strips, plan your power supply location early — those controllers and transformers need ventilation and easy access for adjustments. Running 12V instead of 5V can help with voltage drop if you’re doing longer runs.
The clear spray finish really makes the epoxy pop against that natural edge. Just remember that spraying indoors requires serious ventilation — even water-based finishes put off vapors you don’t want to breathe. A simple exhaust fan setup makes all the difference for both safety and finish quality.