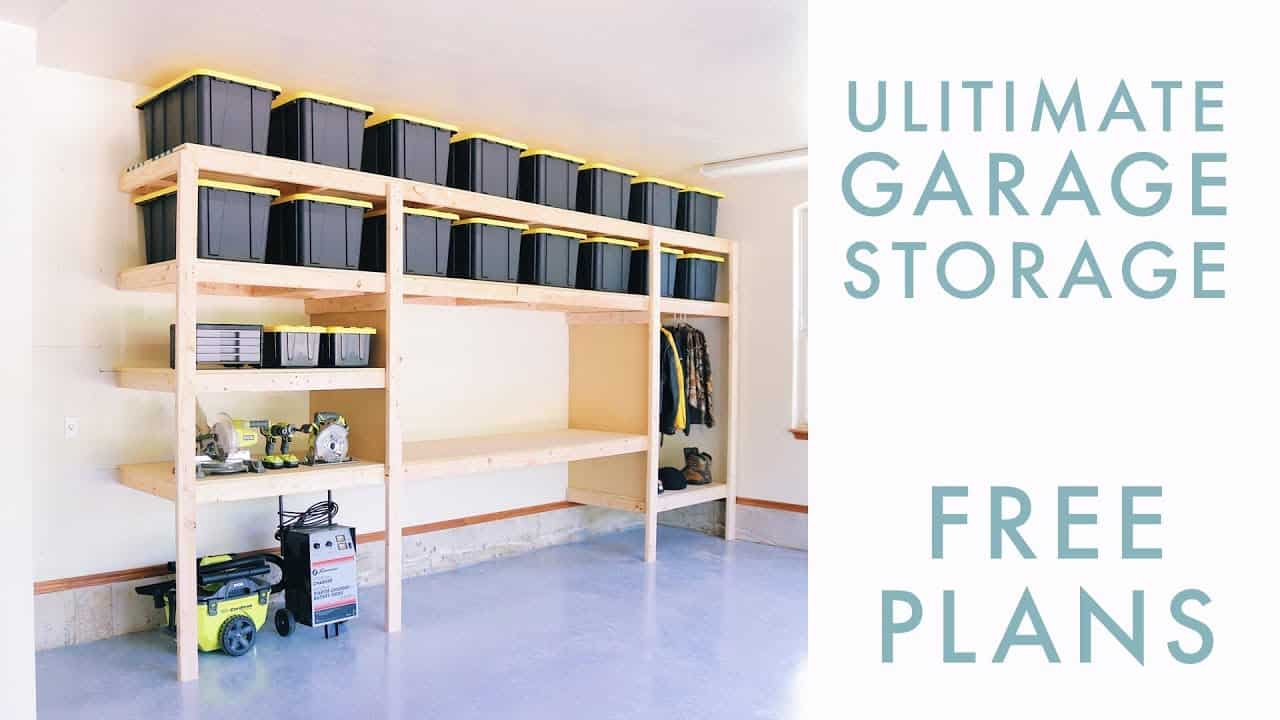
This project was built and designed by Mike Montgomery from Modern Builds. It’s a comprehensive garage solution that includes deep shelving, a stable workbench, and a closet area to keep everything organized and accessible.
Designed for functionality, flexibility, and efficiency, this system helps make the most of garage space while staying budget-friendly and approachable for DIYers of all levels.
Watch the full video and subscribe to Mike’s channel:
Creating a More Functional Garage
Whether you’re working on weekend projects or storing seasonal gear, a cluttered garage can get in the way. Mike’s solution is a multi-purpose wall system that brings together open shelves, a full-size work surface, and enclosed storage—all built with common tools and materials.
This project improves organization and helps turn your garage into a true extension of your workspace. The layout is flexible and scalable, making it easy to adapt to your own space and storage needs.
Planning the Layout and Gathering Tools
Before any cuts are made, Mike emphasizes the importance of planning. Measuring your wall and sketching out what needs to be stored will save time during construction and help avoid future headaches.
The build uses standard lumber and fasteners, so sourcing materials is straightforward. Key tools include a miter saw, a drill or impact driver, and a square for alignment. Optional tools like a stop block or pocket hole jig can help speed up the build, but aren’t essential.
Building and Framing the Shelves
The project starts with the open shelves, which are designed to fit plastic totes and large bins. Mike cuts identical frame pieces using a miter saw and stop block setup, ensuring each shelf frame is consistent in length.
Using screws for assembly, he frames each shelf with clean, square corners. Taking extra time here pays off later—aligned joints and flush faces help everything stack and install properly.
The depth of the shelves makes them ideal for storing bins, tools, and supplies. Their open design also keeps everything visible, making it easier to stay organized.
Wall Installation Made Simple
To mount the shelves, Mike shares a trick for solo builders: marking layout lines on the wall before lifting the shelf frame into place. This allows for accurate positioning without needing a second person to help.
Each frame is secured to the wall studs using long screws. As more shelves go up, the process speeds up thanks to the reference points already in place. Mike also screws through the sides of the frames to connect them together, locking the entire system into one solid structure.
Adding a Solid Workbench
Below the shelving, Mike incorporates a built-in workbench. The bench is built using leftover cuts from the shelves to reduce waste and keep costs low. This efficient use of material also maintains a cohesive look across the entire unit.
Bracing is added under the workbench to provide extra strength, allowing it to support tools, vises, or heavy projects without movement. It’s wide enough for most shop tasks, and shallow enough to keep foot traffic clear in tight garage spaces.
Building a Closet Section for Larger Items
One corner of the wall unit is turned into a closet-style section—ideal for bulkier items like hunting gear, motorcycle helmets, or tall storage bins. This vertical space helps store awkward or seasonal items that don’t fit well on shelves.
Mike installs a lower shelf in this closet by resting it on the wall trim for added support. This not only uses the space efficiently, but also creates a slight lift off the floor, helping prevent pest or moisture issues.
Lighting the Workspace
To improve visibility, Mike installs LED strip lighting above the workbench. These lights are linkable, low-profile, and provide excellent brightness for fine tasks.
Good lighting is often overlooked in garage builds, but it can drastically improve workflow. With proper lighting, you can focus on detail work without adding extra lamps or clutter.
Organized, Efficient, and Built to Last
By the end of the build, the garage wall is completely transformed. The shelves, workbench, and closet work together to provide everything a DIYer or homeowner needs for storage and workspace.
Mike’s method shows how proper planning and consistent construction techniques can elevate a basic garage into a clean, usable shop. The modular design means future changes are easy—add a cabinet, move a shelf, or expand as your needs grow.
Please support Mike by visiting his website: https://www.modernbuilds.com/.

Matt’s Take
These are my personal thoughts and tips based on my own experience in the shop. This section is not written, reviewed, or endorsed by the original creator of this project.
One of the smartest aspects of Mike’s approach is starting with those identical shelf frames. Having a good stop block setup on your miter saw really does make a difference when you’re cutting multiple pieces to the same length. Those small inconsistencies can add up quickly and throw off your whole wall installation.
The solo installation trick Mike uses is gold for anyone working alone. Marking those layout lines beforehand saves you from that awkward dance of trying to hold a frame level while finding studs. I’d add that using a good stud finder and marking all your studs with painter’s tape before you start makes the whole process much smoother.
That built-in workbench design is particularly clever because it uses the wall structure for support rather than requiring legs that would eat up floor space. The bracing underneath is crucial though—nothing worse than a wobbly work surface when you’re trying to get precise work done. The shallow depth keeps traffic flow open, which is essential in most garage shops where space is at a premium.
The lighting addition really ties it all together. Those LED strips have come a long way in terms of brightness and color quality. Good task lighting over your work area isn’t just about convenience—it’s about safety and accuracy too.