This project was built and designed by David from dk builds. It’s a reliable, shop-made cross-cut sled designed to improve both safety and accuracy at the table saw.
Cross-cut sleds are among the most useful shop accessories a woodworker can build. They offer better control, cleaner results, and safer operation than standard miter gauges—making them an essential addition to almost any table saw setup.
Watch the full video and subscribe to David’s channel:
Why You Need a Cross-Cut Sled
A well-made cross-cut sled ensures your workpieces stay square and steady during cuts. Unlike a miter gauge, which can slip or wobble, the sled supports your material on both sides of the blade and runs smoothly along table saw slots.
David’s version uses 3/4″ plywood for the base and walls, with hardwood runners for longevity. A stop block can be clamped along the fence for repeatable cuts, making the sled incredibly helpful for batching out identical pieces.
Cutting the Base and Walls
The first step in the build is cutting the plywood base wide enough to support a range of materials. Two wall pieces are then sized to create the front and back fences—these will hold the sled together and help square the work.
Both the front and rear walls are prepped to be the same height, and the base is large enough to accommodate wide boards. David emphasizes the importance of consistent measuring and clean cuts to keep things aligned throughout the build.
Crafting the Runners
The runners are cut to fit precisely inside the miter slots on the table saw. They’re typically made from hardwood like oak to prevent warping or breaking with repeated use.
David uses a clever trick to save time: cutting multiple runners in one go so he has backups for future projects. These runners are temporarily attached to the sled base using spray adhesive, which holds them in place while screws are added from the top.
Assembling the Sled
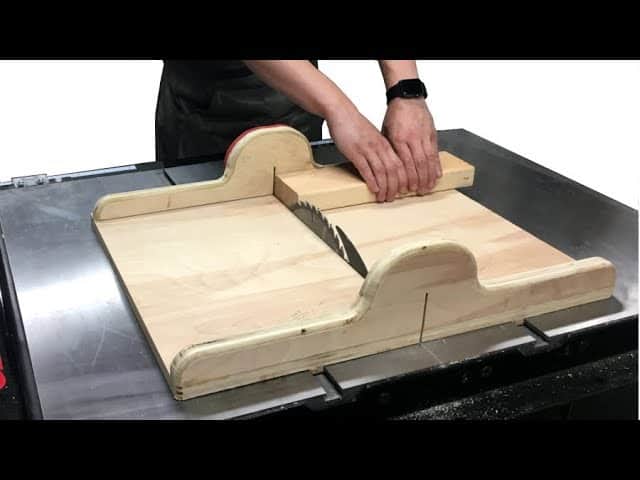
With the runners secured, the next step is to attach the walls. David lines them up, drills pilot holes, and drives screws to hold them in place temporarily. The front wall often includes an arch or cutout to make room for the blade path—this is both a safety feature and a design enhancement.
He then marks where the saw blade will pass through the base and makes a cut to create that clearance. A red-painted arch is added to the front for visual safety, and the edges are rounded over to avoid sharp corners.
Squaring and Testing the Fence
One of the most important steps in building a cross-cut sled is making sure the fence is perfectly square. To do this, David performs a “five-cut” or “V-cut” test using scrap wood, where accuracy is confirmed by checking for consistency in the thickness of the resulting wedge.
If the test shows the sled is out of square, adjustments are made by slightly shifting the front fence and retesting. Once everything is square, more screws are added to lock the fence into its final position.
Sled Maintenance and Extras
For smoother operation, David applies paste wax to the runners and the underside of the sled. This reduces friction and makes the sled glide easily across the saw top.
Over time, sleds can wear or shift slightly. It’s helpful to mark key reference lines and check alignment occasionally. David also suggests using color or labels to remind yourself of safety zones around the blade opening.
Benefits of a Shop-Made Sled
A custom cross-cut sled outperforms many store-bought jigs because it’s tailored to your saw and workflow. It can be expanded with additional features like hold-down clamps, stop blocks, or replaceable zero-clearance inserts.
For repetitive tasks like cutting identical boards or trimming small parts, a sled provides far more stability than handheld methods. It’s also ideal for anyone who frequently works with wide panels, angles, or detailed joinery.
A Safer, Smarter Way to Cut
Safety is a huge benefit of using a sled. By keeping your hands farther from the blade and providing a fixed base for your material, it lowers the risk of kickback and bad cuts.
For beginners, it’s a confidence booster. For experienced woodworkers, it’s a must-have for accuracy. In either case, once you start using one, you’ll wonder how you ever worked without it.
Please support David by visiting his Etsy Store and buying his plans.

Matt’s Take
These are my personal thoughts and tips based on my own experience in the shop. This section is not written, reviewed, or endorsed by the original creator of this project.
The five-cut test David uses is one of the most reliable ways to dial in accuracy on a cross-cut sled. It’s worth taking the time to get this right—even a degree or two off square will compound into noticeable gaps in your joinery. When I’m checking square, I like to use a piece of scrap that’s at least 6 inches wide since larger test pieces make small errors more obvious.
That paste wax tip is gold for keeping things running smooth. I’d add that checking your runners periodically is smart maintenance too. Table saw slots can collect dust and debris, and runners will wear over time. A quick wipe-down of both the slots and runners before use prevents frustrating binding mid-cut.
One safety point worth emphasizing: that red-painted arch isn’t just for looks. Having a clear visual reminder of where the blade travels helps prevent accidentally placing clamps or your hands in the danger zone. I’ve seen folks get comfortable with their sleds and start treating them too casually—that bright color keeps you alert.
For anyone building their first sled, don’t overthink the dimensions. Start with what fits your most common work, and remember you can always build specialized versions later. A basic, well-made sled like David’s will handle 90% of your cross-cutting needs right out of the gate.