This project was built and designed by Caleb from YouCanMakeThisToo. It’s a visually striking piece of epoxy wall art that incorporates LED lighting to create a glowing beach sunset effect.
The design blends woodworking, resin art, and lighting into a single build. With thoughtful techniques and creative layering, the result is a one-of-a-kind display piece for any space.
Watch the full video and subscribe to Caleb’s channel:
Building the Foundation Panel
The project begins with the construction of a solid wood panel. Caleb uses maple, but other materials like plywood or pre-made panels from the hardware store can work just as well depending on your experience level and time constraints.
To ensure the panel is flat and strong, the wood is milled, glued up, and clamped for a tight bond. While a domino joiner can help with precision, standard edge gluing is also effective when done carefully.
Paying attention to grain direction helps avoid tear-out when milling. Caleb recommends feeding boards downhill and keeping the dust collection clear for cleaner results.
Prepping for Epoxy Work
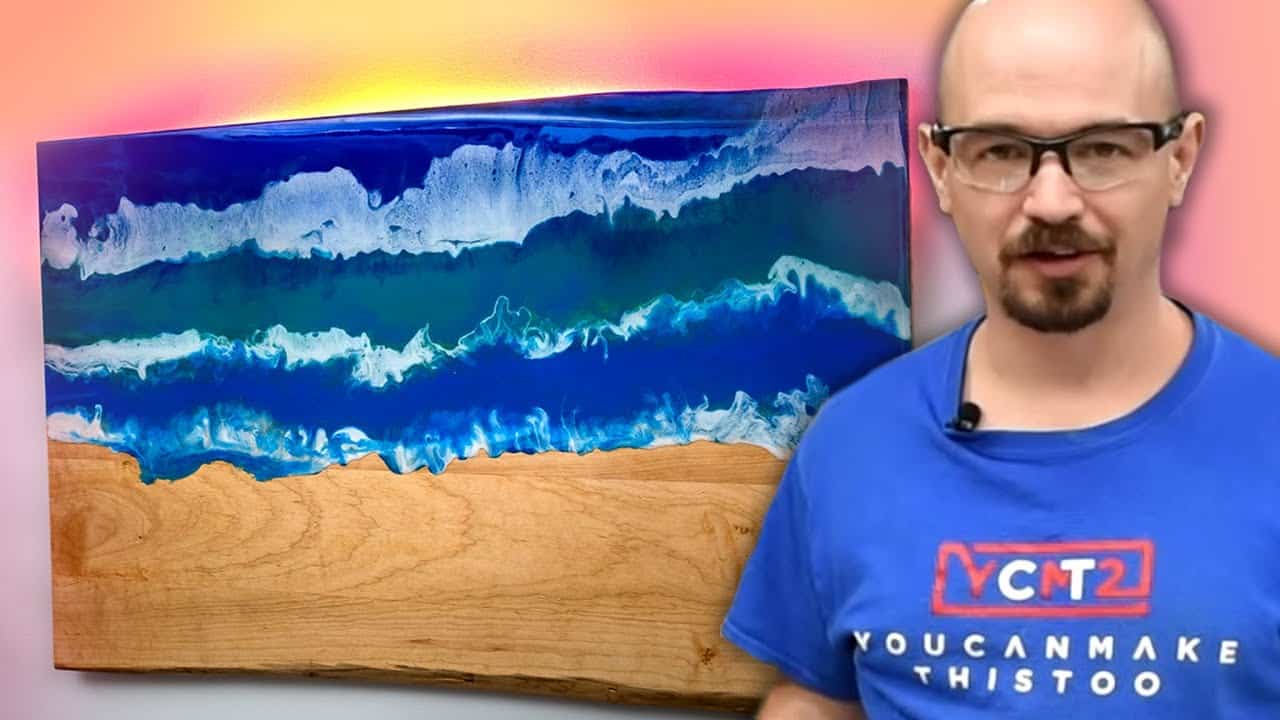
Once the base panel is ready, the next step is to prepare for the epoxy pour. This part of the build introduces the artistic elements, as the epoxy colors mimic the layers of a sunset.
Before applying resin, Caleb seals the surface with shellac. This step prevents bubbles and discoloration by creating a barrier between the wood and the epoxy. Shellac is a universal sealer that maintains the color and character of the wood underneath.
Planning the LED Integration
A French cleat system is added to the back of the panel for hanging. This method not only makes installation easier but also provides space to house the LED components securely.
An acrylic diffuser panel is added to distribute the LED light evenly. Caleb carefully sizes this piece so it fits snugly against the cleat, keeping everything aligned and flush while also allowing for effective backlighting.
Mixing and Pouring Epoxy Colors
To create the sunset scene, Caleb mixes multiple epoxy batches with vibrant acrylic pigments. Colors are poured in order—yellow, orange, magenta, and purple—starting at the center and working outward.
Each layer is blended slightly into the next to create a natural gradient. This technique captures the look of a setting sun over a calm shoreline, adding depth and warmth to the artwork.
Throughout the process, Caleb shares tips on working with resin, including mixing ratios, working times, and temperature management. He also credits Jess from Crow Creek Designs for inspiration and education on advanced epoxy work.
Curing and Surface Cleanup
After curing overnight, the resin hardens and the artwork takes shape. Any excess epoxy on the back is carefully removed using a heat gun, which softens the resin and makes cleanup easier.
Once clean, Caleb reseals the back with shellac. This step not only protects the wood but also keeps the artwork looking professional from all angles.
Installing the LED Lights
With the panel complete, it’s time to install the LED strips. Caleb uses adhesive-backed strips, which stick directly to the acrylic diffuser and cleat area. He doubles the lights to create a brighter, more even glow.
Alternating warm and cool LED tones helps balance the overall lighting and make the gradient colors more vivid. These subtle choices contribute to the overall effect without overpowering the design.
Hanging the Finished Piece
The French cleat allows for quick and level hanging. Caleb secures the opposing cleat to wall studs, ensuring the panel stays flush and stable once mounted.
To finish things off, he orders a white power cord to match the light color and minimize visual distractions. This kind of detail keeps the focus on the artwork itself and rounds out the clean aesthetic.
A Creative Blend of Art and Technique
This epoxy beach wall art project shows how woodworking and art can come together in a functional and decorative piece. The blend of natural wood, layered color, and subtle lighting gives it life—especially when the lights are dimmed.
Whether you’re making a gift or creating something personal for your space, this is a great way to experiment with resin and LED design. Caleb’s build makes the process approachable while offering plenty of space for personal creativity.
Please support Caleb by visiting his website: https://www.ycmt2.com/.

Matt’s Take
These are my personal thoughts and tips based on my own experience in the shop. This section is not written, reviewed, or endorsed by the original creator of this project.
Working with epoxy and LEDs together opens up some really interesting possibilities in the shop. The key to success with resin projects like this is temperature control — both your shop temperature and the resin itself. Cold resin moves like molasses and traps air bubbles, while hot resin kicks off too fast to work with. I keep my epoxy in a warm water bath before mixing, especially during colder months.
French cleats are brilliant for wall-mounted pieces, particularly when you’re dealing with electrical components. They distribute weight evenly and make it easy to access the back of the piece if you ever need to service the LEDs. When routing the cleat channel, take light passes — tear-out on the back of your finished piece is heartbreaking.
One thing worth mentioning about LED strips: not all adhesive backing is created equal. The cheap stuff fails over time, especially with any heat buildup. Spending a few extra dollars on quality strips with 3M adhesive backing pays off. Also, test your color combinations before committing — warm and cool LEDs can create some unexpected color shifts when they mix.
Safety-wise, always work with epoxy in a well-ventilated space and wear nitrile gloves. The fumes aren’t great for you, and uncured resin can cause skin sensitization. A simple box fan pointed away from your work area makes a huge difference in air quality.