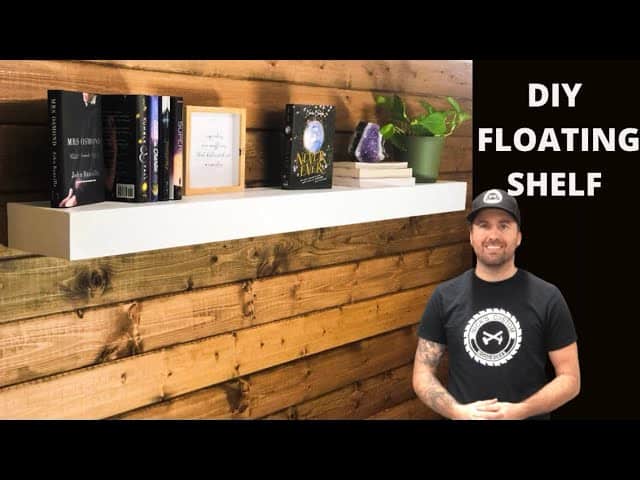
This project was designed and built by Nick from Nick’s Custom Woodworks. It’s a clean and functional floating shelf that adds style and storage to any wall.
The design is simple enough for beginners but polished enough to look custom-made. If you’re looking to upgrade your space, this project is worth checking out.
Watch the full video and subscribe to Nick’s channel:
Why a Floating Shelf Works in Any Room
Floating shelves are great because they don’t take up floor space and can fit just about anywhere. Whether in a living room, kitchen, or office, they offer a sleek way to display books, plants, or decor.
This project uses basic materials and a straightforward approach. It’s an accessible way to add a modern, minimalist touch to your home.
Starting with the Materials
Nick begins with a standard 2×4 and poplar boards, keeping the materials simple and affordable. Poplar is easy to work with and finishes well, whether you’re staining or painting.
The shelf is sized to be around five feet long, but dimensions can be adjusted to fit your space. The goal is a sturdy, lightweight shelf that mounts flush against the wall.
Cutting and Mitering the Pieces
All boards are cut to length, and the ends are squared for clean assembly. A table saw is used to rip everything down to the right width.
Next, 45-degree miters are applied to the edges of the outer frame pieces. This hides the end grain and helps create a seamless, professional look once the shelf is finished.
Building the Shelf Box
Assembly begins with gluing and pin-nailing the perimeter pieces together. Nick uses a thick wood glue for this step, which holds the mitered joints firmly in place.
Once the frame is secure, the top and bottom panels are added. Making sure all sides sit flush is key to getting a clean finish later during sanding.
Making the Mounting Bracket
To support the shelf on the wall, Nick builds a simple bracket system. A two-inch channel is left open on the back of the shelf to allow the bracket to slide in securely.
The bracket arms are pre-drilled and screwed together for alignment and strength. Once mounted, the shelf slides over the bracket and rests snugly against the wall.
Sanding and Painting
After the glue dries, the surface is filled where needed and sanded smooth with 220-grit sandpaper. This prepares the shelf for a clean and even finish.
Nick uses spray paint for its smooth coverage and ease of application. Multiple light coats help avoid drips and create a uniform finish.
Hanging the Shelf
The bracket is attached directly to wall studs for stability. Using a level ensures the shelf sits evenly once installed.
After sliding the shelf into place over the bracket, it’s ready to use. The result is a floating shelf that appears to hover with no visible supports.
Why This Project Is Worth Trying
This floating shelf is simple but impactful. It adds storage and display space without cluttering your room.
The project uses basic tools and materials but results in a sharp, clean look. It’s a great way to gain confidence with joinery, sanding, and finishing techniques.
Want to See the Full Build?
Please support Nick by visiting his website here: https://www.nickscustomwoodworks.com/.

Matt’s Take
These are my personal thoughts and tips based on my own experience in the shop. This section is not written, reviewed, or endorsed by the original creator of this project.
The hidden bracket system Nick uses here is really clever – it’s one of those solutions that looks complicated but is actually pretty straightforward once you understand it. That channel in the back of the shelf needs to be cut precisely for the bracket to slide in smoothly, so take your time with those measurements.
Poplar is a solid choice for painted projects like this. It’s affordable, machines well, and doesn’t have the strong grain pattern that can telegraph through paint like some other woods. If you’re planning to stain instead of paint, consider maple or cherry for better color consistency.
When you’re cutting those 45-degree miters, a sharp blade makes all the difference. Dull blades can cause tearout on the back edge, which defeats the purpose of hiding that end grain. Test your cuts on scraps first – poplar can be finicky with miters if your blade angle isn’t spot-on.
One thing I always stress with wall-mounted shelves: find those studs. Drywall anchors might seem easier, but they’re not worth the risk when you’re dealing with books or heavier decor items. A stud finder and some patience will save you from a shelf full of stuff crashing down later.