This practical and beautiful woodworking project was built and designed by Al and Imo. They created a timber baby change table tray that’s ideal for any nursery, providing both functionality and style.
Be sure to check out their YouTube channel for more creative woodworking projects and helpful DIY guides.
Watch the full video and subscribe to Al and Imo’s channel:
Why Build a Timber Change Table Tray?
A timber change table tray offers the perfect balance of convenience, safety, and aesthetics. Designed to sit comfortably atop a standard set of drawers, it can easily be removed once your child outgrows the need for it.
The clever design ensures the drawers remain useful long after the tray is no longer needed. Additionally, making the tray yourself lets you tailor its appearance to perfectly match your nursery’s decor and style.
Materials Selection and Preparation
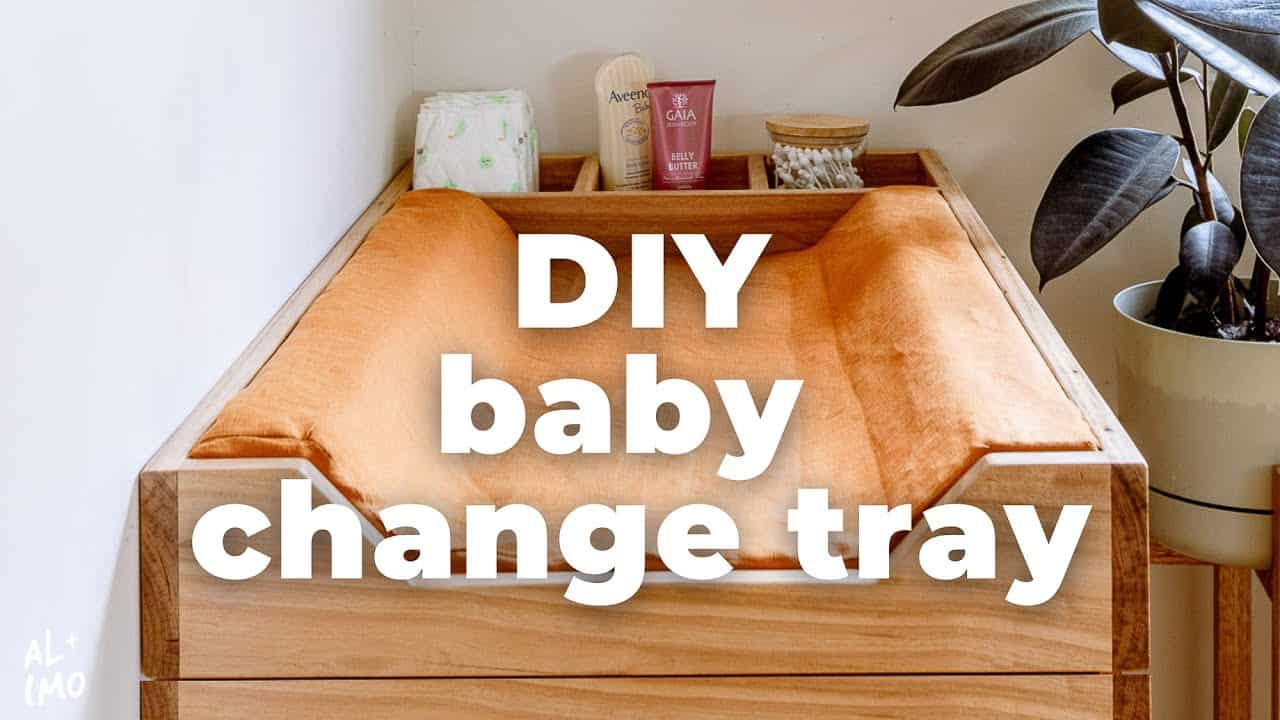
Al and Imo chose plywood for the base of the tray due to its strength and stability. For the outer frame, they selected a durable hardwood, giving the tray added durability and an elegant finish.
They began by cutting the plywood and hardwood into appropriately sized pieces, carefully preparing each part to ensure tight-fitting joints. Properly sizing each component before assembly is essential for achieving a clean and professional result.
Shaping the Tray Components
One key step in Al and Imo’s build involved shaping the end pieces to match the dimensions of a standard changing mat. To simplify cutting curves and corners, they first drilled small holes in each corner to guide the blade and avoid mistakes.
Using a jigsaw allowed them to make precise, clean cuts, which they carefully refined by hand sanding. Sanding the edges thoroughly is crucial, creating smooth surfaces and eliminating rough spots that could potentially cause discomfort.
Assembling the Tray
Once all the components were prepared and sanded, Al and Imo started the assembly process. They began by attaching the side pieces, carefully using glue and small nails to ensure a secure and flush joint.
Internal dividers were then positioned within the tray, providing organization and additional support. These dividers were accurately measured and marked, ensuring they aligned perfectly to maintain structural integrity.
Finishing and Refinement
With the tray assembled, Al and Imo took extra care to finalize the appearance and safety of the piece. Any protruding nails were punched below the surface, and a final sanding ensured the tray was smooth and splinter-free.
They finished the tray with a hard wax oil, enhancing the timber’s natural beauty and protecting the wood from everyday wear. This final coating ensured durability and easy cleaning, important qualities for items used regularly in childcare.
The Benefits of a Custom-Built Tray
Building your own changing tray offers many advantages, including the opportunity to create something tailored to your nursery’s specific needs. Custom woodworking projects like this also provide a meaningful sense of accomplishment and personal touch that can’t be replicated by store-bought items.
Moreover, the tray’s removable design ensures the drawers beneath remain functional and stylish even after your child has outgrown the changing station. It’s an ideal project for parents looking for both practicality and beauty in their nursery setup.
See the Full Build from Al and Imo
If you’re ready to tackle this project yourself, Al and Imo have provided a comprehensive step-by-step video tutorial. Their detailed instructions and tips will guide you through each part of the process, helping you achieve excellent results.

Matt’s Take
These are my personal thoughts and tips based on my own experience in the shop. This section is not written, reviewed, or endorsed by the original creator of this project.
This is such a clever design approach – creating a removable changing station that doesn’t permanently alter the furniture underneath. The combination of plywood for the base with hardwood framing is spot-on for this type of project. Plywood gives you dimensional stability and strength where you need it most, while the hardwood frame adds durability at the edges where wear typically occurs.
The safety considerations here are really important. That final sanding and the choice to use hard wax oil as a finish shows good thinking – you want surfaces that are smooth enough for regular cleaning but won’t be compromised by the inevitable spills and moisture that come with diaper changes. Hard wax oil is particularly smart because it penetrates the wood rather than just sitting on top, so it won’t chip or peel over time.
One thing I really appreciate about this build is the attention to making clean cuts on those curved corners. Pre-drilling those corner holes before using the jigsaw is a technique that prevents tear-out and gives you much more control over your cuts. It’s one of those small steps that makes a huge difference in the final appearance of the project.