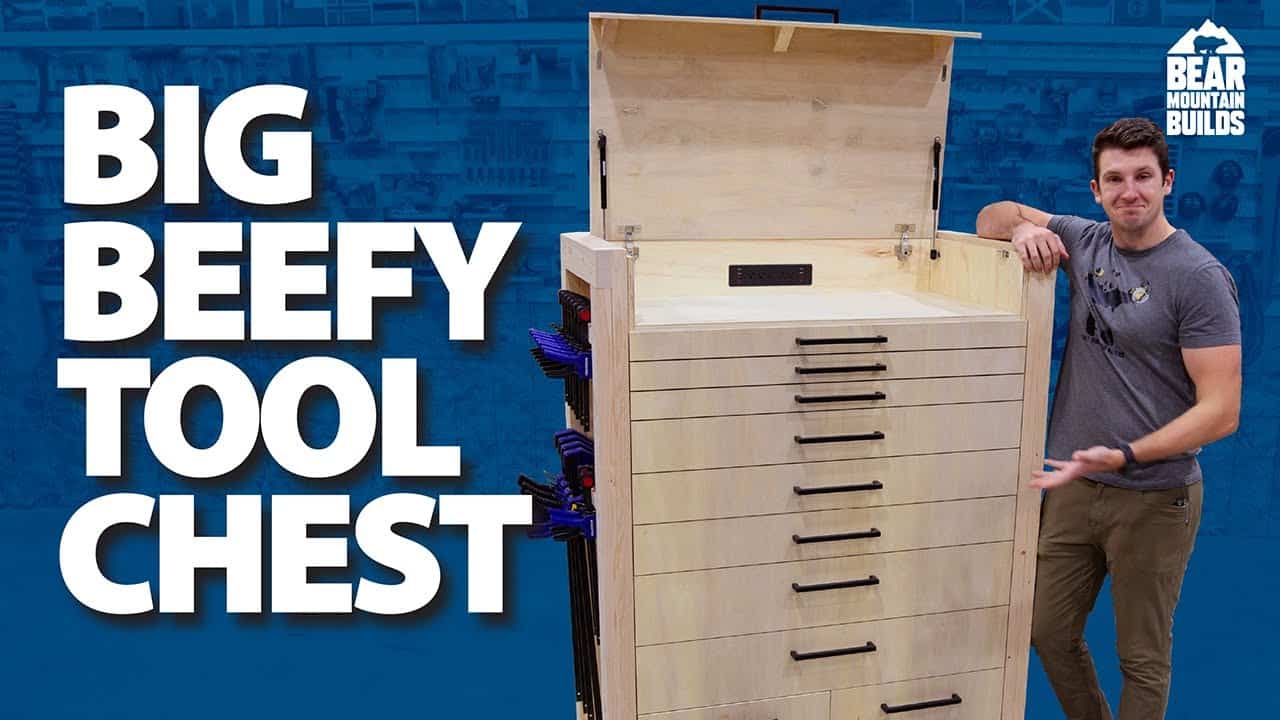
Zach from Bear Mountain Builds built and designed this all-in-one tool chest project.
This project condenses a workshop workbench, charger bay, and ten drawers into a single rolling cabinet with integrated clamp storage and a secure lid, focusing on practical shop use rather than decorative excess.
Watch the full video and subscribe to Bear Mountain Builds:
Design
The tool chest is designed around durability, storage density, and shop ergonomics rather than fine furniture aesthetics.
Zach prioritized an enclosed central work platform with integrated power and accessible clamp storage at the sides to keep chargers, batteries, and clamps organized and within reach.
Lumber Prep and Layout
The structural frame is framed using common dimensional lumber and the internal panels are cut from plywood to balance strength with weight savings.
Zach emphasizes measuring and pre-cutting all the frame members first and using simple spacers and stops during assembly to keep parts consistent and square.
Joinery and Frame Assembly
Lap joints form the backbone of the frame to route forces through wood into the ground, with screws used only to clamp joints while glue cures.
Pocket holes and glue reinforce cross pieces and internal supports, creating a rock‑solid shell ready to accept drawers and the top platform.
Clamping, Bracing, and Practical Jigs
Rather than commercial jigs, the build uses shop‑made spacers and corner blocks to apply clamp pressure and ensure alignment during glue‑ups.
Zach also demonstrates creative clamping tricks—like temporary sacrificial blocks and stacked spacers—that simplify large assemblies when long clamps won’t reach.
Drawer Construction and Slide Installation
Drawers are assembled quickly using corner clamps and brad nails to produce consistent, square boxes without complicated fixtures.
For slide alignment, a stacking spacer method keeps every slide parallel and perfectly located, eliminating the need for purpose‑built jigs and speeding up installation.
Lid, Hinges, and Soft‑Close Hardware
The lid is prepped separately and fitted with full‑overlay cabinet hinges using a simple hinge guide for repeatable pocket and bore locations.
Gas struts and magnetic catches are added to control lid motion and keep it closed, while small gussets reinforce the lid face for long‑term stability.
Finishing Touches and Storage Extras
Drawer fronts are aligned using the same spacer stacking technique and mounted with discrete screws so handles can be centered later for a clean look.
A back panel and internal backing strips hide cables and create a tidy enclosure, and an optional clamp rack fits in unused vertical space for quick access.
Why This Build Matters
This tool chest is useful because it combines mobility, abundant storage, and a functional charging/work surface into a single footprint suitable for garages and workshops.
Techniques shown—lap joints for structure, spacer methods for repeatable alignment, and simple jig use for hinges—are adaptable to other shop projects and scale well to different sizes.
Get Zach’s plans here: https://www.bearmountainbuilds.com/products/tool-chest.

Matt’s Take
These are my personal thoughts and tips based on my own experience in the shop. This section is not written, reviewed, or endorsed by the original creator of this project.
This type of mobile storage really shines in smaller shops where every square foot counts. The lap joint approach for the frame is smart — it’s stronger than butt joints and doesn’t require the precision of traditional joinery, making it perfect for shop furniture that needs to take some abuse. Those joints will hold up to years of rolling around and loading heavy tools.
The spacer stacking method for drawer slides is a game-changer that more woodworkers should know about. It’s one of those simple tricks that eliminates so much measuring and marking, plus you get perfectly aligned results every time. I always keep a collection of scrap blocks in different thicknesses for exactly this kind of setup work.
One thing I really appreciate about this build is the focus on function over fancy joinery. Shop furniture needs to work first and look pretty second. The combination of mobility, charging station, and work surface in one unit addresses the reality of modern cordless tools — we need dedicated space for all those batteries and chargers, not just the tools themselves.