This project was built and designed by Caleb from YouCanMakeThisToo. It’s a large raised garden bed designed for long-term durability, easy access, and thoughtful detailing, ideal for improving any backyard gardening setup.
From smart layout tips to clever assembly techniques, this build covers everything needed to create a productive and visually appealing garden space. With the right approach, the result is a raised bed that looks great and performs even better.
Watch the full video and subscribe to Caleb’s channel:
Planning the Layout and Corners
Before construction begins, the layout must be square and level. Caleb starts by marking out the corners using a triangular method—a reliable way to form right angles without needing complex tools.
Once the corners are measured, temporary stakes are driven into the ground, and string lines are run between them. This outlines the footprint of the garden bed and makes it easier to visualize spacing and positioning before digging.
Site Prep and Post Holes
With the layout established, the next step is clearing the area of grass and debris. Caleb uses a small tractor with an auger to dig the post holes, speeding up the process and saving wear on the shovel.
Removing sod is important to avoid clogging the auger and to create a cleaner site. While a tractor isn’t required, having one certainly helps on large builds like this.
Setting Posts in Concrete
Each post is dropped into a pre-dug hole and aligned with the string line. Concrete is added for strength, but Caleb notes that exact instructions aren’t always necessary—just be sure to add water and allow it to cure properly.
Leveling each post is critical, especially on uneven terrain. A string line paired with a line level keeps everything consistent in height. Where elevation varies, adjusting the build is easier than excavating the entire site.
Starting the Frame
After the posts are secured and set, cleats are added to hold the garden bed sides. These cleats are positioned using measurements taken from the string line, ensuring the boards will sit flat and level.
Working from the top down helps keep everything tight. Caleb temporarily screws some boards in place while securing them properly, which is especially helpful when working solo.
Dealing with Uneven Ground
As more boards are added, minor adjustments are needed to accommodate the natural slope of the yard. Caleb makes small digs in spots where the boards don’t sit flush, helping maintain clean lines without major grading.
To increase structural strength, additional bracing is added around the outer walls. These extra boards serve both a functional and visual role, tightening up the build and giving it a more polished finish.
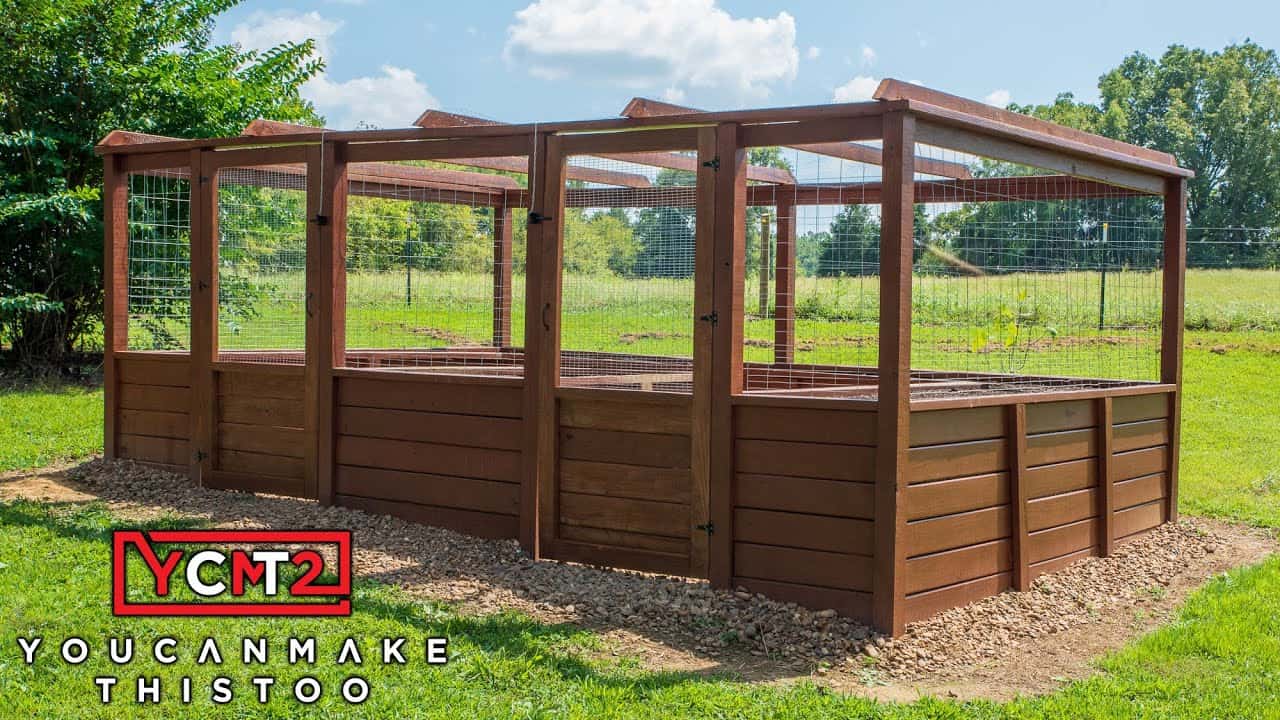
Adding a Top Rail
With the walls complete, a top rail is added to create a finished look and offer support for optional fencing or netting. The top boards are mitered at the corners, adding a refined touch that ties the whole build together.
Measuring carefully and making precise cuts ensures that the rails meet tightly at each corner. Once installed, they reinforce the frame and make the garden bed feel like a permanent part of the yard.
Protecting the Garden with Netting
To protect the plants from birds and other animals, Caleb installs netting by stapling it along the top rail. This lightweight barrier is easy to attach and effective in keeping unwanted visitors out.
It’s a simple upgrade that adds major value, especially once seedlings start to grow. The netting is easy to remove if needed and doesn’t interfere with airflow or sunlight.
Building Access Doors
Access is important, so Caleb adds doors to make it easy to enter the bed for maintenance or harvesting. Each door is framed from lumber scraps and fitted with durable hardware to prevent sagging over time.
A latch keeps the doors shut when not in use, and a chain is added to allow opening from the inside—an extra safety measure that shows attention to real-life use. These doors make the bed feel more accessible and user-friendly.
Filling the Garden with Soil
After construction, it’s time to add soil and get planting. Caleb uses a mix of raised bed soil and gravel to ensure proper drainage and nutrient balance.
With everything filled, the garden is ready for seeds or seedlings. The added height makes gardening easier on the back and keeps things organized within a defined space.
A Strong and Practical Outdoor Project
This raised garden bed is a great example of practical woodworking that’s also visually satisfying. It’s big enough to handle serious planting and sturdy enough to last through many growing seasons.
Caleb’s process focuses on efficient techniques, helpful tools, and clever planning to make the build approachable. Whether you’re new to gardening or looking to expand your growing space, this project is a smart and rewarding choice.
Please support Caleb by visiting his website: https://www.ycmt2.com/.

Matt’s Take
These are my personal thoughts and tips based on my own experience in the shop. This section is not written, reviewed, or endorsed by the original creator of this project.
This is exactly the kind of project that bridges woodworking and practical home improvement. The triangular method for squaring corners is solid—measuring 3-4-5 triangles (or any multiple) gives you perfect 90-degree angles every time. It’s one of those fundamental techniques that applies to everything from garden beds to deck framing.
The concrete setting approach here is refreshingly practical. For outdoor posts, you don’t need engineering-grade precision—just make sure there’s enough concrete to lock the post in place and that it cures properly. Fast-setting concrete mix works great for projects like this, though regular concrete is fine if you can wait the extra time.
Working from the top down with temporary screws is a smart solo builder technique. It lets you get everything positioned before committing to final attachment. The mitered corners on the top rail really do make a difference—it’s that extra step that separates a functional build from one that looks intentionally designed.
One detail worth noting is how thoughtfully the access doors are planned. That inside chain release might seem like overkill, but it shows someone who’s actually thought through how this will be used day-to-day. Good outdoor projects always benefit from that kind of real-world thinking.