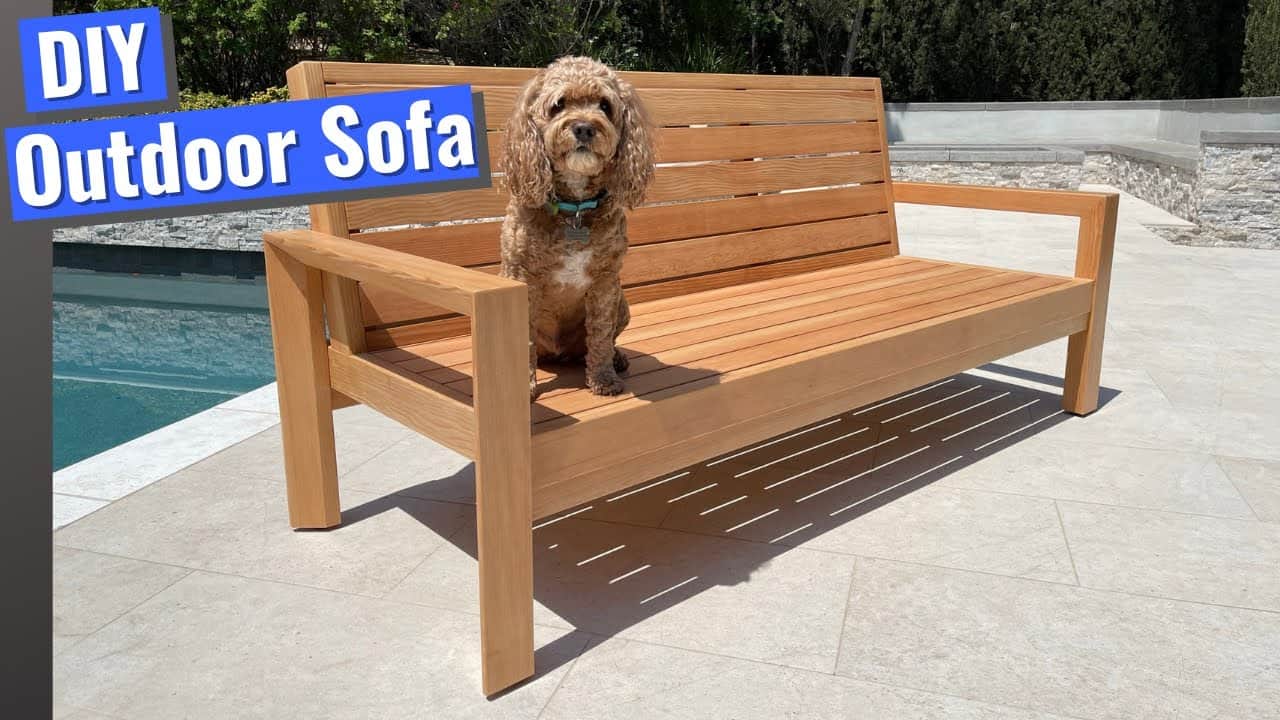
This project was built and designed by Anthony from Wood Pack DIY, with some close supervision from his trusted shop assistant, Bob Barker. It’s the final piece in a coordinated outdoor furniture collection that includes patio chairs and a coffee table—all built with matching design and joinery for a clean, cohesive setup.
Anthony walks through every step of the build, from shaping the legs to installing the slats, using simple techniques that balance strength, comfort, and style. The result is a durable outdoor sofa ready for daily use and changing weather.
Watch the full video and subscribe to Anthony’s channel:
Starting with the Legs
The legs are designed to match the look of the earlier patio pieces, giving the full set a unified appearance. Anthony starts by cutting down a 4×4 post to size, then uses a table saw to bevel the edges. This angled cut gives the piece a lighter look while still keeping it strong.
To join the legs, he uses a beadlock jig—an accurate and dependable method for dowel-style joinery. Each piece is clamped carefully in place while the mortises are drilled. A chisel is used to refine any rough cuts and ensure a snug fit for the beadlock tenons.
Building the Frame Platform
The sofa platform connects directly to the front and back legs, which gives the piece more strength compared to the floating design used in the chairs. Cross supports are cut to fit, and each is secured using a combination of pocket screws and beadlock tenons.
Anthony prefers to hide screws when possible, so pocket holes are strategically placed on the inside faces. Once clamped and secured, the platform provides a solid base to build on, and Bob Barker occasionally strolls by to inspect the progress.
Constructing the Backrest
The backrest is made to angle slightly, improving comfort while maintaining the clean, boxy style of the overall design. Each board is measured and cut to nest cleanly between the rear legs, with angles cut to match the slope of the design.
Pocket holes are again used here to fasten the pieces without leaving hardware visible. Glue is applied at each joint, and additional supports are installed to give the backrest extra strength for everyday use.
Slats, Spacing, and Assembly
Once the frame and back are built, it’s time to attach the seat slats. Each one is cut to size, edges softened, and pre-drilled to avoid splitting the wood during installation.
Anthony pays careful attention to slat spacing, using a small block as a spacer to maintain even gaps. This detail keeps the seat looking clean and adds comfort by preventing warping or sagging.
Final Sanding and Outdoor Finishing
With the build complete, everything is sanded thoroughly to remove any sharp corners or rough patches. The round-overs and softened joints make the sofa more inviting and safe, especially if kids or pets will be using it.
The stain chosen for this project matches the other patio pieces, keeping the set consistent. A protective urethane coat is then applied to guard against rain, sun, and temperature changes—something Bob Barker seems to appreciate while lounging nearby.
Bringing It All Together
Once the sofa is finished and in place, it completes a well-rounded patio furniture set that’s sturdy, stylish, and built to last. Anthony’s design choices make the sofa easy to reproduce, and his use of simple joinery ensures that DIYers of all levels can take this on.
Whether you’re building your first outdoor seating piece or adding to an existing set, this sofa brings the whole space together. It offers plenty of room to relax and enjoy the outdoors, and the satisfaction of knowing you built it yourself.
Bonus: Plans and More Builds
Anthony has made detailed plans available for anyone who wants to build this sofa on their own. The plans follow the same design approach seen in his video, making it easy to get professional-looking results with just a few tools.
With Bob Barker always nearby and a clear eye for design, Anthony continues to deliver functional, great-looking projects that any backyard would benefit from.
Please support Anthony (and Bob Barker) by visiting their website (he sells awesome plans): https://www.woodpackdiy.com/.

Matt’s Take
These are my personal thoughts and tips based on my own experience in the shop. This section is not written, reviewed, or endorsed by the original creator of this project.
The beadlock jig Anthony uses here is a smart choice for this type of joinery. These jigs create incredibly strong connections that hold up well to the seasonal movement outdoor furniture experiences. If you don’t have a beadlock setup, traditional dowel joints or even mortise and tenon would work great too — just make sure your glue is rated for exterior use.
That slight backrest angle makes a huge difference in comfort. Even a 5-10 degree slope transforms how the piece feels when you’re actually sitting on it. When working with angles like this, I always dry-fit everything twice before final assembly. Outdoor projects don’t forgive measurement mistakes as easily since you’re usually working with treated lumber that’s harder to replace.
The pocket screw approach Anthony uses is really practical for hidden fasteners, but don’t skip the exterior wood glue. Weather puts serious stress on joints, and that combination of mechanical fasteners plus good adhesive creates redundancy. For the finish, that urethane topcoat is critical — raw wood exposed to UV and moisture cycles won’t last more than a season or two without protection.