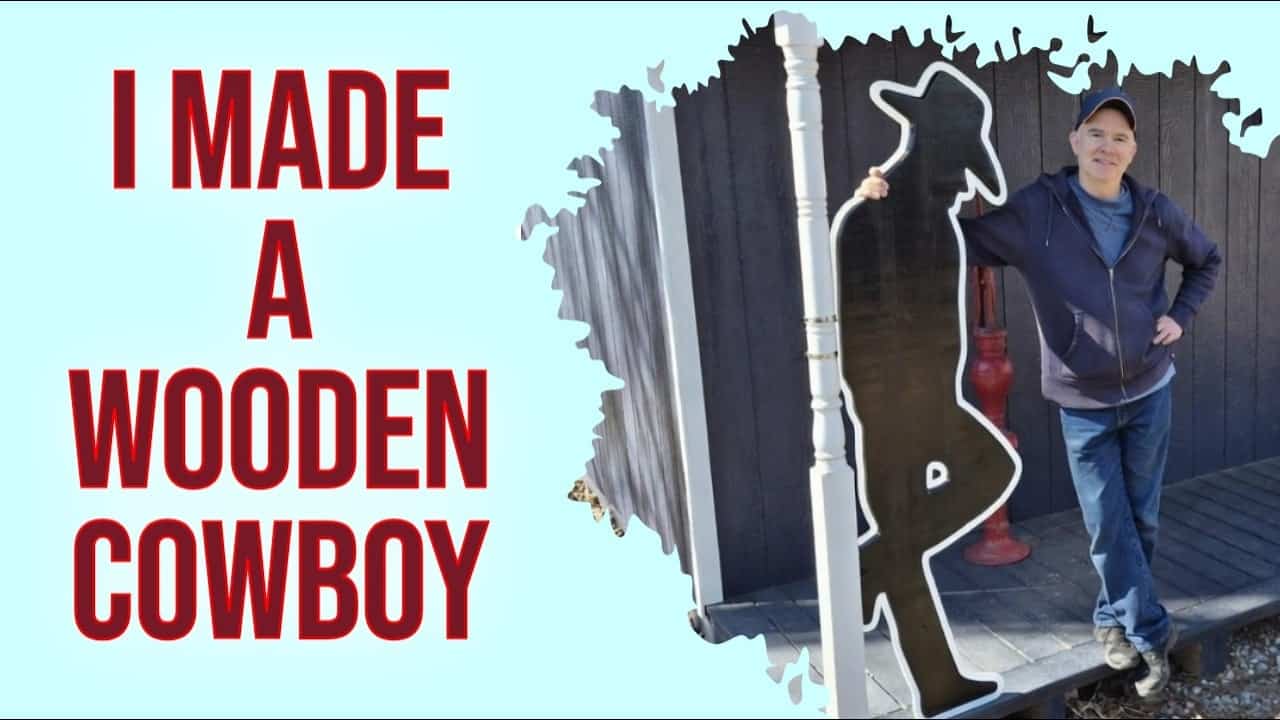
This project was built and designed by Tom from Alley Picked.
A leaning cowboy porch decoration starts as a simple idea: take an image, scale it up, and use it as a pattern for a bold outdoor display that can face different ways depending on the lean. It’s a fun project that also teaches practical shop habits—especially how to get straight join surfaces and choose finishes that can handle the outdoors.
Watch the full video and subscribe to Tom’s channel:
Design: Turn a Flat Image Into a Standout Shape
The key creative move is scaling a graphic into a full-size silhouette using classic projection. With that outline on a work surface, the cowboy becomes a repeatable pattern—useful not only for one build, but also for making more variations later.
The project also shows how “design” isn’t fixed. Small changes to face shape, hat profile, and even what elements appear (like whether arms or accessories are included) help the decoration match personal taste and the intended look from the street.
Pattern Prep: How Projection Helps Accuracy
Instead of eyeballing proportions, projection lets the shop transfer a chosen image into a clean outline. That matters when the end result is large, visible from a distance, and meant to look intentional rather than approximate.
Once the outline is marked, the thin pattern material becomes a template for the thicker final version. Using a template also speeds layout and helps keep symmetry consistent—especially for mirrored “lean” directions.
Lumber Prep: The Real Work Is Getting Edges Flat
For an outdoor leaning decoration, the biggest structural challenge is not cutting the silhouette—it’s preparing boards so they glue together without weak gaps. The project emphasizes that warped or twisted stock makes milling frustrating and the outcome less sturdy.
After selecting more usable stock, the boards are trimmed to remove rounded edges and then brought into alignment. When power-tool methods don’t fully solve the issue, a hand-planing approach is treated as the dependable fallback.
Joinery: Dowels Add Strength for Outdoor Conditions
Even with good edge alignment, relying on glue alone across a long seam can feel risky for something exposed to wind and weather. The solution uses dowel pins and a doweling jig to register the two halves and add mechanical reinforcement.
This is a practical lesson for outdoor woodworking: movement and vibration can gradually stress a joint, so adding alignment and extra holding power helps the finished decoration stay straight over time.
Shaping and Fit: Make It Look “Right” Up Close
Once the cowboy blank is assembled, shaping turns the template into personality. Details like the hat line, facial features, pocket stance, and the smoothness of the silhouette determine whether the decoration reads clearly from a distance.
Sanding is handled as a refinement step rather than an afterthought. Smoother edges improve how the piece feels to interact with, and it also prepares the surface so paint finishes evenly.
Finishing: Layered Outdoor Paint for Faster Progress
Outdoor finish choice is treated as a performance decision. The project compares water-based and oil-based approaches, using them in a sequence that balances drying speed with longer-lasting durability.
Before full coverage, light sanding helps smooth the surface between coats. That creates a more uniform appearance and reduces the chance of raised grain or uneven texture showing through the final color.
Mounting: Clamp Placement and Pilot Holes Prevent Splitting
To keep the cowboy upright against wind, the mounting method focuses on secure contact points. Band-style clamps hold the figure in place while it’s fastened, and pilot holes reduce the risk of splitting in the wood.
The mounting strategy also reflects a general rule: large decorative shapes need multiple stabilizing points to resist wobble and twist. Proper pre-drilling is a small step that saves a lot of frustration.
Overall Takeaways: A Template Project With Durable Outdoor Logic
This build matters because it combines creative patterning with structural seriousness. Projection makes the design scalable and accurate, while board prep, alignment, dowel reinforcement, and outdoor-oriented finishing help the cowboy behave well outside.
Most importantly, the methods adapt easily. The same approach can be used to make other oversized porch figures, yard silhouettes, or mirrored display pieces—just swap the image and keep the principles: flat glue surfaces, reinforced seams, and finishes chosen for real weather exposure.
Wrapping Up
Tom’s leaning cowboy is a reminder that the best decorative projects feel “simple” only after the tough prep work is done. When the pattern is accurate and the structure is reinforced, the final piece looks bold without turning into a maintenance problem.
Watch the full video and subscribe to Tom’s channel:

Matt’s Take
These are my personal thoughts and tips based on my own experience in the shop. This section is not written, reviewed, or endorsed by the original creator of this project.
The projection technique Tom uses here is brilliant for anyone wanting to scale up decorative pieces accurately. I’ve found that getting those proportions right from the start saves hours of frustration later when you’re trying to figure out why something just doesn’t look quite right from across the yard.
What really stands out to me is the emphasis on edge preparation—this is where a lot of outdoor projects fail down the road. Those glue joints are going to see temperature swings, moisture changes, and UV exposure. Taking the time to get truly flat, clean edges makes the difference between a decoration that lasts years versus one that starts separating after the first winter. The dowel reinforcement is smart insurance too, especially for something that’ll catch wind.
The finish approach Tom takes is worth noting for any outdoor project. Starting with a sealer, then building up color coats while sanding between—that’s the kind of patience that pays off when you’re not repainting every season. For pieces this size, investing in quality exterior paint from the start is way cheaper than redoing the whole finish in two years.
This project shows how thoughtful preparation can make even ambitious decorative pieces totally doable in a home shop. The principles here work for any large outdoor silhouette—whether it’s cowboys, garden figures, or yard art.