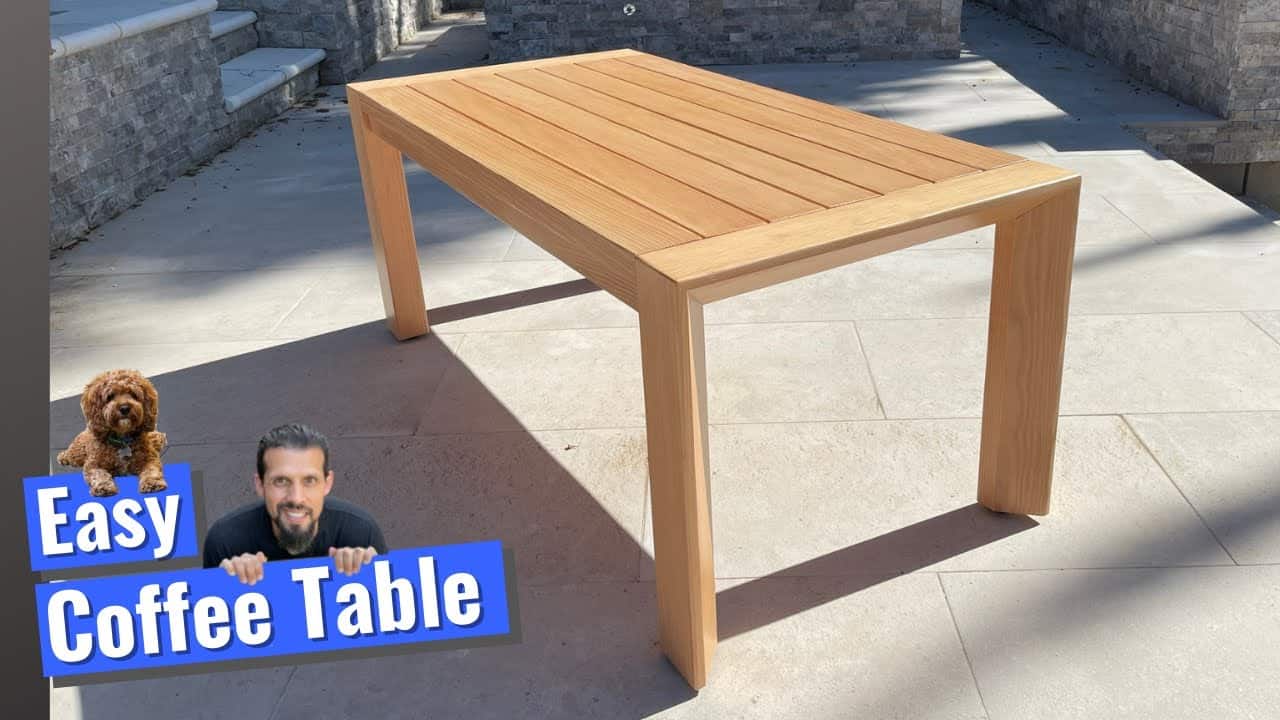
This project was built and designed by Anthony from Wood Pack DIY, with some close supervision from his workshop sidekick, Bob Barker. The build is part of a matching outdoor furniture series and focuses on creating a coffee table that’s both sturdy and visually polished.
Designed to pair with Anthony’s earlier patio chairs, the table follows the same principles of strong joinery, careful proportions, and smart finishing. It’s a project that’s approachable for weekend woodworkers, yet refined enough to elevate any outdoor setup.
Watch the full video and subscribe to Anthony’s channel:
Getting Started with the Base
Anthony begins by prepping the materials, starting with four-by-four posts for the table legs. These are trimmed down to a slimmer four-by-three size, giving the legs a more balanced and intentional look.
Each leg is labeled to keep track of orientation during the build. Bob Barker makes a few appearances in the shop during this stage, keeping an eye on the workflow—and occasionally sniffing out any misplaced scraps.
Beveling and Mitering the Legs
After the rough cuts, Anthony adds bevels to the leg edges to soften their appearance and tie into the design language of the patio chairs. Miter cuts are made on the ends to help the legs meet flush with the stretchers during assembly.
To reinforce the joints, he uses a bead lock jig to drill precise mortises. These dowel-style tenons give the project added stability, especially in outdoor environments where joints are exposed to humidity and temperature changes.
Leg Assembly and Clamping
Assembly begins with glue-ups using the clamping jig he developed in previous projects. Because clamp quantity is limited, Anthony assembles one section at a time, taking care to apply even pressure and check for square.
This part of the process rewards patience. As each joint sets, the legs come together neatly and create a solid base for the table to rest on.
Fixing a Bowed Board
While prepping the rest of the structure, Anthony notices a bow in one of the main frame boards. Using a track saw guide, he trims the piece to straighten it out and ensure proper alignment with the other components.
With the board corrected, more bead lock tenons are installed to add strength to the final connections. It’s a good reminder that small corrections make a big difference in final fit and longevity.
Assembling the Tabletop
The tabletop is built using evenly spaced slats. To keep the spacing consistent, Anthony makes a simple support block from scrap wood and uses it as a spacer during installation.
As the slats are added, minor bows or warps are corrected on the fly. Additional support is installed where needed to ensure a flat, even surface across the table.
Sanding, Staining, and Finishing
Once the structure is complete, Anthony sands everything smooth—though he saves time by pre-sanding key parts before assembly. This avoids awkward corners and reduces the finishing workload.
For the stain, he uses the same product and color as the rest of the patio furniture to maintain a unified aesthetic. It’s a subtle touch, but it makes the whole set look like it was purchased together rather than built piece by piece.
To protect the wood from the elements, multiple coats of spar urethane are applied. This finish is built for outdoor use and provides a long-lasting shield against sun, rain, and wear.
Adding Final Details
Levelers are installed on the bottom of each leg to help the table sit evenly on patios or decks with uneven surfaces. This small upgrade improves stability and avoids any annoying wobble during use.
Anthony also does a final touch-up sanding and checks for any sharp edges or missed spots. With everything smooth and sealed, the project is ready to take its place outdoors.
A Finished Piece That Completes the Set
The result is a clean, solid outdoor coffee table that fits perfectly with Anthony’s patio chair build. It adds function to the patio layout and gives the whole area a professional, cohesive feel.
Anthony’s thoughtful process, combined with practical joinery and consistent finishing, makes this a great project for anyone building a matching outdoor set. And of course, Bob Barker seems to approve of the finished table—just as long as it doesn’t block his sunspot.
Please support Anthony (and Bob Barker) by visiting their website (he sells awesome plans): https://www.woodpackdiy.com/.

Matt’s Take
These are my personal thoughts and tips based on my own experience in the shop. This section is not written, reviewed, or endorsed by the original creator of this project.
This kind of outdoor coffee table build really highlights how much difference proper joinery makes in furniture that lives outside. Those bead lock joints Anthony used are smart—dowel connections like that handle seasonal wood movement better than just screws, which is crucial when your project faces humidity swings and temperature changes year-round.
The leg modification from 4×4 to 4×3 is a nice touch that shows how small adjustments can completely change the proportions of a piece. Standard dimensional lumber often looks chunky in furniture applications, so taking the time to mill it down creates a more refined appearance without adding much complexity to the build.
That leveler detail at the end is one of those things that separates furniture from shop projects. Most patios and decks aren’t perfectly level, and a wobbly table drives everyone crazy. Spending a few extra dollars on adjustable feet saves you from shimming with napkins for the next decade.
Spar urethane is definitely the way to go for outdoor pieces like this. Regular polyurethane breaks down quickly under UV exposure, but spar formulations are designed to flex with the wood and resist sun damage. It’s worth the extra cost when you’re putting this much work into a project.