This project was built and designed by Jon Peters from Longview Woodworking.
It’s a simple, functional solution to an everyday problem—covering exposed exterior plumbing with a clean, well-fitted box that blends into the surroundings.
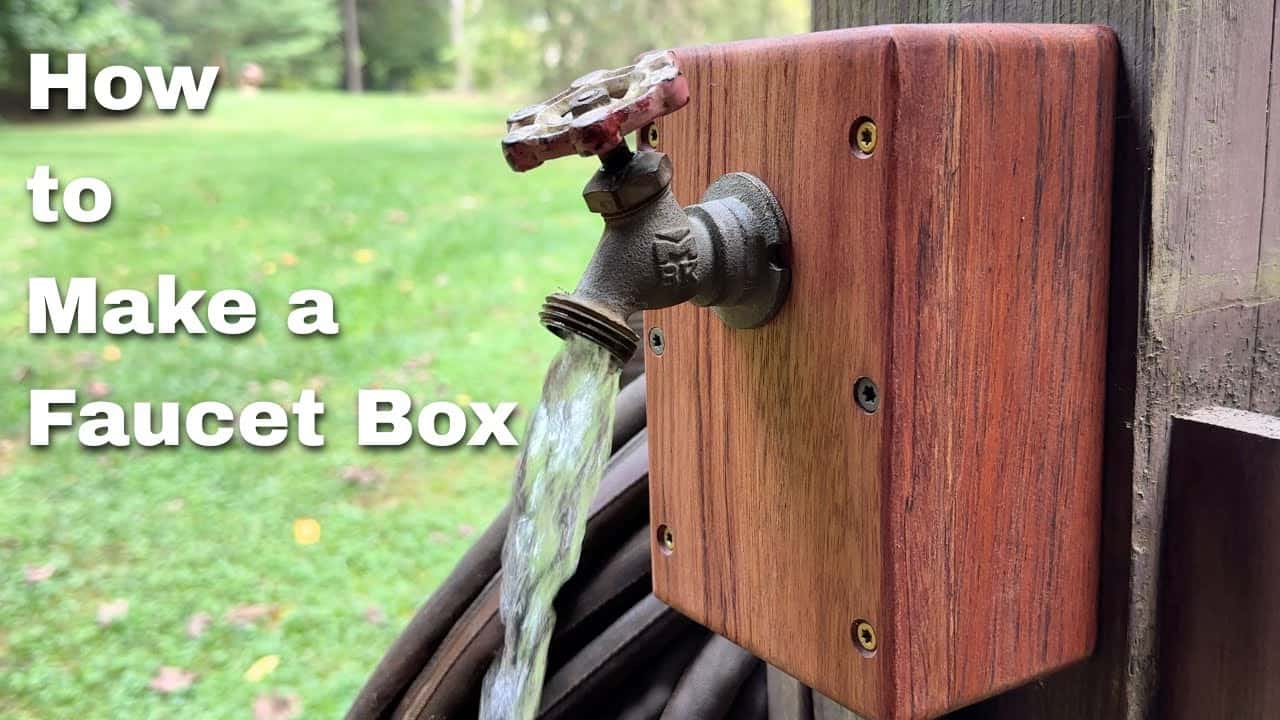
Jon’s faucet box doesn’t try to be flashy or over-engineered. It’s a thoughtful fix to a long-standing eyesore: a PVC pipe running up the side of a deck. The result is a three-sided box that’s protective, purposeful, and satisfying to complete.
Watch the full video and subscribe to Jon’s channel:
Why This Project Makes a Big Difference
The real appeal of this build is its practicality. It takes something visually messy—a water pipe and valve sticking out in plain sight—and makes it look intentional and tidy. More importantly, it adds physical protection to the plumbing, guarding it from weather and accidental impact.
Jon had been putting this task off for a while. But once finished, it quickly became one of his favorite builds of the year—not because of complexity, but because of the peace of mind and clean appearance it delivered.
What the Faucet Box Is and What It Does
At its core, the faucet box is a three-sided enclosure designed to fit around a pipe and outdoor spigot. The open back allows it to sit flush against siding or a deck face, and its close-fitting design keeps the plumbing easy to access while protecting it from daily wear and tear.
There are no hinges, no doors, and no unnecessary trim. This is woodworking at its most purposeful: fit the function, keep it clean, and make it last.
Design Principles That Keep It Simple
Jon’s approach revolves around four key principles:
- Simplicity: Only three panels are needed, joined tightly and securely.
- Fit: The box is measured precisely to hug the pipe and valve without forcing them.
- Durability: The materials are suited for exterior conditions, and the joinery holds up over time.
- Access: The design allows for future removal or maintenance without cutting or dismantling anything major.
The result is something you barely notice—which is exactly the point.
Materials and Build Prep
Jon uses exterior-grade boards that will hold up to weather exposure. While he doesn’t specify exact measurements in the video, the materials fall into a few categories: boards for the sides and face, fasteners that resist corrosion, and a protective finish to extend the life of the piece.
He focuses on preparing the wood for tight joints and flat faces. The cleaner the fit, the better the final box will look—and the less reliant it will be on caulk or trim to hide gaps.
Step-by-Step Build Overview
Jon starts by assessing the situation at the deck, noting where the pipe exits and how it aligns with the siding. From there, he cuts the main pieces: two sides and a front.
Each piece is test-fitted to ensure it sits square and provides enough clearance for the pipe and valve. Small adjustments are made to fine-tune the fit before assembly.
Once satisfied, he assembles the box using basic joinery and weather-resistant fasteners. Corners are reinforced, faces are sanded flush, and sharp edges are softened to reduce splintering and wear.
A finish is then applied to protect the wood from UV and moisture damage. Jon selects a product that’s suitable for the home’s exterior and that blends into the background rather than drawing attention.
Finishing Details That Matter
While the overall project is simple, it’s the small touches that give it a professional look:
- Shadow lines and small reveals make the box look intentional and help shed water away from seams.
- Chamfered edges reduce the chance of splintering and soften the profile visually.
- Countersunk fasteners keep the face clean and reduce hardware exposure to weather.
- Protective finish is applied to match the deck and prevent early wood breakdown.
These aren’t flashy upgrades, but they’re what turn a functional piece into something you’re glad to see every day.
Tips for Building Your Own
If you’re considering building a similar box, Jon’s method offers a lot of useful insights. A few extra tips include:
- Use pressure-treated wood or rot-resistant species like cedar for longevity.
- Consider designing the box to be removable if your plumbing might need frequent access.
- Secure it to framing or blocking rather than just the siding for long-term strength.
- Allow for drainage or venting to prevent moisture buildup inside.
- Match the stain or paint to your trim or deck color to help it blend in naturally.
Why Small Projects Like This Matter
Not every woodworking project needs to be a large piece of furniture or a complex build. This faucet box is a great reminder that solving small, visible problems around the house can be just as satisfying.
It improves curb appeal, protects plumbing, and eliminates an annoying to-do list item—all in a single afternoon of work.
Please support Jon by visiting his website here: https://jonpeters.com/.

Matt’s Take
These are my personal thoughts and tips based on my own experience in the shop. This section is not written, reviewed, or endorsed by the original creator of this project.
This kind of utility project is exactly what woodworking is all about—solving real problems with clean, simple solutions. I love how Jon approached this as purely functional carpentry, focusing on fit and protection rather than trying to make it decorative. That’s the sweet spot for exterior utility boxes.
One thing I always keep in mind with outdoor plumbing enclosures is moisture management. Even though this is a three-sided box, trapped humidity can still cause issues over time. I typically drill a small drain hole in the bottom and maybe add a weep hole or two for ventilation. Also, using stainless steel or galvanized fasteners is worth the extra few dollars—regular screws will streak rust down your nice finish within a season or two.
The beauty of this design is how adaptable it is. Whether you’re covering a hose bib, electrical box, or even a gas meter, the same principles apply: measure twice, cut once, and keep the joints tight. Projects like this are perfect for using up scraps too, since you rarely need full boards. It’s satisfying work that makes a real difference in how your house looks from the street.