This project was built and designed by Sam Macy. It’s a creative woodworking build that walks through the process of making a round picture frame using segmented joinery, custom inlay, and precision cutting techniques.
Sam blends maple and flame birch to form a clean, elegant ring, then adds a walnut artwork insert for contrast. The project shows how circular designs can be approachable with the right tools and careful planning.
Watch the full video and subscribe to Sam’s channel:
Preparing the Workspace and Selecting Materials
Before beginning, Sam emphasizes the importance of a clean, organized workspace. Clearing off the bench and prepping your tools helps ensure focus during the more delicate phases of the build.
For the frame material, Sam uses a combination of maple and flame birch. These species provide a balance of strength, clarity, and visual interest. The same process can be used with other hardwoods like cherry, walnut, or even exotics for a bolder result.
Resawing and Surfacing the Stock
To create the thin segments needed for a circular frame, Sam starts by resawing the boards down to manageable thickness. A bandsaw is ideal here, followed by a drum sander to smooth and even out the cut surfaces.
The resawn material needs to be flat and consistent for segment joinery to work well. Whether you’re using rough-cut lumber or S4S boards, this step ensures all future cuts will fit together cleanly.
Calculating Segment Sizes
With the wood prepped, Sam calculates the size and angle of the segments that will form the circular frame. Using an online segment calculator, he adjusts for a 16-inch inner diameter and wood thickness to determine the number of segments and their angle.
Each piece is cut to form a trapezoid that will form part of the circle. While precision is helpful, Sam notes that slight gaps can be corrected during glue-up, especially if the cuts are consistent and tight overall.
Cutting and Assembling the Frame
The segment cuts are made using a miter saw or table saw with a stop block for consistency. Accuracy in the angles is critical to achieving a clean, full circle.
Once all the pieces are cut, Sam dry fits the ring before gluing. A ratcheting band clamp holds the segments tightly while the glue sets. Taking time to align each piece results in a frame with nearly invisible seams and a smooth outer curve.
Marking and Cutting the Circle
After the glue is dry, Sam finds the center point of the ring and uses it to mark both the inner and outer diameters of the frame. A cardboard template or simple compass setup helps with this.
For cutting, he uses a bandsaw, but other tools like a scroll saw or jigsaw can also work. Those with access to a CNC machine can achieve even greater accuracy, especially when making repeated frames or shadowbox styles.
Rabbets and Shadowbox Construction
For frames that will include both glass and backing, Sam cuts two rabbets—one to hold the artwork or design insert and one for the backer board. These can be cut using a router or table saw, or integrated during the CNC stage if applicable.
This step adds depth and gives the frame a shadowbox-style profile. It also allows for clean mounting of decorative pieces, photographs, or layered designs.
Sanding and Finishing
After cutting the circular profile, Sam sands all edges and surfaces to remove saw marks and prep the wood for finish. Extra care is given to the curved inner and outer edges to ensure they remain symmetrical.
He finishes the piece with lacquer, enhancing the grain and providing long-term protection. The finish also deepens the contrast between the flame birch and any darker inlay or artwork.
Adding a Custom Artwork Insert
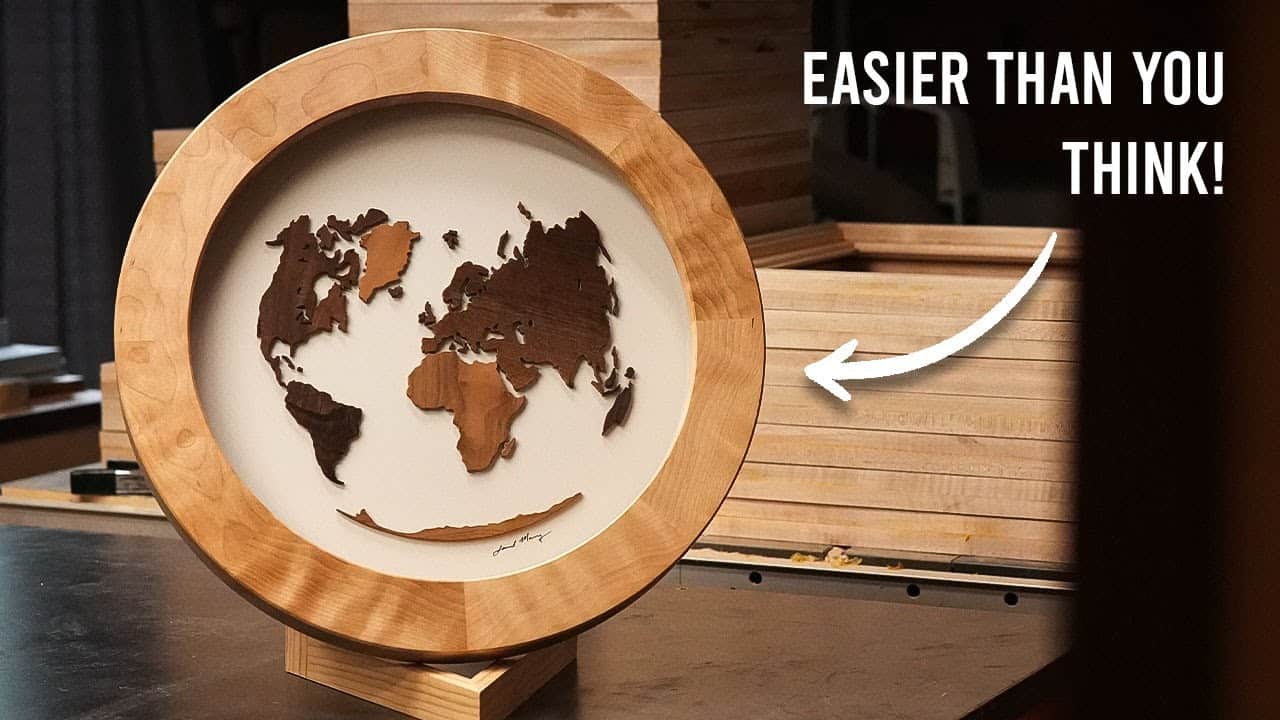
To complete the project, Sam adds a walnut design to the center of the frame. This insert is cut separately and mounted inside the circular opening, creating a strong visual contrast with the light outer ring.
Whether it’s a graphic design, monogram, or organic shape, this element adds a personalized touch and makes the project more than just a frame—it becomes a piece of art in itself.
A Unique Project Worth Trying
This circular frame is a beautiful, skill-building project that balances geometry with creativity. It’s accessible with basic tools and opens the door to more complex segmented work down the line.
Sam’s approach shows that circular woodworking doesn’t have to be intimidating. With careful planning and a step-by-step process, anyone can turn flat boards into a striking frame that stands out.
Please support Sam by visiting his website here: https://sammacydesigns.com/.

Matt’s Take
These are my personal thoughts and tips based on my own experience in the shop. This section is not written, reviewed, or endorsed by the original creator of this project.
Circular frames are one of those projects that look intimidating but break down into manageable steps once you understand the geometry. The key is really in that initial setup — getting your segment calculations right and maintaining consistency through every cut. Even small variations in angle will compound around the circle, so taking time with your setup pays off big.
I love the shadowbox approach Sam uses here. Those dual rabbets create so much versatility — you can display artwork, pressed flowers, coins, really anything that benefits from that floating effect. When routing those rabbets on curved work, take light passes and keep the router moving. The grain direction changes constantly around the circle, so you’ll hit some tricky spots that want to tear out.
The material combination really makes this piece sing. That contrast between the light maple-birch frame and dark walnut insert creates instant visual impact. If you’re just starting with segmented work, this is actually a great first project since any small gaps get hidden by the inlay, and you’re working with relatively few segments compared to something like a segmented bowl.
One safety note on the band clamp during glue-up — keep some cauls handy to distribute the pressure evenly. Those ratcheting clamps can create pressure points that might cause the segments to bow or create uneven joints. A few curved cauls cut from scrap plywood can save you hours of sanding later.