This project was built and designed by Kreg Tool, offering a practical solution to help organize large clamps in any workshop. It’s a smart way to save space, improve efficiency, and keep your shop neat and accessible.
Watch the full video and subscribe to Kreg Tool’s channel:
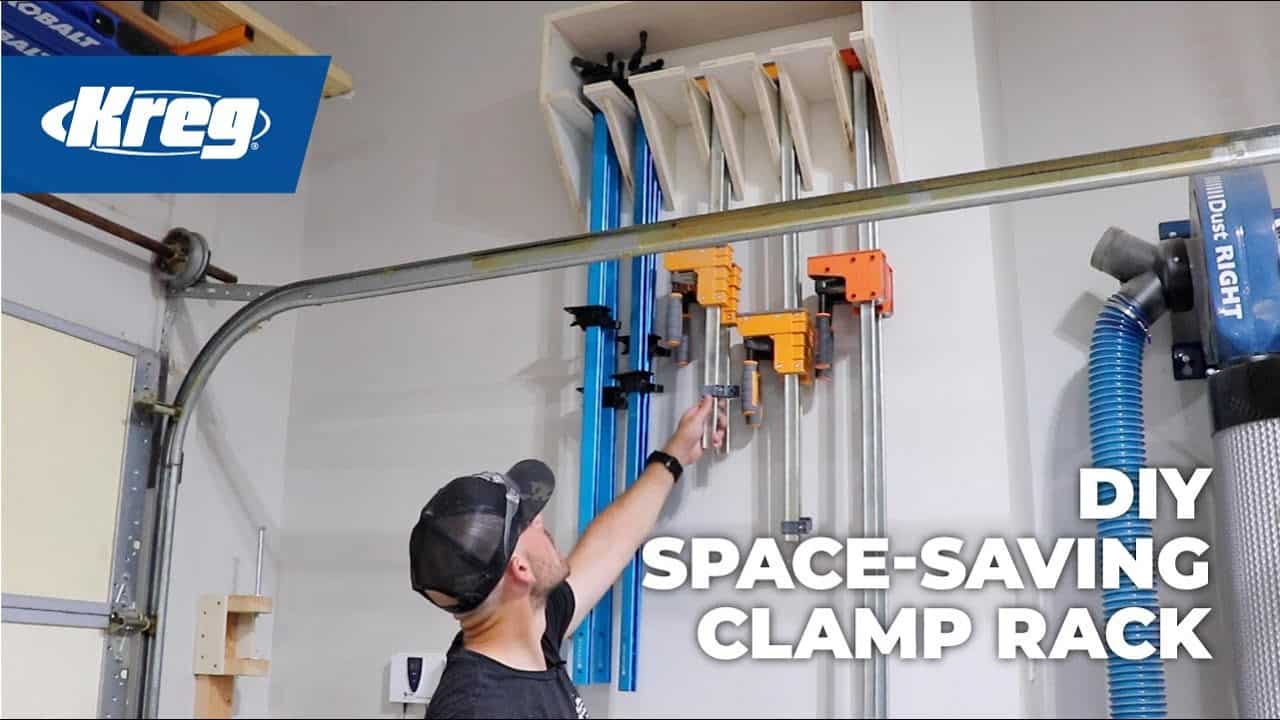
Why Build a Clamp Rack?
Over time, most woodworkers collect a wide variety of clamps that end up piled in corners or scattered around the shop. A dedicated rack gives each clamp a home, helping you work faster and reduce frustration.
By installing a clamp rack on an upper wall, you reclaim underused space while freeing up room for tools or material storage. This small change can lead to a big improvement in how your shop functions every day.
Customizing the Design to Fit Your Shop
The clamp rack design from Kreg Tool is straightforward and easy to customize. It provides stacking space for parallel and bar clamps, helping you store more clamps without taking up floor space.
Before starting, consider where the rack will go in your shop. Mounting it high allows you to keep other storage or benches below it, maximizing your wall use.
Materials and Tools to Get Started
To build the rack, a sheet of plywood is typically all you need. Kreg Tool’s version uses about half a sheet, making this a great project for scrap wood if you have leftovers.
Cutting large panels is easier with the help of a panel carrier. A track saw or circular saw with a guide rail helps ensure straight, clean cuts for all your parts.
Assembling the Rack
Once the pieces are cut, the build moves quickly. A mix of screws, brad nails, and wood glue creates a strong, reliable structure.
A light sanding before assembly helps remove rough edges and reduces the amount of finishing work later on. This also helps the glue bond better, creating a cleaner result.
Using spacers during the build ensures consistent shelf spacing. This is especially helpful if you plan to store different clamp sizes and want a uniform look.
Planning Ahead for More Clamps
As you add more clamps to your collection, a good design should still work. Kreg Tool’s build allows you to adjust shelf spacing or add more sections later without starting over.
Thinking ahead during the build can save time down the line. You can always leave room for expansion so you don’t outgrow your rack in a year.
Mounting for Stability
Mounting the rack securely is essential. Kreg uses a cleat attached to wall studs to provide strength and stability.
Positioning the rack high up keeps clamps easy to reach while maintaining open wall space underneath. It’s an efficient way to store heavy tools without cluttering your workspace.
A Better Shop with One Simple Project
The finished clamp rack makes a noticeable difference in your daily workflow. No more hunting around for a specific clamp or tripping over piles of them on the floor.
Everything is visible, accessible, and organized. That means more time building and less time searching for tools.
Explore More Projects from Kreg Tool
If you’re interested in building your own clamp rack or exploring similar shop upgrades, Kreg Tool offers free downloadable plans. Their step-by-step videos are helpful for woodworkers at any experience level.

Matt’s Take
These are my personal thoughts and tips based on my own experience in the shop. This section is not written, reviewed, or endorsed by the original creator of this project.
Shop organization projects like this clamp rack are some of the most rewarding builds you can tackle. You feel the benefit every single day, and it’s one of those upgrades that makes you wonder why you waited so long. The wall-mounted approach is particularly smart — I see too many shops where floor space gets eaten up by storage that could easily go vertical.
One thing I really appreciate about this design is how it accounts for different clamp types. Parallel clamps, bar clamps, and pipe clamps all have different storage needs, and having dedicated spots for each prevents that frustrating game of Jenga every time you need one from the bottom of a pile. The spacing considerations matter more than you might think — leave too little room and you’re fighting to get clamps in and out.
From a safety standpoint, that wall cleat system is the way to go for something this heavy when loaded. Clamps add up fast, and you want zero chance of this thing coming down. Take the time to hit solid studs and use quality hardware. Also worth mentioning — mount it at a height where you’re not stretching or straining to reach your most-used clamps. Your back will thank you after a long day in the shop.