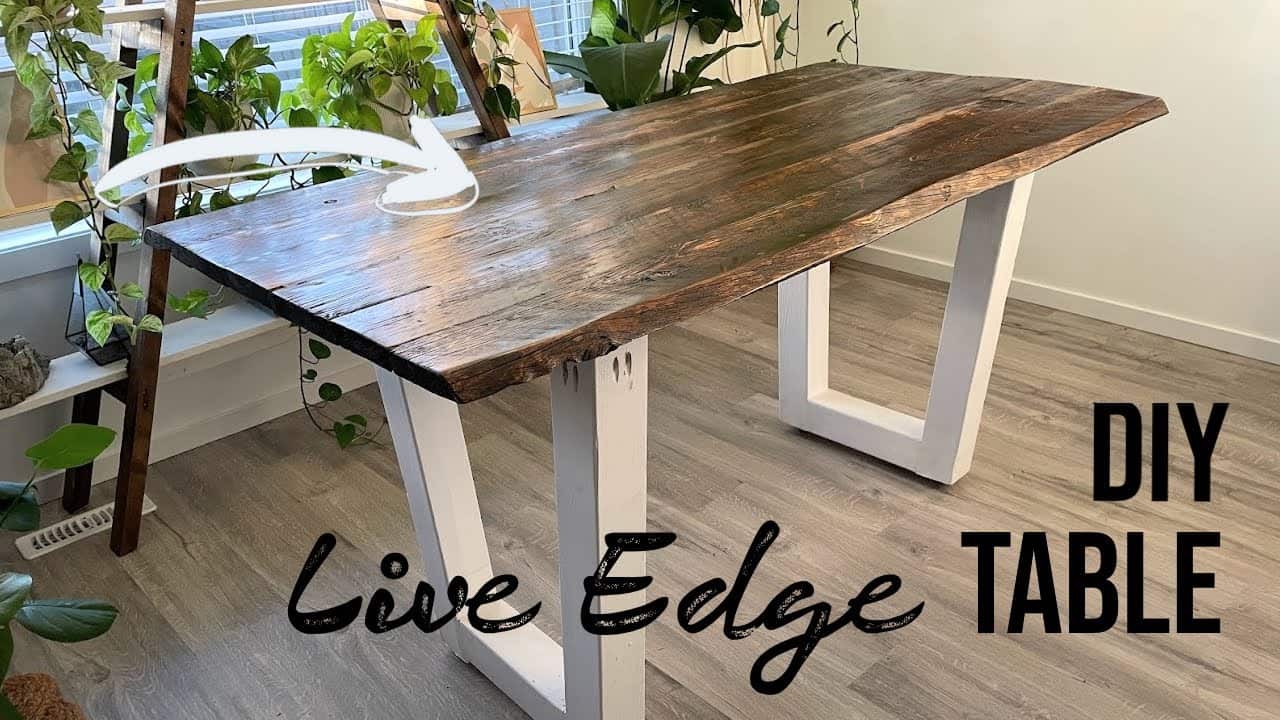
This project was built and designed by Taylor from Designed by Taylor. It’s a beautiful example of using rustic barn wood to create a functional table with striking live edge character.
Combining natural texture with thoughtful craftsmanship, this table serves as both a centerpiece and a practical addition to any space. If you’re interested in how it all comes together, Taylor’s original video walks through the full process.
Watch the full video and subscribe to Taylor’s channel:
Sourcing and Preparing the Wood
Taylor begins by sourcing barn wood, chosen for its weathered appearance and unique character. After selecting the boards, the first step is a thorough cleaning to remove dirt and debris.
Once clean, each board is run through a table saw using a homemade edge jointing jig. This creates one straight edge that allows the boards to be trimmed into parallel sides for easier glue-up.
Creating the Tabletop
With straight edges on each board, they’re ready to be joined together. Taylor uses glue and pocket hole screws to assemble the tabletop, ensuring strong joints and long-term stability.
After the glue has cured, any cracks or knots are filled with wood filler. This smooths out the surface while preserving the rustic feel of the barn wood.
The top is then sanded, starting with a coarse grit and moving gradually to finer grits. The result is a silky finish that feels smooth while still showcasing the wood’s character.
Staining and Finishing
Before applying stain, Taylor uses a pre-stain conditioner to help the wood absorb the color evenly. This step reduces blotchiness and enhances the overall look.
A dark walnut stain brings out the wood grain and adds warmth to the surface. Once dry, Taylor applies a matte topcoat, sanding lightly between coats to maintain a flawless finish.
Building the Legs
While the tabletop dries, the focus turns to building the legs from four-by-four lumber. Each leg is cut at a five-degree angle to create a subtle, modern taper.
To align the dowel holes for joining the leg sections, Taylor uses finishing nails as a marking tool. This technique ensures a precise and repeatable layout.
Once glued and clamped, the legs are reinforced with pocket screws. The result is a sturdy leg structure ready to support the finished table.
Taylor also installs adjustable feet to help level the table on uneven floors. Multiple coats of satin enamel paint are applied for durability and a clean look.
Final Assembly
With both the top and legs ready, Taylor secures the legs using pocket screws. The installation is straightforward, and everything fits together cleanly thanks to the earlier prep work.
The end result is a live edge table that blends rustic materials with clean lines and solid joinery. It’s a piece that will stand out in any home while serving a daily function.
Why This Table Is Worth Making
This project highlights the value of combining reclaimed materials with thoughtful design. The barn wood provides character, while the live edge and sleek base bring balance and contrast.
It’s also a satisfying build that covers a wide range of woodworking techniques. From jointing and assembly to sanding, finishing, and leg construction, it’s a rewarding process from start to finish.
Want to See the Full Build?
Please support Taylor by visiting his website here: https://www.designedbytaylor.ca/

Matt’s Take
These are my personal thoughts and tips based on my own experience in the shop. This section is not written, reviewed, or endorsed by the original creator of this project.
Working with reclaimed barn wood is one of my favorite challenges in the shop. That weathered patina tells a story, but it also comes with its own set of considerations. When cleaning old boards like this, I always wear a dust mask — you never know what kind of grime or treatments might be lurking in wood that’s seen decades of use. That homemade edge jointing jig Taylor uses is a smart approach when you don’t have a jointer wide enough for your boards.
The pocket screw and glue combination for the tabletop is solid thinking. Barn wood can be unpredictable with moisture movement, and those mechanical fasteners give you that extra insurance against seasonal wood movement. Pre-stain conditioner is absolutely crucial with weathered wood — older boards often have varying densities that can create a blotchy mess without proper prep.
That five-degree taper on the legs is a nice touch that keeps things from looking too chunky. Using finishing nails as marking tools for dowel alignment is an old trick that works beautifully — just make sure to pull them out before drilling! The adjustable feet are a professional detail that many DIYers skip, but they make all the difference when your floors aren’t perfectly level.