

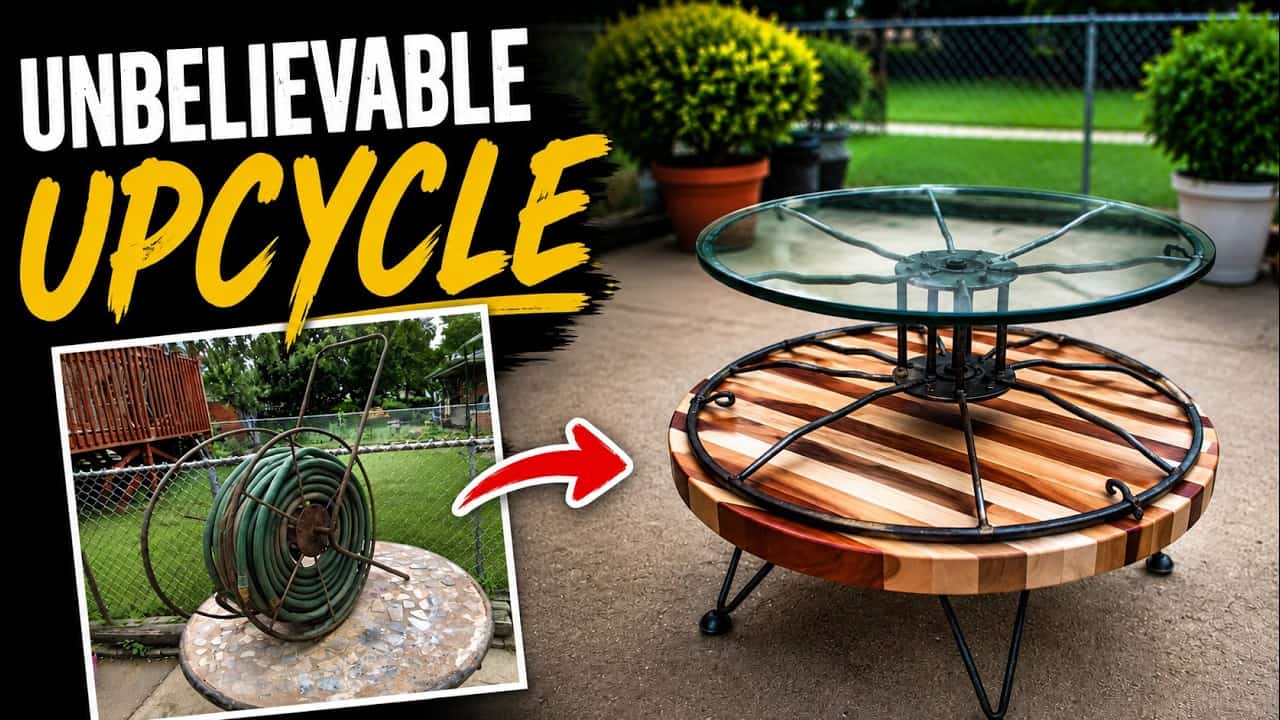
This project was built and designed by Tom from Alley Picked.
An old steel hose reel cart, picked up for a few dollars at an estate sale, becomes the centerpiece of a striking upcycled coffee table in this build. Instead of restoring the cart to its original purpose, Tom saw a completely different future for it: mounted on a custom scrap wood base, topped with thick glass, and turned into a functional piece of furniture that still tells the story of where it came from.
Watch the full video and subscribe to Alley Picked:
Finding the Vision in a Rusty Cart
Most people walking past a bent, rusted hose reel cart at an estate sale would see junk or, at best, an antique curiosity. Tom saw the bones of a coffee table. The plan formed quickly in his head: build a round wooden base with feet to support the cart, then top the whole thing with glass so the metal frame and wood grain would remain visible from above.
This kind of vision is really the heart of upcycled furniture building. It’s less about following a set of plans and more about looking at discarded objects and imagining new uses for them. A hose cart destined for a landfill instead becomes the visual anchor of a living room piece.
Preserving the Patina Instead of Repainting
Once home, Tom cleaned up the cart and discovered traces of its original green paint peeking through years of rust. This led to a key decision point: repaint it to look uniform, or leave the aged finish intact. He chose to preserve the character of the piece rather than erase it.
To do this, he treated the metal with a rust-neutralizing product, which is a simple but effective way to stop corrosion from spreading without stripping the surface down to bare metal. A couple of missing hardware pieces were treated with a black patina chemical to help them blend in and look aged like the rest of the cart. Finally, a metal-safe oil finish was applied to seal everything and give it a subtle sheen, though it required a long cure time before handling.
This approach is worth remembering for anyone restoring old metal finds. Sometimes the most authentic look comes from stabilizing what’s already there instead of covering it up with fresh paint.
Building a Base from Reclaimed Scrap Wood
The wooden base is where this project really shows off the value of saving scrap material. Tom pulled pieces from a disassembled dresser and, more surprisingly, salvaged wood from an old bowling alley lane, specifically the side walls near the pin area. Combining wood from such different sources gives the base a mixed, one-of-a-kind grain pattern that no single board could replicate.
Gluing dozens of individual pieces together into a round base created a real time crunch. Because traditional glue application methods would cause the earlier pieces to start drying before the last ones were even coated, Tom switched to a roller and thinned the glue slightly with water to speed up the process. Even then, the glue-up had to be split into two clamping stages to keep everything workable before it set.
This kind of large panel glue-up is a useful technique for anyone building bigger round or slab-style tops from smaller offcuts. Working in batches and adjusting glue consistency can make the difference between a smooth process and a rushed, uneven one.
Flattening, Sanding, and Finishing the Top
With the base glued into two halves and then joined together, the next challenge was getting it flat. A belt sander with coarse paper was used across the grain first, which speeds up material removal on a surface this uneven, followed by finer grits sanded with the grain to smooth things out. Tom notes that cross-grain sanding is not something he does often, and that a belt sander can easily leave gouges if the operator isn’t careful.
After switching to an orbital sander for the final smoothing, the mixed wood grain came through beautifully. Rather than staining the surface and masking the different wood tones, Tom left it natural, letting the contrast between the dresser wood and bowling lane wood speak for itself. A satin polyurethane finish, several coats, brought out the depth of the grain without changing its color.
One small but important adjustment came when a stray piece of embedded metal was discovered on what was meant to be the top surface. Flipping the panel over solved the problem and became the new show face, a good reminder to inspect reclaimed wood closely before committing to a final orientation.
Legs, Glass, and Final Assembly
To support the base, Tom used hairpin legs rather than making his own, citing the time investment required to fabricate them by hand. The legs came in a bright silver finish that clashed with the aged look of the rest of the piece, so he repainted them using a layered technique: black spray paint as a base coat, followed by a hammered metallic brown pressed with shiny newspaper before it dried. This created a mottled, textured pattern that echoed the random wear on the hose reel itself.
A thick round piece of glass, sourced secondhand, was set on top with silicone pads to keep it from shifting. This top layer allows the hose reel structure and the mixed wood grain underneath to remain visible, tying the whole piece together visually. The final step was figuring out how to secure the hose reel cart to the wooden base so the finished table would be sturdy enough for everyday use.
Why This Build Stands Out
What makes this coffee table memorable isn’t just the unusual combination of materials, it’s the layered history behind each component. The wood carries the story of a dresser and a bowling alley. The metal cart carries decades of use as a hose reeler. Bringing them together under a glass top creates a functional piece that also works as a conversation starter.
Projects like this are a good reminder that furniture doesn’t have to start as furniture. An estate sale find, a scrap pile, and a bit of imagination can be combined into something that couldn’t be bought off a shelf.
Watch the full video and subscribe to Alley Picked:

Matt’s Take
These are my personal thoughts and tips based on my own experience in the shop. This section is not written, reviewed, or endorsed by the original creator of this project.
Rust-neutralizing products are worth having in the shop even if you don’t do a lot of metal work. They’re cheap, easy to brush or spray on, and they stop active corrosion cold without requiring a full strip-down. If you ever come across an old metal find with a finish worth keeping, that’s the move over sanding or media blasting it back to bare steel.
The glue-up technique here is a good one to file away. Thinned glue and a roller are a simple fix for a common problem: by the time you’ve hand-spread glue on piece 20 of a large panel, piece 1 is already skinning over. Working in batches and splitting a big glue-up into stages keeps everything clampable and even, and it’s a technique that scales up to any large slab or tabletop made from smaller pieces.
On the flattening side, a belt sander across the grain is a legitimate way to knock down an uneven glue-up fast, but it’s also one of the easier ways to gouge a project if you get impatient or let it sit in one spot too long. Keep it moving, let the sander do the work, and step down through the grits before finishing with the grain. Eye and ear protection matter here too, since you’re removing a lot of material quickly.
Setting glass on silicone pads instead of a hard seat is also a small detail worth noting. It keeps the glass from shifting or rattling and helps absorb minor unevenness in the wood below without cracking the glass over time.