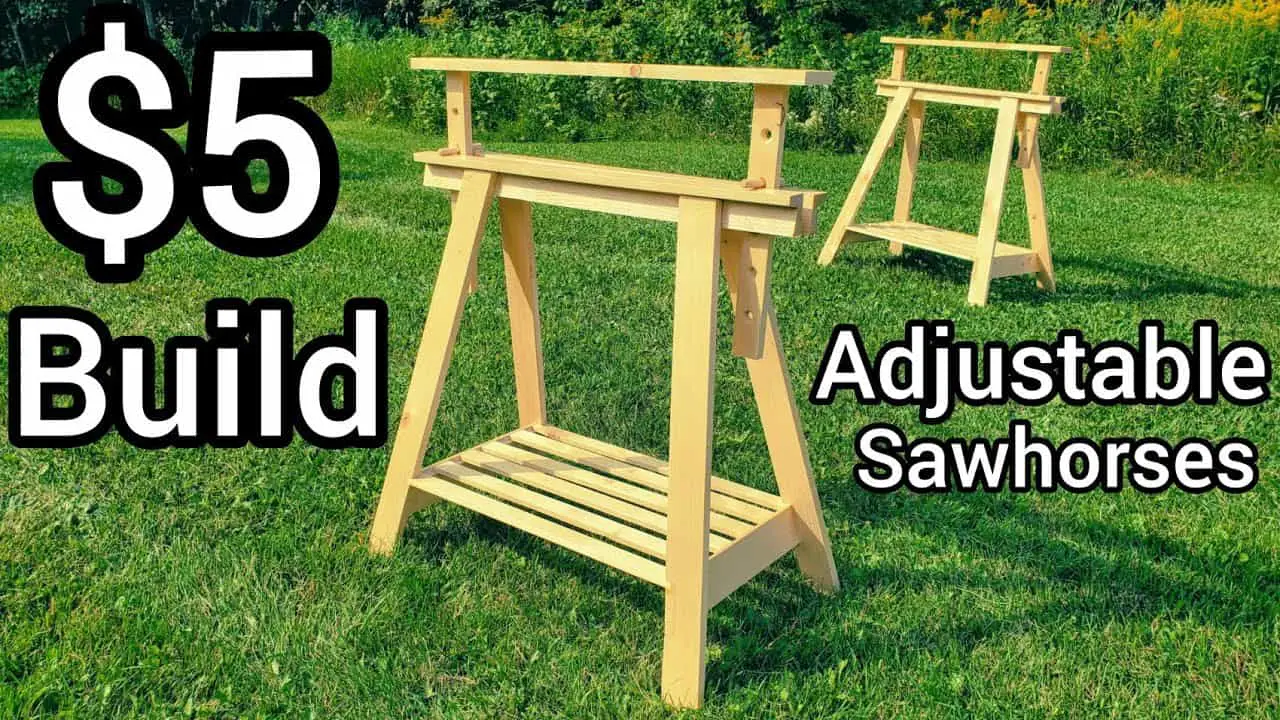
This project was built and designed by Josh Wright. It’s a simple and affordable sawhorse made entirely from one construction-grade 2×6—perfect for woodworkers who want to create reliable shop equipment without spending a fortune.
The design is clean, efficient, and easy to build with basic tools. Whether you’re just getting started or need extra support in the shop, this project delivers a solid, no-nonsense solution.
Watch the full video and subscribe to Josh’s channel:
Why Build Your Own Sawhorses?
Store-bought sawhorses often come with compromises—high price tags, poor build quality, or sizes that don’t quite match your needs. Josh’s design solves that by offering a custom, sturdy option made with a single board and a little shop time.
More than just a cost-saving measure, building your own gives you full control over dimensions, strength, and joinery style. Plus, there’s a certain satisfaction that comes from using equipment you made yourself.
Materials and Tool Requirements
The only lumber needed for this project is one 2×6, typically available at any hardware store for around $5–$6. The minimal material list is part of what makes this build so appealing—it’s accessible and budget-friendly.
Tools include a table saw, miter gauge, and wood glue. While optional, screws can be added for extra strength. Josh also emphasizes basic safety precautions, including eye protection and push sticks when working with the saw.
Cutting and Prepping the Legs
The build starts by cutting leg components from the 2×6. These are sliced into strips and cut to a consistent length, with each end beveled to improve stability.
Josh uses his table saw to make angled cuts for the legs, ensuring a wide and balanced base. Angled leg ends help distribute weight more evenly and reduce wobble, making the sawhorse more secure under load.
Adding Notches for the Shelf
To strengthen the design, notches are cut into the legs. These allow crosspieces to fit snugly and act as shelves that brace the legs while providing a spot to store tools or offcuts.
The notches are cut using repeated passes on the table saw with the blade height set precisely. Josh stresses the importance of consistency when cutting multiple notches so all support pieces seat properly during assembly.
Building the Top Surface
The top of the sawhorse is made from two strips cut from the same 2×6. These pieces form a flat surface where materials can rest or be clamped during use.
The width and placement of the top can be adjusted depending on how much overhang you want. Josh’s version keeps things compact but still gives enough space for handling sheet goods or working with clamps.
Assembly and Glue-Up
With all parts cut, it’s time to assemble the sawhorse. Josh begins by gluing the legs and shelf pieces together, ensuring they sit tightly in the notches.
The assembly process is fast, especially since all parts are already cut to fit. Clamps are used to hold everything together while the glue dries. Screws can also be added to reinforce stress points, particularly if you plan to use the sawhorses for heavy-duty tasks.
Finishing for Durability
Once the glue dries, the sawhorse gets a light sanding to remove any rough edges. Josh applies a coat of polyurethane to help seal the wood and protect it from moisture and wear.
While finishing is optional, it does extend the life of the sawhorse—especially if it’s used in a garage or outside. It also adds a nice touch to what’s otherwise a purely functional piece.
Strength Test and Real-World Use
After finishing, Josh gradually adds weight to test the sawhorse’s strength. It holds up well under significant pressure, confirming that the friction-fit notches and glue are more than capable of supporting typical workshop loads.
He also notes that having multiple sawhorses built this way creates a versatile and portable work surface. Stack boards between two or more to create a makeshift table or scaffold for larger projects.
Beyond the Workshop
While designed as a shop aid, Josh points out that sawhorses have many uses beyond holding wood. They work well as temporary stands for painting, outdoor tables, or supports for mobile workstations.
Because the design uses so little material, these can be made in batches and stored easily when not in use. It’s a project that combines utility, speed, and simplicity all in one.
An Ideal Project for Any Skill Level
This single-board sawhorse build is a great entry point for newer woodworkers, but also a fast and useful build for experienced makers. With smart cuts and clean joinery, Josh shows that even scrap-grade lumber can be turned into something practical.
It’s a perfect example of what’s possible with limited materials, a sharp blade, and thoughtful planning.
Support Josh by visiting his Etsy Store.

Matt’s Take
These are my personal thoughts and tips based on my own experience in the shop. This section is not written, reviewed, or endorsed by the original creator of this project.
What I love about Josh’s approach here is how he maximizes every inch of that 2×6. This kind of efficient lumber usage is a skill that serves you well in any project — when you start thinking about how to get the most out of each board, you naturally become a more resourceful woodworker.
The notched joint system he uses is brilliant for shop-built sawhorses. Those friction-fit connections create surprising strength without hardware, and they’re forgiving if your cuts aren’t absolutely perfect. When you’re making repeated cuts for the notches, take your time setting up that first pass — getting the blade height and fence position dialed in will make the rest go smoothly.
One thing worth considering is making these in pairs or even sets of four. The material cost stays incredibly low, and having matched sawhorses opens up a lot of possibilities in the shop. I’d also suggest adding a small chamfer to any sharp edges during the sanding stage — it makes them more comfortable to handle and less likely to snag on materials.
For anyone hesitant about the strength of glue-only joints, remember that a good glue joint in long grain is actually stronger than the surrounding wood. Josh’s design puts the stress where wood glue excels, making this a genuinely robust solution for shop use.