These projects were built and designed by Josh Wright.
In this video, he demonstrates the often-overlooked potential of the miter saw by building three very different cutting board and serving tray designs—using the miter saw for nearly every cut.
Each board showcases a creative use of the tool, from plunge cuts to patterned inlays. Josh’s goal isn’t to create the fastest process, but to explore how far one can push a familiar shop staple.
Watch the full video and subscribe to Josh’s channel:
Rethinking the Miter Saw
Most woodworkers see the miter saw as a basic chop tool—great for crosscuts, and that’s about it. Josh challenges that mindset by using adjustments like blade angle, the depth stop, and a locked sliding mechanism to expand the saw’s role.
He uses the saw to perform shallow plunge cuts, carve pockets, and even create decorative inlays.
While not always efficient, the techniques offer new creative pathways for builders working with limited tools or space.
Equipment and Tool Notes
During the build, Josh’s original saw started sparking and failed mid-project. The manufacturer sent him a new model, which he used to complete the remaining boards.
Though lighter and less robust, the replacement featured sliding action, a depth stop, and a cut-line indicator—making it surprisingly capable for the price.
This comparison of saws offers insights for woodworkers debating between premium and budget models.
Smaller, lighter blades proved especially useful for controlled plunge cuts, while heavier saws were more stable for wider passes.
The First Board: Salvaging with Inlays

Josh begins with a cutting board that has a noticeable split running through it. Instead of scrapping the piece, he turns the flaw into a design feature by adding a series of bow-tie style inlays.
Using the miter saw’s depth stop, he plunge-cuts shallow pockets across the crack.
Then he fills the void with glue mixed with sawdust—an affordable method that blends in with the surrounding wood grain.
Once the inlays are trimmed and sanded flush, the board is finished with food-safe oil. The result is a clean and functional cutting board that embraces its imperfection in a subtle, handmade way.
The Second Board: Grooves and Pockets

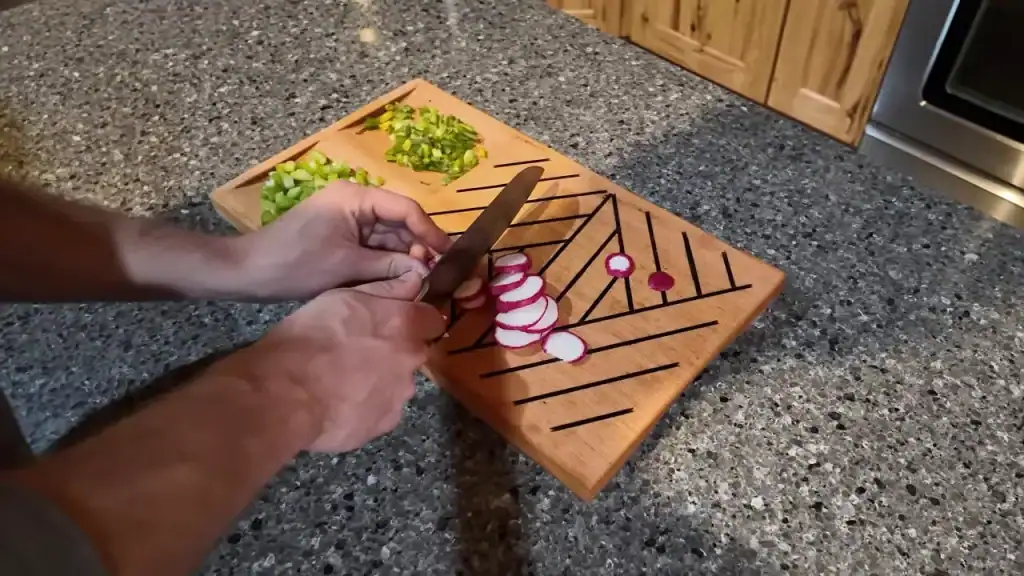
The next cutting board takes a more functional approach, featuring patterned lines and ingredient pockets.
Josh carves rhythmic, shallow grooves into one face of the board using repeated plunge cuts. These decorative lines are filled with black epoxy for contrast.
On the flip side, he creates two shallow pockets—ideal for separating chopped ingredients while prepping.
Each pocket is carved with multiple passes at a locked depth, showing how consistent results can be achieved even with a tool not designed for this type of detail.
Once again, the board is finished with oil, emphasizing the contrast between the epoxy lines and the natural wood.
It’s both functional and stylish, with a slightly industrial edge.
The Third Board: Decorative Serving Tray

The final project is the most complex. Josh starts with a clean panel and begins cutting a grid of shallow angled grooves using the miter saw.
These cuts are filled with thin strips of dark contrasting wood, forming a complex geometric inlay.
After sanding the first layer flush, he adds more intersecting grooves and fills those as well. The process is slow and intentionally inefficient, but the result is a tray that echoes kumiko-inspired aesthetics in a fully handmade way.
To make the tray functional, he builds a border frame. The longer sides are straightforward, but the shorter sides are notched and beveled to match the center piece.
For the handles, Josh uses the miter saw to carve a cove across each border piece by making many shallow angled passes—something usually done with a router or table saw.
To clean up glue residue and add visual interest, the bottom of the tray is textured and coated in epoxy.
The tray is less about daily use and more about pushing creative limits with limited tools.
Lessons Learned from These Builds
Josh wraps up with several key takeaways for anyone inspired to try similar techniques:
- Use the depth stop and blade lock to make repeatable plunge cuts or shallow pockets.
- Practice plunge cuts on scrap, especially when using large blades or soft wood prone to tear-out.
- Choose filler types based on your needs: glue and sawdust work well for subtle, small repairs, while epoxy is best for bold, structural fills.
- Recognize when to switch tools—the miter saw is versatile, but not always the best option for every cut.
- Finishing matters, especially with food-safe surfaces. Sand flush, smooth the edges, and choose an oil that enhances the grain.
Why This Approach Matters
Josh’s series of builds proves that you don’t always need a full shop of tools to create beautiful, functional pieces.
With some patience and creativity, even a standard miter saw can handle joinery, shaping, and detailed inlay work.
More than anything, these projects show that limitations often spark the most creative solutions.
Whether you’re reclaiming damaged wood, adding visual flair with simple tools, or experimenting with layout, there’s inspiration to be found in each of these builds.
Support Josh by visiting his Etsy Store.
