This project was built and designed by Chris from B&O Craftsman. It’s a practical and customizable French cleat system perfect for hanging tools, shelves, or decorations in a workshop or around the home.
The French cleat is a go-to solution for anyone looking to create flexible wall storage. With its simple angled design, this system makes it easy to rearrange or swap out mounted items without needing to drill more holes.
Watch the full video and subscribe to Chris’s channel:
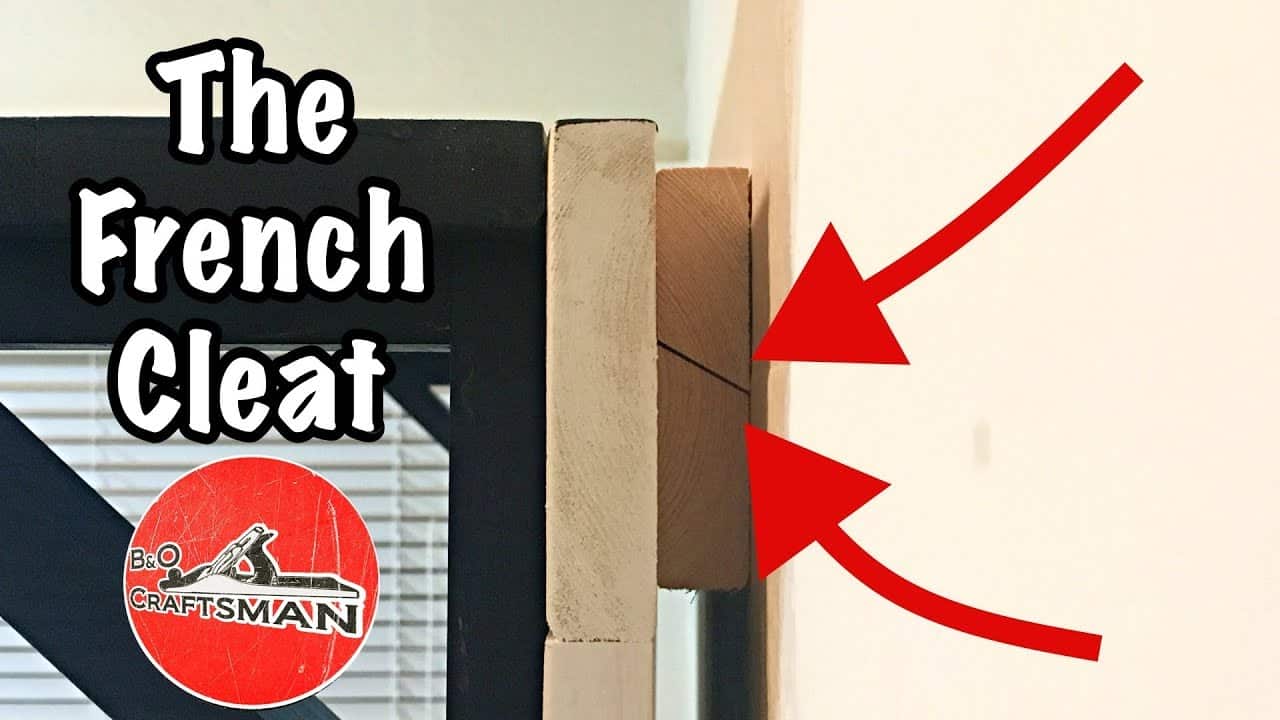
What Is a French Cleat System?
A French cleat consists of two interlocking boards, each cut with a 45-degree angle along one edge. One board mounts to the wall, while the other attaches to the back of the item you want to hang.
Once the two boards lock together, they form a secure connection capable of holding considerable weight. This makes the system ideal for tool cabinets, shop jigs, wall shelves, and even decorative items.
Materials and Tools You’ll Need
Chris starts the build with a standard 1×4 board, though other sizes can be used depending on the load you expect the cleat to carry. A table saw is used to make the angled cuts, and a drill with countersink bits is needed for clean screw holes.
A stud finder, level, and a few clamps are also helpful for accurate placement. Chris recommends using a spacer made from scrap wood that matches the cleat’s thickness to ensure mounted items sit flush against the wall.
Measuring and Cutting the Cleats
The first step involves cutting the cleat board to your desired length. For example, if you’re mounting a 34-inch-wide shelf, a 30-inch cleat allows for a small overhang on both ends, creating a balanced look.
With the board cut to length, Chris adjusts his table saw blade to exactly 45 degrees. He carefully rips the board lengthwise to produce two matching cleats—one for the wall, one for the back of the item.
Making a Spacer for Wall Flushness
After cutting the cleats, Chris creates a spacer strip that matches the cleat’s thickness. This spacer goes on the lower part of the wall, beneath the item you’re hanging, so the item sits level and doesn’t tilt forward.
This is especially important for larger or heavier objects where a flush, stable fit improves both safety and appearance.
Drilling and Countersinking Mounting Holes
To prepare the cleats for mounting, Chris drills pilot holes along the length of both cleat pieces. Using an 1/8-inch bit, he spaces the holes evenly to ensure a secure hold when screwed into the wall.
Each hole is countersunk so that the screw heads will sit below the wood surface. This not only gives a cleaner appearance but also prevents interference when mounting the second cleat.
Mounting the Wall Cleat
Using a stud finder, Chris locates the wall studs to ensure a secure base. He then uses a level to align the cleat horizontally before driving screws into the studs at a slight outward angle for added grip.
The spacer strip is installed below the cleat to maintain proper spacing. This strip acts as a shelf support and ensures everything sits flush once the upper cleat is in place.
Attaching the Cleat to the Back of the Item
With the wall cleat installed, the second cleat is mounted to the item being hung. The angled edge must face downward and outward to lock securely onto the wall cleat.
Chris double-checks the height and position before fastening the cleat with screws. The design allows the item to be easily lifted and moved later without tools, offering excellent flexibility for evolving storage needs.
Advantages of a French Cleat System
French cleats offer two major advantages: strength and modularity. Unlike fixed shelves or hooks, cleats let you reposition or replace items with no damage to the wall.
They also distribute weight evenly across the wall surface, making them ideal for heavier loads like tool chests or power tool stations. And because cleats can be cut to size, they work in both small and large spaces.
Finishing Touches and Custom Ideas
To complete the project, Chris recommends giving the cleats a light sanding to remove any rough edges. For aesthetic purposes, they can also be painted or stained to match your wall or item being mounted.
Many woodworkers add additional cleat rails above or below the first to create entire walls of movable storage. Whether you’re hanging bins, clamps, organizers, or art, the French cleat system offers a clean, professional look.
A Great Addition to Any Workshop
This project is a simple but powerful upgrade for anyone looking to improve workshop organization. The cleat system is reusable, flexible, and cost-effective—making it one of the most efficient storage methods available.
Even better, the system scales easily. Once you’ve installed one cleat, it’s easy to expand the setup as your tool collection grows or your shop layout evolves.
Please support Chris by visiting his website here: https://bo-craftsman-shop.creator-spring.com/.

Matt’s Take
These are my personal thoughts and tips based on my own experience in the shop. This section is not written, reviewed, or endorsed by the original creator of this project.
French cleat systems are one of those shop solutions that make you wonder why you waited so long to try them. The 45-degree angle creates a surprisingly strong mechanical connection that just gets tighter under load — no sagging or loosening over time like you might get with other hanging methods.
When cutting those 45-degree angles, take your time with the table saw setup. A sharp blade and steady feed rate will give you clean, smooth cuts that lock together perfectly. If your saw tends to drift or you’re not comfortable with the cut, a miter saw can work too, though you’ll need to clamp the board securely to prevent any shifting.
That spacer strip detail is really smart — it’s one of those small touches that separates a functional system from a professional-looking one. Without it, anything you hang will tilt forward slightly, which looks sloppy and can make items harder to access. The spacer keeps everything sitting nice and flush against the wall.
One thing I love about French cleats is how they grow with your shop. Start with one section and you’ll find yourself adding more rails as you discover just how handy they are. They’re perfect for everything from hand tool holders to entire cabinet systems, and moving things around becomes effortless.