


You smell it before your foot hits the last stair. A damp-cardboard, old-carpet-pad kind of smell, with something faintly sweet buried underneath.
The basement itself isn’t to blame. Trace the smell back far enough and you’ll almost always land on a decision someone made during construction — a poly sheet stapled in the wrong place, a fiberglass batt pushed against raw concrete, a bottom plate set flat on a slab that never dries.
Basements simply don’t play by the same rules as the rest of the house. An assembly that works perfectly in a second-floor bedroom can rot out in under two years below grade, because the concrete on the other side of that wall never really stops sweating moisture into the room.
Mold’s requirements are simple: water, something to eat, and enough time left alone. A finished basement quietly supplies all three, then papers over the evidence with drywall.
Below are 29 build errors that turn a finished lower level into a mold incubator, along with the fix for each one.
1. Closing In a Live Crack or a Seeping Tie-Hole

Most shrinkage cracks in a poured wall are cosmetic — right up until the day they aren’t.
The trouble is they don’t leak on a schedule. A crack that looks bone-dry in August can weep for days after an April storm, and the homeowner who checked it mid-summer frames right over it feeling confident. Form-tie holes cause the same false sense of security: the plugs that seal old snap-tie voids can fail years or decades later, and a rusty streak or a chalky mineral trail below a small round hole is basically a water-history report.
The fix for a non-structural crack is a polyurethane or epoxy injection from the inside, typically a few hundred dollars per crack, done in an afternoon by someone who knows what they’re doing — cheap next to the cost of tearing into a finished wall later.
Sealing a crack behind drywall also means you lose the ability to keep an eye on it. Anything horizontal, any stair-step pattern in block, or a crack wider than roughly 1/8 inch and still moving deserves a structural look before framing starts. In the meantime, date and mark the ends of every crack in pencil and recheck after the next rainy stretch.
2. Trapping the Sump Pit, Cleanouts, and Main Shutoff Inside the Walls

Whoever lays out the framing decides how easy — or miserable — every future repair will be.
Drywall over the main water shutoff and the next emergency call turns into a reciprocating saw and a flooded floor. The same goes for drain cleanouts, the sewer ejector access, and the sump pit itself — build an access panel or a hinged cabinet at each location. A framed opening with a magnetic cover panel is nearly free and looks like it was planned that way.
The sump pit deserves extra attention on its own. Left open, it’s essentially a hole punched into damp soil, evaporating ground moisture into your finished room nonstop and pushing up whole-room humidity on its own. Cap it with a gasketed, sealed lid that has a proper vent and a grommeted pass-through for the discharge line and float cord — that keeps the moisture (and any radon) contained, while the lid still lifts off easily whenever the pump needs service.
3. Skipping the Dehumidifier — or Giving It Nowhere to Drain

Every summer, a finished basement needs mechanical drying — this isn’t a nice-to-have. Aim for 45-55% relative humidity, and check it with a cheap hygrometer, since the built-in dial on most units can be off by ten points. The real weak link is the bucket: it fills, the unit shuts itself off, no one checks it for a week, and suddenly there’s a warm tray of stagnant water sitting in the room you just finished. Run a gravity drain hose to a floor drain, or add a condensate pump — never leave it on a bucket.
4. Cold-Water Pipes Left Bare Above the New Ceiling

Bare copper pipe in an 80%-humidity basement sweats the same way a glass of iced tea does on a hot porch.
Above a finished ceiling, that condensation drips onto insulation, drywall, or tile and gets absorbed silently for weeks before any stain shows on the surface.
Foam pipe sleeves run about a dollar per six-foot length — slide them on, tape the seams, and it’s an afternoon project.
Few fixes in this whole list return more protection for less money.
5. Skipping the Permit and the Required Egress Window

An unpermitted basement has a way of resurfacing — at closing, during an insurance claim, or worst of all, during a fire.
The inspection itself is worth having: a second, trained set of eyes checking your framing, vapor detailing, and wiring before it all vanishes behind drywall.
Code also sets non-negotiable minimums for habitable below-grade rooms — an emergency escape opening in every bedroom (typically 5.7 sq ft of clear openable area, sill no higher than 44 inches off the floor) and a minimum ceiling height. Exact numbers shift by jurisdiction, so your local building department’s version is the one that counts.
Make that call before the lumber gets ordered, not after.
6. Window Wells Left Uncovered With Clogged Drains
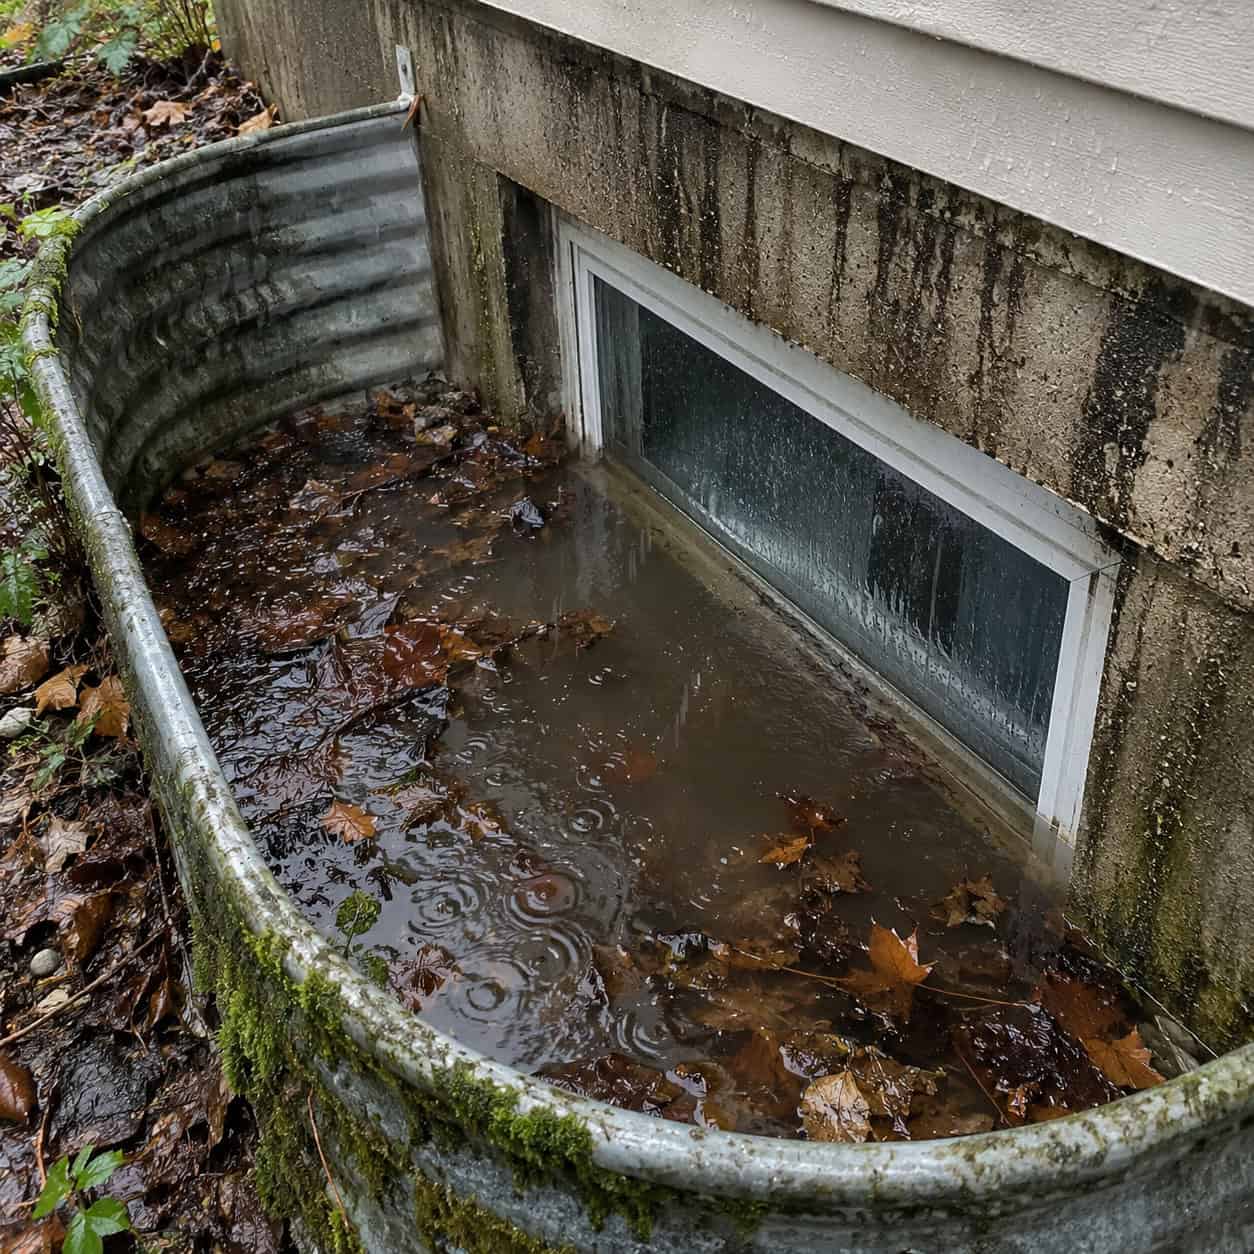
Think of a window well as a bucket buried right against your foundation — it’s only as good as its drain.
The gravel base at the bottom is supposed to let water pass through, but years of leaves, mulch, and silt turn it into a basin. During a heavy storm, that basin fills and spills straight over the sill into your new wall.
Clear out the silt, confirm the drain still works, and add a clear polycarbonate cover. If a leak only ever shows up during the third big rain of the season, this is usually where it’s coming from.
7. Bathroom Exhaust Fans That Dead-End in a Joist Bay

A single shower load puts a surprising volume of water vapor into the air — and it needs an exit route out of the building, full stop.
If the duct just terminates inside a joist bay, a soffit cavity, or somewhere vaguely “up there,” all you’ve done is move the moisture to a colder, darker spot.
Run insulated duct all the way to the exterior, sloped so any condensate drains outward. Plenty of below-grade bathrooms skip a fan entirely because there’s no window requiring one — install one anyway.
8. Relying on Waterproof Masonry Paint as Your Entire Water Plan

These heavy masonry coatings genuinely help — they just help with a much smaller problem than most people assume.
On a clean, sound wall with no serious exterior drainage issue, a properly applied cementitious or acrylic waterproofing coating can reduce surface dampness and minor vapor drive, and that might be all a wall needs.
But under real hydrostatic pressure, it simply loses. Water pushing in from the soil side doesn’t respect a 20-mil film — it blisters the coating, spalls the concrete underneath, and forces salts to the surface somewhere else on the wall. Efflorescence showing up three feet away from a fresh coat is the wall trying to tell you something.
The dangerous part is what the coating hides. Paint the wall, frame over it, and you’ve sealed away the one surface that would have warned you something was wrong. By the time a stain reaches the drywall, the studs behind it have already been wet for a year.
Actual water management happens outside: grading, gutters, footing drains, and — for serious cases — interior drain tile tied into a sump. Coatings should be the finishing 5%, never the primary strategy. If a wall is actively seeping, put the paint down and call a foundation contractor about drainage first.
9. Sandwiching the Wall in Interior Poly Vapor Barrier
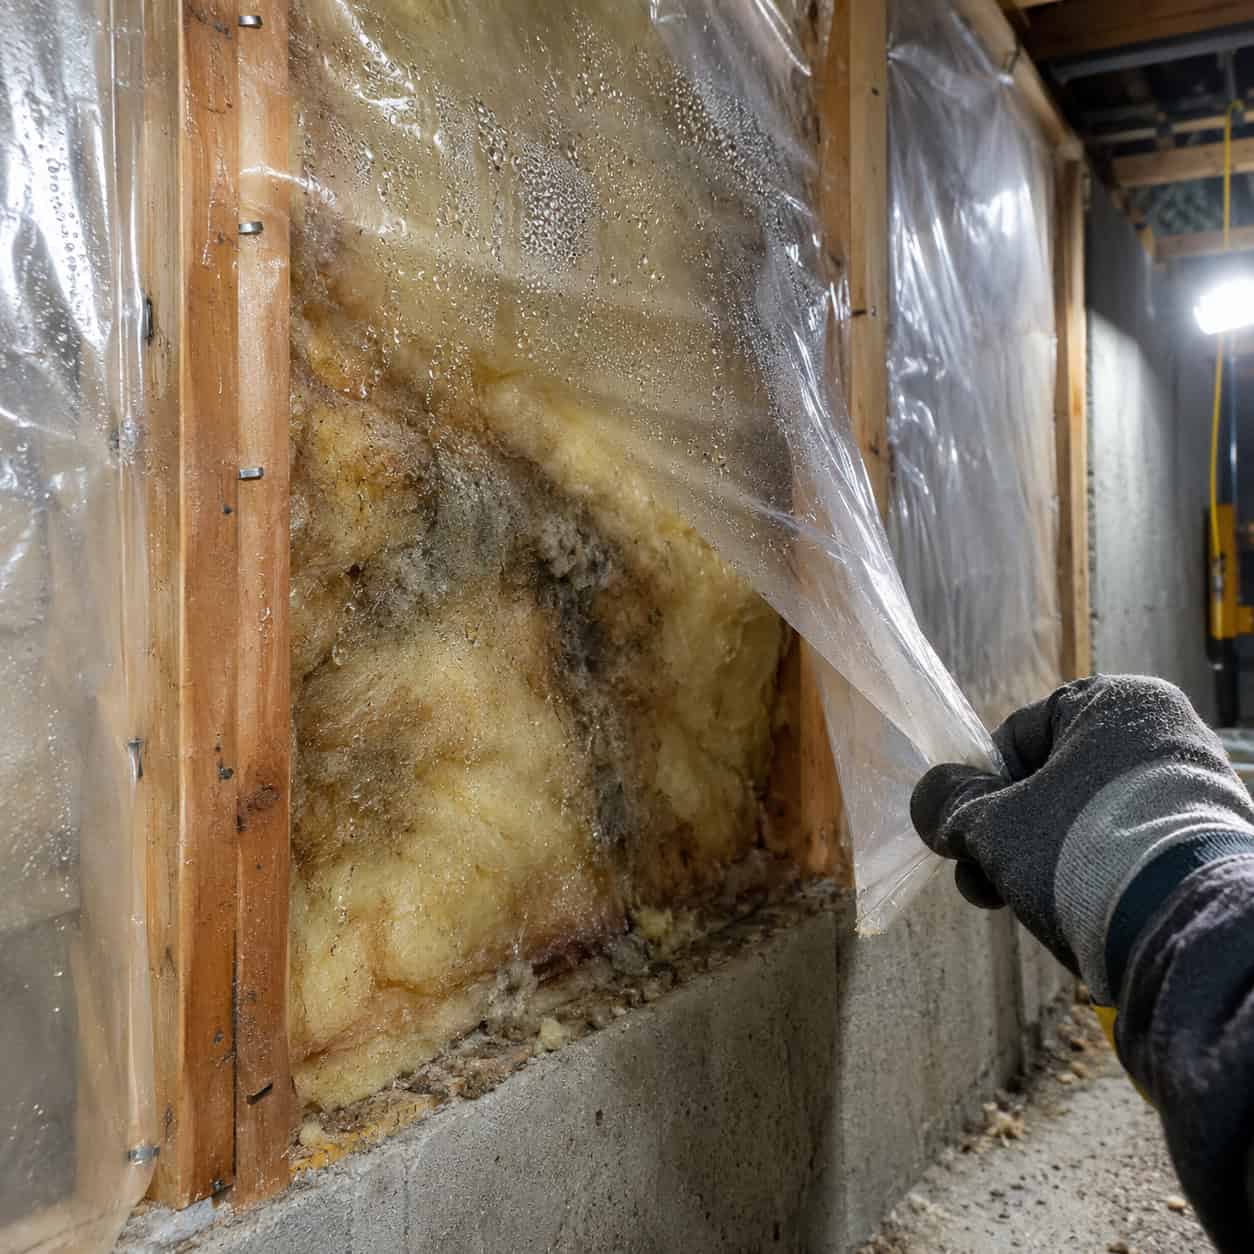
Staple 6-mil poly to the studs, close it up with drywall, and congratulations — you’ve built a moisture trap that happens to be painted a nice color.
That detail makes sense above grade in cold climates, where the plastic keeps warm interior moisture from pushing into the wall cavity. Below grade, the physics reverse entirely: foundation concrete is hygroscopic and permanently damp, constantly drawing water from the soil and releasing it inward. Put a Class I vapor barrier on the interior face and that moisture has no direction left to travel.
It gets worse with the double-poly setup — plastic against the concrete, then studs and fiberglass, then a second sheet of poly, then drywall. Now the cavity can’t dry toward either side, and the framing lumber sits soaking inside a sealed bag indefinitely.
The correct order runs opposite. Rigid foam or closed-cell spray foam goes straight against the concrete first, acting as both vapor control and condensation control, because it keeps the concrete surface warm enough that indoor air never reaches its dew point there. Tape the seams. If you want room inside the wall for wiring, frame a stud wall inside the foam, insulate it lightly (or not at all), then hang drywall and finish with latex paint. No plastic sheeting anywhere in the assembly.
Latex paint over drywall behaves like a Class III vapor retarder — enough resistance to slow moisture movement, enough permeability to let the wall dry inward when it needs to. Building Science Corporation has been teaching this exact detail for twenty years without changing the recommendation.
If your basement already has poly buried in the wall, cut a small inspection hole low on an exterior wall before doing anything else. Whatever you find there determines your next move.
10. Enclosing the Water Heater, Washer, or Furnace Without a Drain Pan

Mechanical rooms are usually the last thing framed and the first thing forgotten.
A failing 50-gallon water heater empties itself in minutes and then keeps feeding water from the supply line until someone catches it. A ruptured washer hose can dump hundreds of gallons an hour. In an unfinished basement, that’s an unpleasant afternoon with a shop vac; in a finished one, it’s ruined insulation, drywall, framing, and flooring.
Set a drain pan under both the water heater and the washer, and pipe each pan to a floor drain or condensate pump — pans cost about $30, but only help if they actually drain somewhere; a pan with no outlet just holds water against the appliance instead.
Swap rubber washer hoses for braided stainless, and consider a washing machine shutoff box or an automatic leak-shutoff valve.
Wi-Fi leak sensors ($20-30 each) placed by the heater, the washer, the furnace condensate line, and the sump will text you the moment something’s wrong, even at 2 a.m. — the gap between “mop” and “five-figure remediation bill” is often exactly that alert.
It’s also worth knowing how insurance treats this: sudden, accidental discharge is usually covered, but slow seepage that goes unnoticed for a long time frequently isn’t. The sensor protects the claim just as much as it protects the drywall.
11. Letting the Insulation End Right at Grade

Somebody always figures they can save four sheets of foam by only insulating the top three feet of wall.
What that shortcut actually produces is a cold band of exposed concrete directly below the foam’s edge — the coldest surface in the room, tucked into the darkest part of the wall.
That band is precisely where condensation forms and where the mold streak eventually appears. Insulate the full height, from wall to slab, with no exceptions.
12. Fiberglass Batts Pushed Directly Against Bare Concrete

Fiberglass is air-permeable — that single fact explains most of the problem.
Humid room air moves right through the batt, hits the cold concrete on the other side, and condenses there, inside the wall where no one ever looks. The kraft paper facing and the batt binders then supply mold with something to feed on.
Rigid or spray foam should always go against the concrete first. Unfaced fiberglass in the stud cavity after that is fine, but the DOE’s Building America Solution Center doesn’t hedge on the rest: never put an interior vapor retarder over air-permeable insulation below grade.
13. No Battery Backup or High-Water Alarm on the Sump Pump

Power tends to go out precisely during the storms that push the most water into your sump pit. A battery backup system, roughly $300-600 installed, keeps the pump running for hours through exactly that kind of outage. Pair it with a $15 high-water float alarm that sounds off before water ever reaches your new flooring, and test both setups twice a year by simply pouring a bucket into the pit.
14. Rushing to Finish Before One Full Wet Season Has Passed

Nobody bottles patience, but this project needs it anyway.
Fresh concrete continues releasing water for months after the pour — figure roughly 30 days of drying per inch of thickness before it’s ready for impermeable flooring, and that’s assuming decent drying conditions.
More importantly, a basement’s real weaknesses only show up after it’s been tested by a spring thaw, a humid July, and a hard October downpour — each one exposes something different.
Leave the basement bare for a full year if you can, walking it with a flashlight after every significant storm and noting whatever you find.
15. Using the Finished Room to Store Cardboard and Old Carpet

Finish the room, and the boxes inevitably follow. Cardboard, paper files, carpet remnants, and stacked cushions are all cellulose — mold’s preferred meal — and stacked on a cool slab in a humid room, they don’t just grow mold themselves, they also trap moisture against the floor and wall behind them. Switch to sealed plastic totes on wire shelving lifted a few inches off the slab, keep everything clear of exterior walls and dead-air corners, and pull one box out to check underneath — what you find there is basically a free humidity report.
16. Standard Paper-Faced Drywall in the Basement Bath and Laundry

Ordinary gypsum board is essentially chalk wrapped in paper, and hanging it behind a shower is close to building a petri dish on purpose.
Even “green board” is still paper-faced underneath — moisture-resistant is not the same claim as mold-proof.
Cement board belongs in wet areas, and glass-mat gypsum panels elsewhere throughout the bath and laundry. Both remove the food source outright, which is the only fix that actually lasts. Building Science Corporation frames it simply: controlling mold means controlling both the water and the materials that feed on it.
17. Skipping a Radon Test Before Closing Up the Walls

Finishing a basement changes how its air behaves, so testing needs to happen before the walls close, not after.
A short-term test kit costs $15-25, and if the reading comes back at or above 4 pCi/L, mitigation is dramatically cheaper to install before framing goes up — the suction pit and riser pipe need a clear path, and retrofitting that pipe through finished space later is both ugly and costly.
There’s an unexpected bonus, too: a sub-slab depressurization system pulls soil gas and soil moisture out from beneath the concrete, which measurably dries the slab as a side effect. The EPA’s mold-prevention guidance keeps returning to the same core idea — control the water at its source and the biological problem tends to resolve itself.
Look closely and nearly every mistake on this list has the same root cause: someone treated a basement like an ordinary room and used ordinary-room details to build it.
But below grade is its own separate climate — cold surfaces, constant vapor drive from the soil, no sunlight, and air that goes nowhere unless something forces it to move.
Manage the water outside the house, keep the concrete warm enough to dry inward, and keep paper and particleboard out of the room entirely. Handle those three things and a basement can stay every bit as dry as the floors above it.
That smell was never inevitable. It’s just proof of what got built wrong.
18. Carpet and Pad Installed Directly on the Bare Slab

It’s the classic rec-room floor — and also the classic reason the rec room smells the way it does.
A slab continually wicks vapor up from the soil beneath it, and a foam pad lying flat on top traps that moisture against a surface that hovers around 55°F all summer long. Combine warm, humid air with a cold slab and you get condensation forming right inside the pad.
Install a dimpled subfloor panel or a foam-backed sleeper panel first — the air gap it creates breaks capillary contact and lets the slab breathe sideways toward a drain or dehumidifier.
Or bypass soft flooring altogether. Sealed concrete, LVP over the right underlayment, or ceramic tile all hold up to conditions that destroy carpet.
19. Finishing Before Gutters, Downspouts, and Grading Get Corrected

No interior detail can outmuscle bulk water — fix the outside first, or don’t bother starting inside.
Consider the math on an average house: one inch of rain falling on a 1,500-square-foot roof produces roughly 900 gallons of water, all of which lands in a gutter system that either carries it safely away or dumps it a few feet from your foundation.
Downspouts need to discharge at least 6 feet from the wall — 10 feet is better still, and buried solid pipe running to daylight is the best option of all. Corrugated flex extensions crush, clog, and pop loose over time, so use rigid PVC wherever possible.
Grading matters just as much as the gutters. Soil should drop about 6 inches over the first 10 feet moving away from the house — that’s a real, visible slope, not a token gesture. Mulch beds topped off year after year for a decade or more often end up sloping the wrong way, back toward the foundation, without anyone noticing.
A quick outdoor checklist before framing day:
- Gutters clear, seams tight, no overflow stains on the fascia
- Every downspout extended 6-10 feet out and discharging downhill
- Soil sloping away, no ponding within 24 hours of a storm
- Window wells drained and covered
- No irrigation heads spraying the foundation
Once all of that checks out, wait for a hard rain and go inspect again. A dry wall after a two-inch storm is the only real green light.
20. Never Running a Slab Moisture Test

For about twenty dollars and a weekend, you can find out whether the floor is actually ready.
Tape a clear 2×2-foot plastic sheet to the slab, seal it airtight on all four edges, and check back in 24-72 hours — condensation trapped underneath, or a darkened patch of concrete, means the slab is still off-gassing vapor.
For higher-stakes projects, go a step further: a calcium chloride kit measures pounds of vapor emission per 1,000 square feet, while an in-slab RH probe following ASTM F2170 is the standard flooring manufacturers actually ask for — many warranties require it outright.
Ripping out a finished floor later costs orders of magnitude more than running this test up front. The Department of Energy treats slab moisture as a fundamental design input, not an afterthought.
21. Running Drywall All the Way Down to the Floor

Paper-faced gypsum touching the slab is basically a wick that comes with its own food supply attached.
Moisture climbs the board through capillary action — sometimes 6 to 8 inches up — and that paper facing is exactly what mold wants to eat.
Leave a half-inch gap between the board and the floor; base trim covers it completely and no one will ever know the gap is there. Professionals leave this gap everywhere, not just in basements.
22. Rigid Foam With Untaped Seams and Open Perimeter Gaps

Rigid foam only earns its keep when it’s continuous — a panel with open joints is little more than decoration.
Air always finds the gap. It slides behind the foam, reaches the cold concrete, and condenses in exactly the spot you’ll never get to inspect.
Tape every seam with a compatible foil or acrylic tape, and spray-foam the entire perimeter — top against the sill, bottom against the slab, and around every single penetration.
Make it continuous and airtight, or skip it entirely.
23. Insulating the Ceiling When the Walls Needed It

For two decades this was the standard energy-retrofit recommendation, and it quietly made basements worse.
Insulating the floor above the basement thermally disconnects it from the heated house above. The space below stays cold, the walls and slab stay cold along with it, and any warm humid air that leaks down there condenses on those cold surfaces.
Below grade, insulation belongs on the perimeter walls instead — that pulls the basement inside the home’s thermal envelope, keeping it warm enough to stay dry.
24. Adding Supply Registers to the Basement With No Return Path

A couple of extra supply registers sounds like a generous upgrade, but it’s often exactly what starts the condensation problem.
Supply air with no return pressurizes the room, kills natural circulation, and chills wall surfaces below the summer dew point — cold surfaces plus humid air is the whole recipe for trouble.
Add a return duct or a transfer path back to the air handler. Down here, balance matters more than raw capacity.
| Supply Only | Supply + Return | |
|---|---|---|
| Room pressure | Positive, leaks outward | Neutral, balanced |
| Air movement | Stagnant corners | Circulates fully |
| Wall surface temp | Often below dew point | Closer to room temp |
| Humidity control | Poor | Manageable |
If the basement feels cold and clammy every July, this table is telling you why.
25. Setting an Untreated Bottom Plate on Bare Concrete
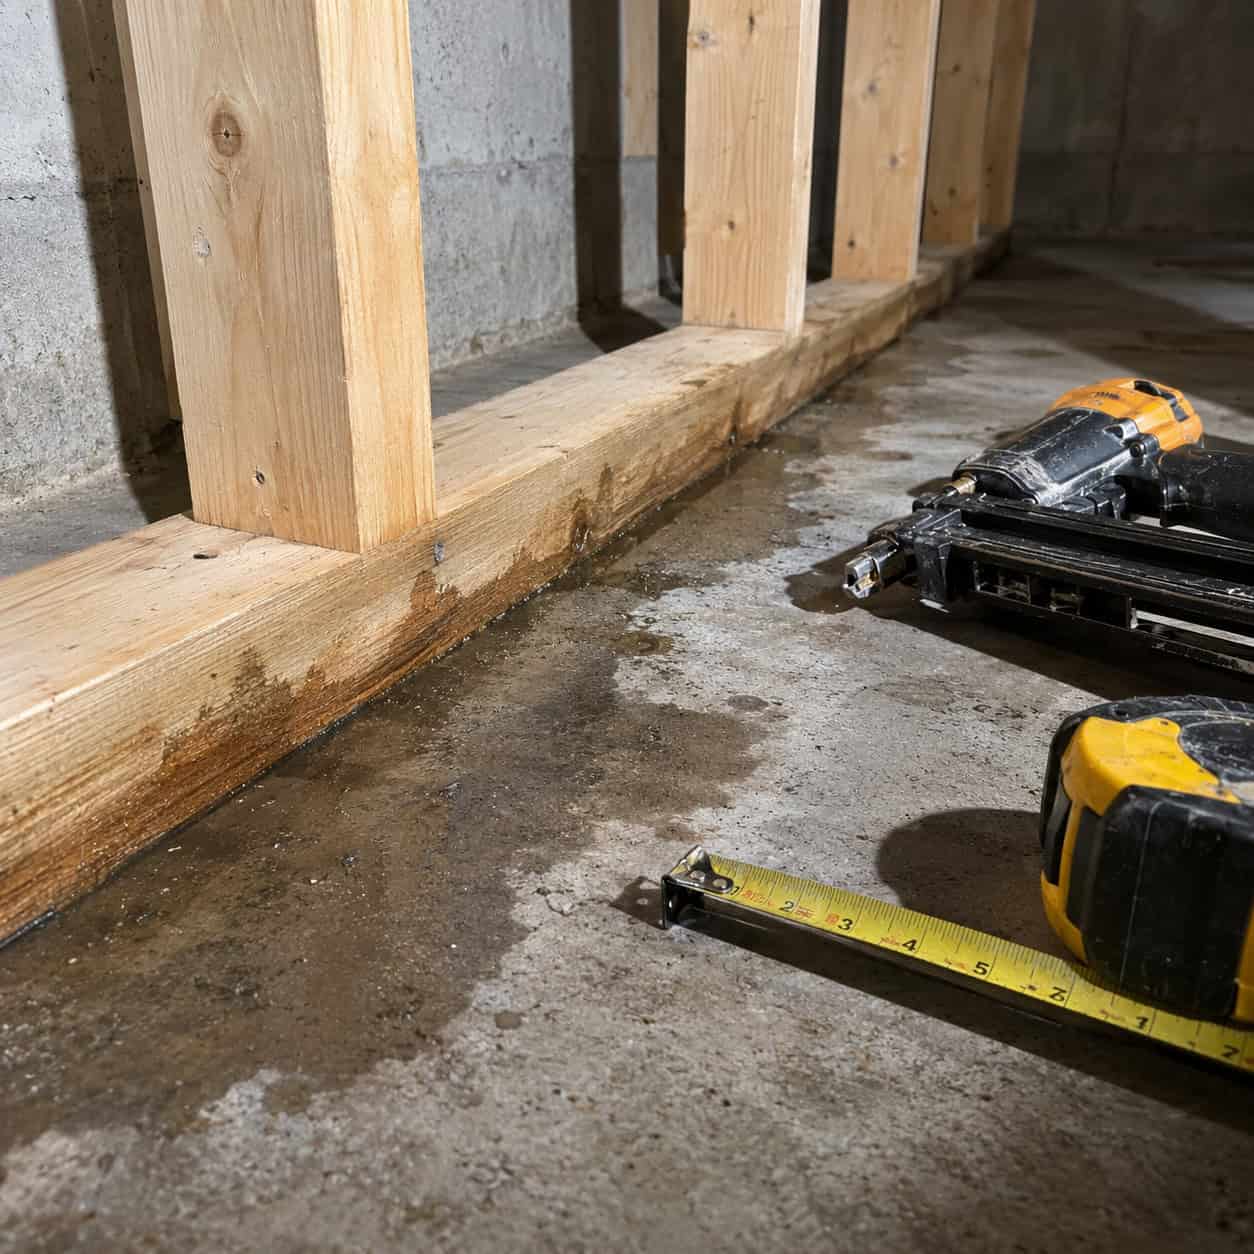
It’s a thirty-second decision on framing day with consequences that stretch out for twenty years.
Standard SPF lumber laid flat against a slab has zero capillary break, so the concrete feeds moisture straight into the end grain and the plate stays damp more or less permanently.
Use pressure-treated lumber for the bottom plate and add a sill gasket or foam strip beneath it — a cost of just a few dollars per wall.
26. Rim Joist Fiberglass With No Air Sealing Behind It

The rim joist is typically the coldest, leakiest surface anywhere in the basement.
Batts stuffed into that cavity don’t block air movement — they filter it. Warm, humid house air passes right through the fiberglass, hits the cold band board, and condenses on wood that then stays damp all winter long.
Cut-and-cobble rigid foam, sealed tight at every edge, solves it. Two inches of closed-cell spray foam solves it even better and faster.
Pull one batt free and look at the wood underneath — it’s a five-minute diagnosis that tells you everything.
27. MDF Trim and Particleboard Cabinets Installed Below Grade

There’s one thing engineered wood reliably does in a basement: swell.
MDF baseboard pulls moisture up from the slab and mushrooms along its bottom edge, while particleboard cabinet boxes do the same at the toe kick — and the glue line inside stays wet long after the surrounding room has dried out.
Choose PVC or composite base trim, solid wood or plywood casework, and solid-core or fiberglass doors instead. It costs more upfront, but it won’t need replacing six years later.