This project was built and designed by Jay Bates. It’s a heavy-duty workbench made from affordable materials, ideal for anyone looking to set up a dependable workspace without spending a fortune.
A workbench is often the most-used surface in any shop, and building one yourself can save money while giving you a bench that’s built to last. Jay walks through a process that uses common lumber and basic tools to create a rock-solid structure.
Watch the full video and subscribe to Jay’s channel:
Using Cost-Effective Materials
Jay chose 2×10 southern yellow pine boards as the main material for this build. These boards are widely available, easy to work with, and significantly cheaper than hardwood alternatives.
At around $110 in total cost, this build is accessible for beginner and budget-conscious woodworkers. Despite the lower price, the final product is strong, flat, and fully functional—proof that you don’t need exotic materials for a great workbench.
Workbench Dimensions and Design
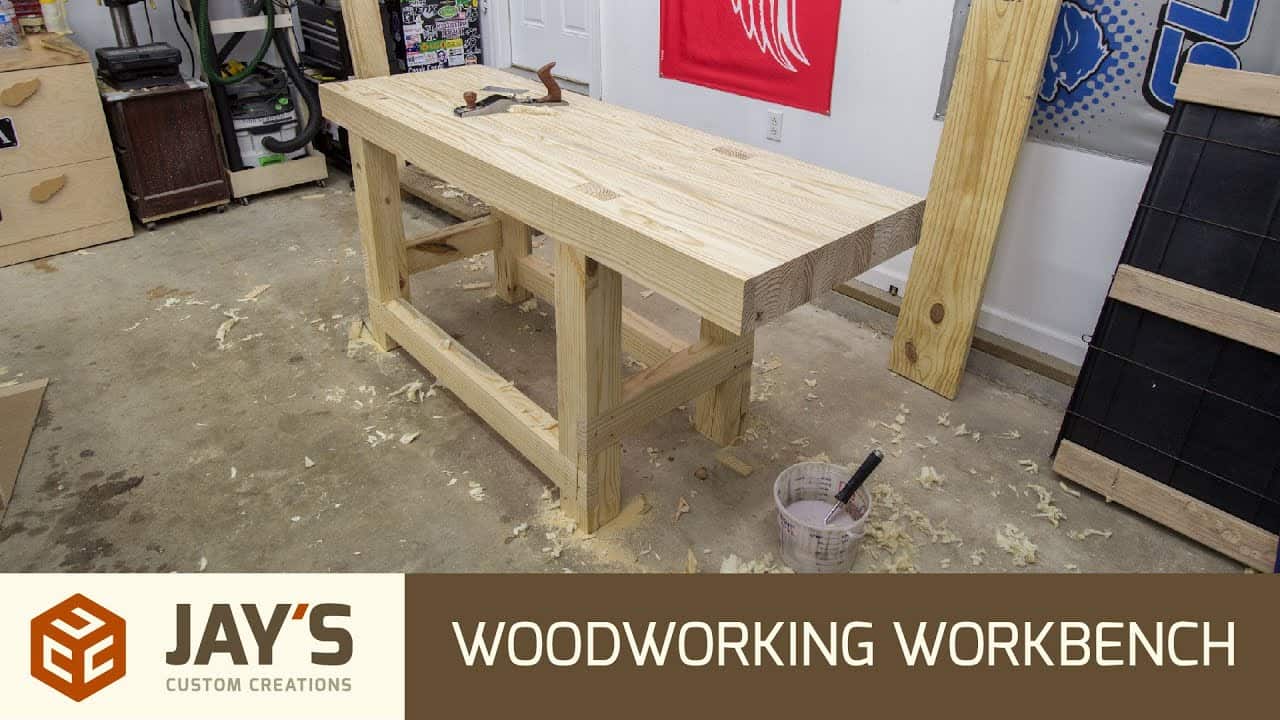
The finished bench measures about six feet long and two feet wide, though the design is flexible. You can adjust the length, width, or height to suit your space or needs.
The thick benchtop is key to this build. It adds stability and weight, reducing vibration during tasks like planing or chiseling. This makes it more comfortable to use and better suited for a wide range of projects.
Building the Top in Stages
The top starts with ripping the 2x10s down the center and turning the boards on edge. This orientation gives the bench its impressive thickness and durability.
Jay begins by skip-planing the boards to remove rough spots and make the glue-up easier. Rather than glue everything at once, he breaks the top into three individual beams. This strategy simplifies clamping and avoids the struggle of flattening one massive slab later.
Gluing for Strength and Stability
When gluing the beams, Jay positions each board so that the crown of the board faces outward. This creates a bow in the center, which becomes helpful when clamping because the boards naturally pull together at the edges.
After gluing, each beam is squared and leveled using a jointer and planer. Attention is given to the bottom surface to minimize snipe, since an uneven bench base could lead to wobbling or instability.
Mortises and Leg Assembly
The base of the bench is designed to be just as solid as the top. Jay cuts mortises into the underside of the benchtop using a plunge router. Each mortise accepts one of the bench legs for a secure, locked-in fit.
The legs themselves are milled and trimmed for tight tolerances, ensuring they fit snugly into the mortises. Precision at this step is essential for a stable base and strong support structure.
Joinery That Lasts
Half-lap joints connect the legs to horizontal stretchers. This simple but strong method distributes pressure across the frame and resists racking during use.
Each joint is carefully marked and cut to fit, and a dry assembly is done before gluing everything together. Jay uses screws during the dry fit to hold parts in place and make final adjustments easier before committing to glue.
Locking Everything Together
Once satisfied with the fit, the full frame is glued up and assembled. The legs are inserted into the mortises and locked in place using wedges, which help expand the tenons for an ultra-tight fit.
This extra step adds to the durability of the bench, making sure nothing shifts or loosens over time. Any glue squeeze-out is cleaned up, and the entire top is planed flat for a smooth finish.
Optional Add-ons and Customizations
Jay mentions that detailed plans are available if you want to follow this build exactly. These plans include optional add-ons like vises or lower cabinets, allowing you to tailor the bench to your workflow.
Whether you want a basic surface or a feature-rich workstation, this bench offers a solid starting point. Its modular design allows for upgrades down the road.
Built to Last for Years
This workbench is proof that simple materials and smart construction techniques can yield pro-level results. It’s not just a surface to work on—it becomes a dependable part of your shop.
The weight, structure, and joinery all contribute to a bench that will hold up through countless projects. Even without high-end tools, you can follow Jay’s approach and end up with a bench that feels solid under every cut and clamp.
Please support Jay by purchasing his plans here: Jay’s Custom Creations.

Matt’s Take
These are my personal thoughts and tips based on my own experience in the shop. This section is not written, reviewed, or endorsed by the original creator of this project.
A solid workbench really is the foundation of any good shop, and Jay’s approach here hits all the right notes. Using 2×10 southern yellow pine is brilliant for a budget build — that lumber gives you serious mass and stability without the hardwood price tag. The key insight about ripping those boards and standing them on edge is spot-on. You’re essentially creating laminated beams that are way stronger than using the boards flat.
The mortise and tenon joinery with wedges is old-school solid. Those wedged tenons aren’t going anywhere, and they actually get tighter over time as the wood moves. When you’re routing those mortises, take your time and use a fence or template if you have one — precision here really pays off in the final assembly. A sharp bit and multiple shallow passes will give you clean walls without tearout.
That crown orientation tip is worth remembering for any glue-up. When you put the crowns facing out, the boards want to close up at the joint lines under clamp pressure, which gives you tight seams. And breaking the top into manageable sections before the final assembly? Smart move. Trying to wrangle a full-width benchtop through a planer is asking for trouble in most home shops.