This project was built and designed by Rob from Let’s Make Things.
Rob takes his previously built taper jig to the next level by adding a sliding hook mechanism that provides consistent starting points for repeat cuts while tucking away when not needed.
Watch the full video and subscribe to Let’s Make Things:
Design Concept
While hold-down clamps can secure workpieces effectively, a hook provides valuable consistency when making multiple identical tapered cuts. Rob’s approach creates a hook that slides along a track, allowing for precise positioning while staying completely out of the way when not in use.
The upgrade requires minimal materials including a piece of T-track, a hardwood block, bolts for securing the mechanism, and basic hardware. The entire modification maintains the jig’s compact profile while significantly expanding its functionality.
Track Preparation
Rob starts by cutting a piece of T-track to be slightly shorter than the jig’s arm length. The track needs modification to allow the sliding mechanism to operate smoothly within its channel.
Using a drill bit that fits snugly in the track’s existing holes, he creates a series of connected holes along the channel. This removes material to form a continuous slot where the hook can slide freely. A chisel and file clean up the rough edges, creating a smooth channel for the sliding action.
Block Construction
The hook itself consists of a hardwood block that matches the thickness and width of the jig’s arm. Rob uses white oak for durability, cutting a piece that extends slightly beyond the arm when attached.
Two precisely placed holes accommodate the bolts that secure the block to the track and provide the locking mechanism. The positioning ensures proper alignment while allowing adequate material for structural integrity around each bolt hole.
Hardware Installation
Rather than using standard threaded rod, Rob employs a creative approach with modified bolts. One bolt secures the track to the jig arm, while another provides the sliding lock mechanism within the track itself.
The installation process involves cutting bolts to appropriate lengths and using epoxy to permanently secure nuts at specific depths within the block. This creates smooth, flush surfaces while maintaining strong mechanical connections throughout the assembly.
Operation and Benefits
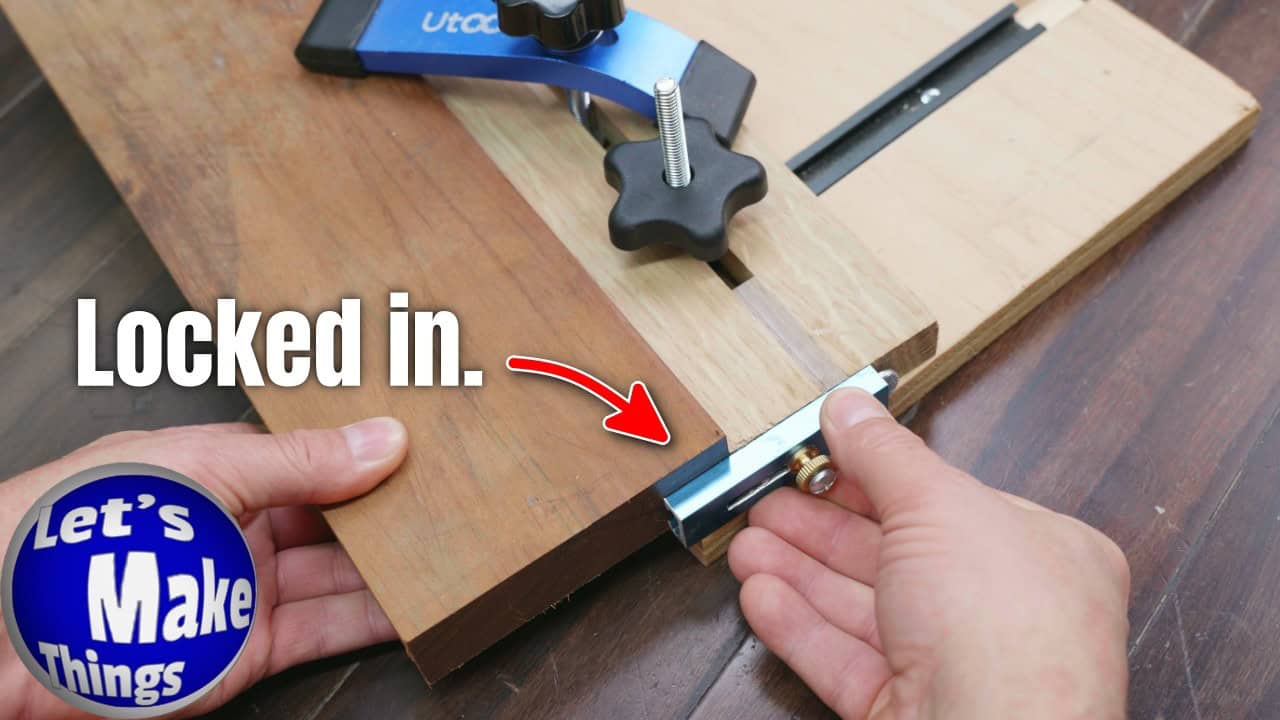
The completed sliding hook operates with simple, intuitive motions. When needed, the hook slides into position and locks with a quick turn of the thumb nut. When not required, it slides completely out of the cutting path and secures in place.
This upgrade transforms the taper jig from a basic cutting aid into a precision tool capable of highly repeatable results. The smooth sliding action and positive locking make it practical for production work while maintaining the jig’s versatility for one-off cuts.
Rob’s sliding hook mechanism demonstrates how thoughtful upgrades can significantly enhance shop-made jigs without compromising their original simplicity. The modification requires minimal time and materials while providing substantial improvements in both functionality and user experience.
See Rob’s plans here: https://makethingswithrob.com/taper-reference-edge-jig/

Matt’s Take
These are my personal thoughts and tips based on my own experience in the shop. This section is not written, reviewed, or endorsed by the original creator of this project.
The sliding hook concept really showcases how smart hardware choices can transform a basic jig. That T-track modification is clever — drilling connected holes and cleaning up with a chisel creates a smooth sliding channel without needing specialized milling equipment. Most of us have those tools already hanging in the shop.
White oak is a solid choice for the hook block. It’s tough enough to handle repeated clamping forces and won’t compress over time like softer woods might. When you’re making production runs of tapered pieces, that consistency becomes crucial. The epoxy-secured nuts create a clean look while keeping everything mechanically sound — no threads working loose after heavy use.
Safety-wise, having that hook slide completely out of the cut path is a huge advantage. Nothing worse than a clamp or stop getting in the way when you’re focused on following a cut line. The positive locking mechanism means you won’t have any surprises with the hook shifting mid-cut, which could definitely throw off your taper angle.
This type of upgrade is exactly what I love about shop-made jigs — you can dial them in to work exactly how you need them to. Rob’s approach keeps the original jig’s simplicity while adding real functionality that pays dividends when you need consistent results.