This project was built and designed by Zach from Bear Mountain Builds.
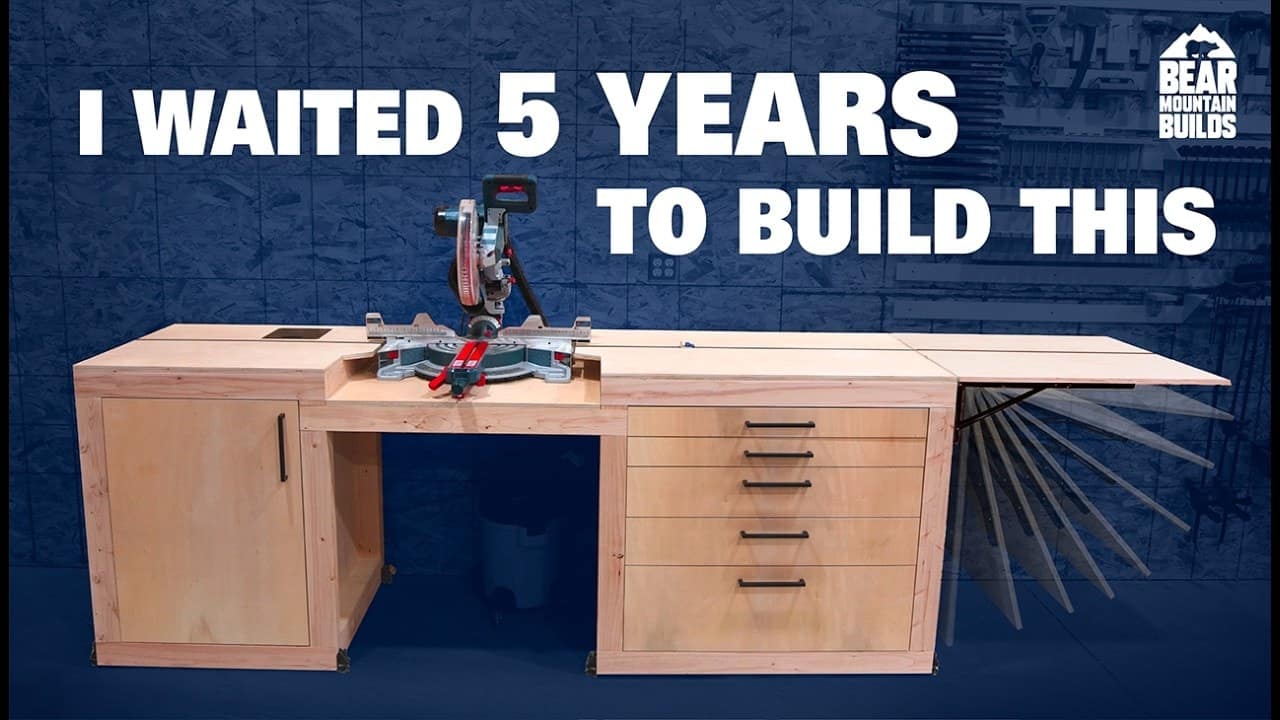
Zach designs a heavy-duty, foldable miter saw table that combines long repetitive cutting capacity with large, accessible storage and smart dust control.
The build is centered on a sturdy 2x framing approach, inset platforms, and a universal layout that accommodates nearly any miter saw and shop size.
Watch the full video and subscribe to Bear Mountain Builds:
Design and capacity
The table is built to be versatile: it folds down for compact storage and opens up to provide long, repeatable cutting runs for large workpieces. Storage is integrated into the base with a bank of drawers on one side and pull-out shelves on the other, making the table a combined workstation and tool chest.
Zach’s layout prioritizes accessibility and workflow by placing a dedicated offcut bucket under a flush lid and designing the top to sit close to the saw fence. That pairing keeps offcuts and dust out of the way and shortens the path from saw to collection.
Frame and materials
The structural core uses common dimensional lumber laminated into robust legs and stretchers, with pocket screws and lap joints for concealed hardware and solid load transfer. Plywood platforms are inset into the frame so drawer and door faces sit flush with the cabinet edges for clean sightlines.
Building the frame as separate halves makes assembly and finishing easier before joining into the final, heavier cabinet, and the design tolerates slightly imperfect lumber by using glue, screws, and clamps to pull everything true. That approach is repeatable and forgiving for home shops.
Drawers, sliders, and the stacking method
Zach uses a simple, repeatable drawer method: lightweight plywood boxes reinforced at the corners and a bottom glued and taped in place, held with temporary corner clamps during assembly. The drawers ride on economical slides that are mounted using a stacking technique with small spacers to guarantee parallel alignment.
The stacking method removes the usual headache of aligning long slides by building up spacers from a reference surface and then fixing the slide in place against those spacers. This keeps the slides parallel, speeds installation, and works whether the cabinet will carry drawers or pull-out shelves.
Saw platform, wing, and fitment
The saw platform is a plywood panel supported by cross pieces and inset stretchers so the saw sits low and level relative to the benchtop surfaces. A folding wing attached with heavy-duty brackets extends the outfeed and collapses for storage, and careful bracket spacing prevents binding when folding.
To fit a specific saw, the platform is notched to clear the saw’s movement; Zach marks and cuts those notches to match the saw’s travel and then cleans them up with a router if desired. The result is a universal platform that still allows full blade articulation without interference.
T-track, flush lid, and offcut management
Zach installs T-track near the fence area to add clamping flexibility and accessories, routing slots with a straight bit to recess the track cleanly into the top. Placement is determined by lining up the track with the saw fence so accessories ride true during crosscuts and miters.
The flush-mount lid above the pullout shelf houses a standard bucket for quick offcut dumping and keeps the top tidy while limiting dust intrusion. The lid can be machined or printed to match shop tools, and it integrates elegantly with the top surface.
Dust control and workflow
A dedicated shop vacuum is plumbed to the saw with a short run and an automated switch so the dust collector runs when the saw is powered on. That setup reduces noise during idle time and ensures dust collection is active only when needed, improving workshop air quality without extra steps.
Designing the dust port into the back of the cabinet and keeping the bucket and lid close to the cutline keeps chips and larger offcuts from wandering across the floor. This kind of deliberate workflow design saves cleanup time and keeps the work area safer.
Tips, jigs, and adaptations
Two recurring shop tricks in this build are simple spacers for repeatable spacing and small corner clamps that make drawer assembly a one-person job. These jigs and spacers let builders reproduce alignments quickly and reduce the need for a second pair of hands.
Zach also leans on a hinge guide and purpose-made spacers to keep door and drawer gaps consistent, and the same stacking approach can be adapted to fit different saw models or alternate drawer slide lengths. Those small process choices make the plan adaptable for different tools and shops.
Why this table matters
The value of this build is its combination of durability, storage, and workflow thinking—nothing superfluous, just practical solutions that reduce friction while cutting and building. For shops that need a single, permanent workstation that accommodates large material and stores frequently used items, this table consolidates several functions into one footprint.
Techniques used here—laminated legs, inset platforms, spacer-based slide installs, and a dedicated offcut system—are broadly useful and can be applied to other shop furniture and stations. Adapting the spacing or finishes lets builders make a version that suits personal tools and aesthetics.
Get Zach’s plans here: https://www.bearmountainbuilds.com/products/miter-saw-station

Matt’s Take
These are my personal thoughts and tips based on my own experience in the shop. This section is not written, reviewed, or endorsed by the original creator of this project.
The laminated 2x framing approach Zach uses here is rock-solid and surprisingly forgiving. When you’re gluing up dimensional lumber into thicker legs and rails, those inevitable bows and twists in the boards get pulled straight during assembly. It’s a great technique for shop furniture where you need strength but don’t want to spring for expensive hardwood or heavy plywood.
That stacking method for drawer slides is pure gold. I’ve seen too many builders struggle with getting slides parallel, especially on longer runs. Using spacers to build up from a reference surface eliminates the guesswork and makes installation way faster. The same principle works for any hardware that needs to be aligned—think door hinges or cabinet hardware.
The dust collection integration is smart workflow design. Having that automated switch means the vacuum only runs when you’re actually cutting, which saves your ears and extends the motor life. Just make sure your shop vac can handle the startup load of both tools firing up together—some older vacuums don’t play well with the power draw of a miter saw starting up simultaneously.
This kind of multi-function station really pays off in smaller shops where every square foot counts. The combination of storage, dust control, and extended cutting capacity turns a basic miter saw into a complete crosscut workstation without eating up half your shop floor.