This project was built and designed by Connor from Shopfix.
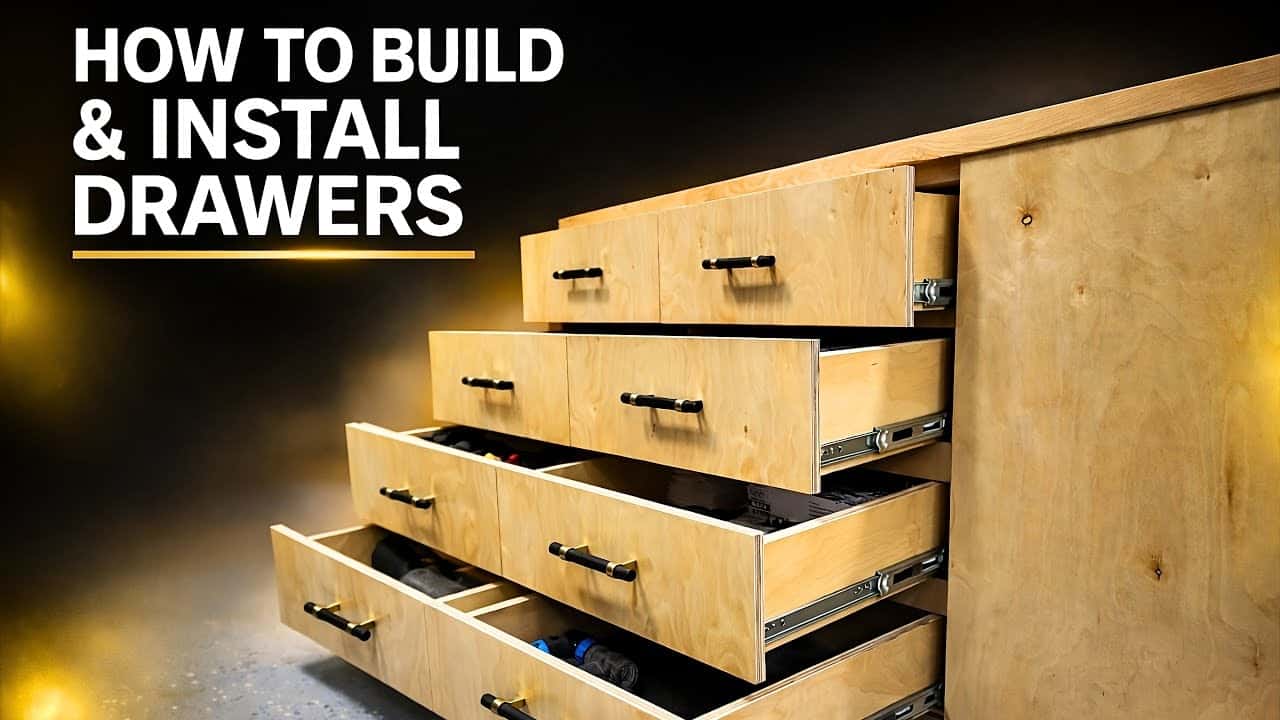
The build focuses on strong, repeatable drawer construction for a frameless cabinet using full-extension slides and plywood drawer boxes. The approach balances simple shop tricks with reliable joinery to create drawers that run smoothly and stand up to heavy use.
Watch the full video and subscribe to Connor’s channel:
Design and Intent
The cabinet is built as a faceless unit so the drawer slides mount directly to the cabinet sides for a clean, minimal look. The design emphasizes tight reveals and matched drawer faces for a professional aesthetic that still works in a busy shop environment.
The goal was durability and serviceability rather than fancy joinery, enabling easy replacement of bottoms and long-term reliability. Small details—like consistent spacing and easy access for screws—were prioritized to keep future maintenance simple.
Lumber Prep and Drawer Bottoms
Parts were ripped and dado grooves cut to accept removable drawer bottoms, allowing the bottoms to be replaced if they wear out. Notching the drawer backs where the bottom slides in prevents binding and makes assembly and future replacement straightforward.
Keeping parts organized and labeled after ripping and dadoing is a small habit that pays off when building multiple identical boxes. The approach favors repeatability over single-piece perfection so all boxes fit uniformly.
Joinery and Box Assembly
Pocket holes are the primary joinery used for the drawer boxes, combined with clamps and 90° assembly jigs to ensure square assemblies. Using pocket screws allows fast, strong joints while keeping the outside faces clean once the drawer faces are applied.
Once the box is assembled, additional screws through the bottom into the back panel lock the parts together and add long-term rigidity. The result is a simple but rock-solid box that handles shop wear without fuss.
Installing Slides — The Spacer Block Trick
Instead of fiddly jigs, a stack of spacer blocks sets slide height consistently and quickly along the cabinet sides. Resting the slides on these blocks eliminates measuring for each slide and produces perfect alignment every time.
Slides are mounted slightly back from the cabinet edge so drawers close tight against the face frame, and the layout on one side is duplicated on the other to keep things square. This method is low-tech, fast, and repeatable for multi-drawer builds.
Fitting Drawers Without Stress
To set consistent gaps between drawer faces, scrap boards stacked on the previously installed drawer act as shims to set drawer height. A temporary board clamped across the cabinet front creates a register surface so each drawer can be pushed flush and secured accurately.
Screws are driven progressively through the slide holes—front, middle, then rear—so nothing needs to be held awkwardly while fastening. This sequence makes installation smooth and avoids fighting gravity or hard-to-reach angles.
Drawer Faces and Hardware Alignment
Cutting all drawer faces from the same sheet of plywood and keeping them in order produces an excellent grain match across the cabinet. Each face is trimmed to leave a deliberate shadow line between drawers, which preserves the matched look while maintaining clarity between parts.
Hardware placement is handled with a consistent jig and a drilling guide for perfectly square holes, and the handle fasteners are used to temporarily hold and fine-tune face position. Allowing a small bit of wiggle room in the screw holes makes final alignment forgiving while the faces are permanently secured.
Drawer Interior and Mats
Custom drawer mats were cut using a wooden template clamped beneath the liner so a razor can trim the mat cleanly against the edge. This simple jig produces crisp, curl-free liners that look finished and keep tools from sliding or scratching the bottom.
Fit-and-finish inside the drawer matters just as much as the outside in a shop environment, and adding liners is a small upgrade that improves usability and longevity. The same template method can be reused for any drawer size to produce consistent interiors.
Why This Build Matters
This drawer method emphasizes practical, repeatable techniques that are accessible in a small shop while still delivering professional results. The combination of dado bottoms, pocket-hole boxes, spacer blocks for slides, and matched faces produces drawers that are serviceable, adjustable, and visually cohesive.
These ideas translate easily to kitchen cabinets, garage storage, or workstation builds and can be adapted to different materials or slide types. The emphasis on serviceability and alignment helps avoid future headaches and makes the build usable for years to come.
Please support Connor by visiting his website: https://www.shopfix.services/.

Matt’s Take
These are my personal thoughts and tips based on my own experience in the shop. This section is not written, reviewed, or endorsed by the original creator of this project.
Pocket hole joinery really shines in drawer construction like this. The joints are strong enough for daily use, and since the screw holes are hidden on the inside faces, you get clean exterior surfaces for the drawer faces. Just make sure your pocket screws are the right length — too long and they’ll poke through, too short and you won’t get a solid bite into the adjoining piece.
That spacer block method for mounting slides is genius and saves so much time over measuring each position. I keep a set of various thickness scraps specifically for this kind of setup work. The key is making sure your spacer blocks are dead flat and consistent thickness, otherwise you’ll end up with drawers that don’t align properly. A quick pass through the planer on your spacer materials pays dividends.
The removable bottom approach is smart for shop drawers that see heavy use. Dados for the bottom panel add a lot of strength compared to just screwing or nailing the bottom on, and being able to slide out a worn bottom for replacement extends the drawer’s life significantly. When cutting those dados, a sacrificial fence on your table saw helps prevent tearout on the drawer sides.
Custom drawer mats might seem like overkill, but they make a real difference in how tools sit and slide around. That template method works great — just make sure your razor blade is sharp to avoid tearing the liner material. A dull blade will pull and create ragged edges that look unprofessional.