Jodee from Inspire Woodcraft shared the woodworking tip featured in this video.
The video demonstrates what a sliding T-bevel (also called a bevel gauge or false square) is, how it’s used for copying and transferring angles, and a few practical shop techniques for getting the most from one.
Watch the full video and subscribe to Inspire Woodcraft:


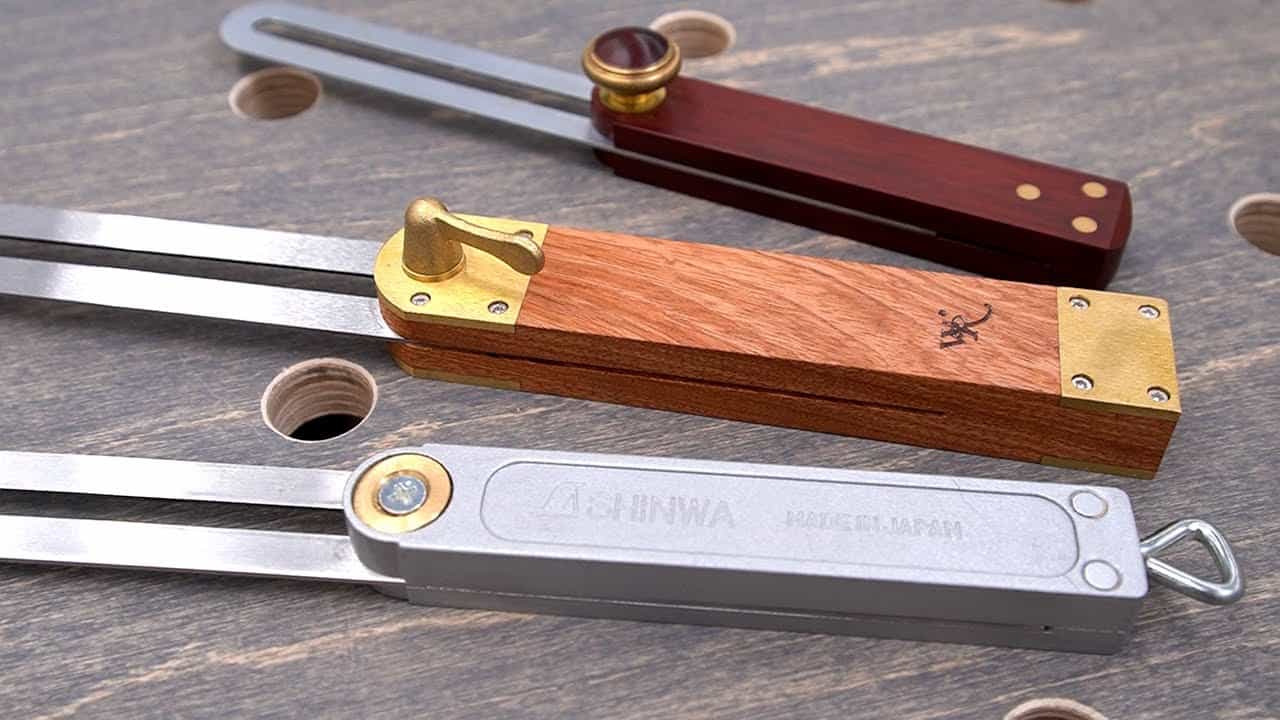
What a Sliding T-Bevel Is
A sliding T-bevel is a simple, inexpensive marking and measuring tool made of a stock and an adjustable blade that pivots and slides to any angle. It does not usually have graduations; instead it functions as a “dummy” or reference tool to copy and transfer angles.
How to Use It
The basic use is like a square: hold the stock against the workpiece edge and strike a line along the blade to mark an angle. If the blade is shorter than the line you need, a straightedge can be held against the blade to extend the marking length.
Locking Styles and Practical Differences
There are two common locking styles: a knob or screw on the side/top of the stock, and a knob on the end of the stock. Side or top locks are usually easier to access and quicker to tighten, which helps during frequent adjustments.
An end-mounted knob can be slightly trickier to tighten but is useful when the user wants to flip the tool and use both faces without the knob interfering with the workpiece.
Copying and Setting Angles
One of the T-bevel’s biggest strengths is that it can be set to any angle, not just fixed angles like 90° or 45°. This makes it ideal for duplicating an existing angle directly from a part, such as copying the angle where an apron meets a table leg so the mitered pieces match perfectly.
For setting the bevel to a known angle, a protractor or a trusted miter gauge can be used as a reference: hold the bevel’s blade against the protractor head or the miter gauge, register the angle, then tighten the bevel to lock it in place.
Practical Shop Tips
Because a sliding T-bevel doesn’t rely on printed graduations, sometimes “not measuring” and simply matching surfaces can be the most accurate approach for joinery and layout. Copying the angle in place and transferring it to the cutting tool helps ensure fit between mating parts.
Choose the locking style that fits the way one works in the shop, keep a straightedge handy to extend lines, and use a reliable miter gauge or protractor when a repeatable, set angle is required for multiple parts.
Why This Small Tool Matters
The sliding T-bevel is a low-cost, versatile tool that solves many everyday layout problems without needing complex measuring instruments. Its ability to copy and transfer angles quickly makes it an indispensable companion for both simple projects and more refined joinery.
Jodee’s overview highlights that with a few simple techniques the tool can improve accuracy and speed during layout and setup, and it adapts easily to different workflows in the shop.
Support Jodee by visiting his online store here: https://inspirewoodcraft.com/collections/all.

Matt’s Take
These are my personal thoughts and tips based on my own experience in the shop. This section is not written, reviewed, or endorsed by the original creator of this project.
This is one of those tools that seems almost too simple to be useful until you actually start using it regularly. The sliding T-bevel really shines when you’re dealing with compound angles or irregular shapes where your standard squares just won’t cut it. I keep mine within arm’s reach of my main workbench because it comes in handy for so many unexpected situations.
The point about not measuring is spot-on and worth emphasizing. Sometimes the most accurate way to achieve perfect joints is to bypass the numbers entirely and work directly from the actual pieces. This is especially true when dealing with older lumber that might have warped slightly or when working with live-edge pieces where the angles aren’t perfectly consistent.
If you’re shopping for one, the locking mechanism really does matter for workflow. I’d lean toward the side-mounted locks for general use since you’ll be adjusting it frequently. Also worth noting that the blade quality varies quite a bit between manufacturers – look for one with a blade that stays put when locked and has clean, straight edges for accurate marking.
For around $15-25, it’s hard to think of another tool that adds this much versatility to your layout arsenal. Once you get comfortable using it as a reference tool rather than a measuring device, you’ll wonder how you managed without it.