This technique was demonstrated and tested by Jodee from Inspire Woodcraft.
It’s a clever and simple upgrade that uses a permanent scribe line on your table saw to speed up everyday tasks like trimming, duplicating, and setting up angled cuts—without relying on lining up directly to the blade teeth.
At first, it seems like changing blades would make the line inaccurate.
But after real-world testing, Jodee found the difference between thin- and full-kerf blades is smaller than most woodworkers think—especially when it comes to the edge that actually matters for alignment.
Watch the full video and subscribe to Jodee’s channel:


What the Scribe Line Does
The idea is to mark the leftmost edge of your most-used blade directly onto your saw’s tabletop. That line becomes a quick reference for setting up cuts without bringing the stock to the blade each time.
Whether trimming multiples to length, duplicating a part, or aligning a layout mark on an angle, the scribe line acts as a repeatable visual and tactile guide. It works especially well for production-style setups where speed and accuracy both matter.
The Common Concern: Blade Swaps Break Accuracy
The usual argument against this trick is that different blades have different widths. If you mark your saw using a thin-kerf blade, wouldn’t swapping in a full-kerf one move the cut?
That’s a fair question—but Jodee’s testing shows it’s mostly unfounded. The trick is to scribe the line based on the plate edge, not the tips of the teeth. This small detail makes a big difference in how reliable the method is across blades.
Real-World Testing Across Blade Types
Instead of relying on theory, Jodee tested multiple blades in actual cutting scenarios: thin kerf, full kerf, even a dado stack. He made fine pencil lines on plywood and performed cuts with each blade, aligning only to the scribe line.
The results? Almost all blades cut exactly along the line, with only tiny deviations. Even switching between blade types didn’t meaningfully shift the cut location. The biggest outlier—a rip blade with aggressive teeth—wasn’t the kind typically used in these setups anyway.
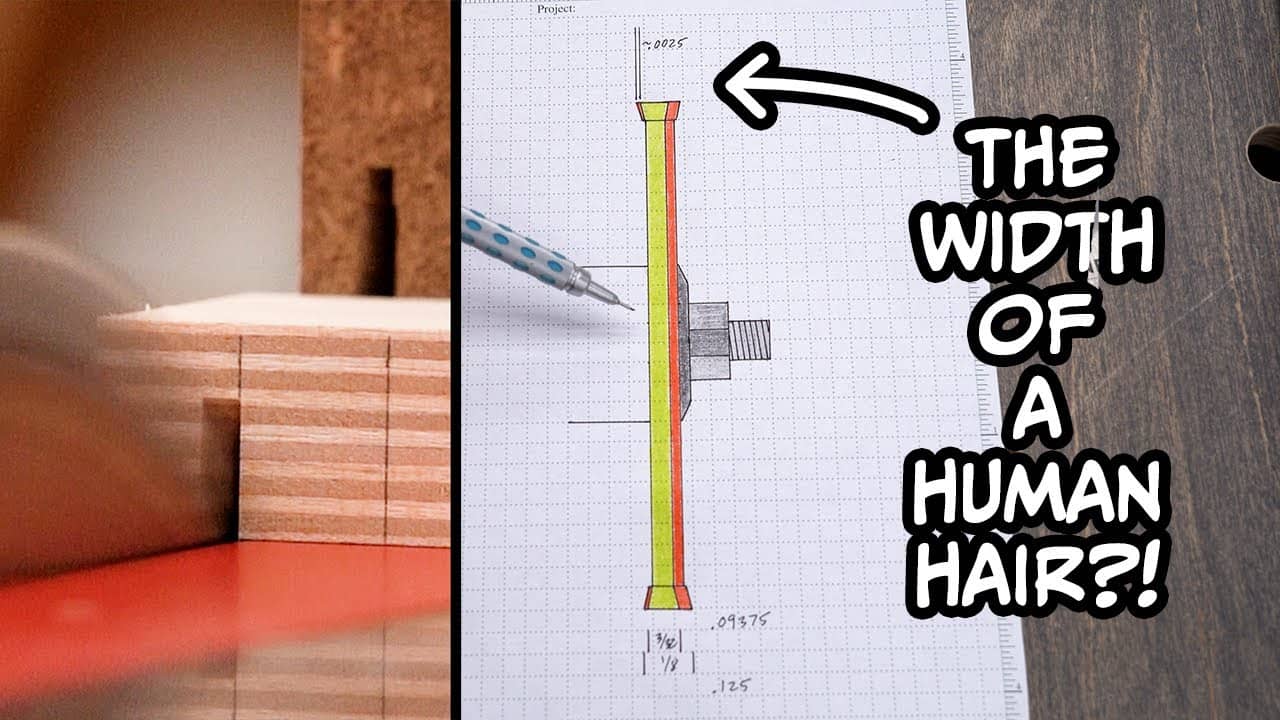
The Measured Difference Is Tiny
To put hard numbers to the test, Jodee used clamped blocks and setup pieces to measure how far the cuts actually shifted between blade types. The result was a difference of just a few thousandths of an inch—about the thickness of a human hair.
In a woodworking context, that kind of variation is smaller than what you’d get from blade runout, fence drift, or wood movement. So the concern about accuracy when switching blades is mostly theoretical unless you’re doing ultra-precise joinery.
Why It Works: Understanding Blade Geometry
The trick’s reliability comes down to how blades mount. Whether you’re using a thin-kerf or full-kerf blade, the left side of the plate tends to stay in the same spot on the arbor.
What varies more dramatically is the width of the teeth, but since the scribe line is set to the plate’s edge, those changes don’t significantly affect where the cut begins. In most cases, the left edge of the blade plate becomes a surprisingly consistent reference.
Best Ways to Use the Scribe Line in Your Shop
This one line can speed up a lot of everyday tasks. Jodee points out several specific uses:
- Trimming parts to length: Use a stop block and align to the scribe for repeat cuts.
- Duplicating pieces: After cutting one, butt it up to the next and use the line to position it.
- Angle work: Align layout marks to the scribe line when direct blade sight is blocked.
- Quick setups: For simple cuts that don’t need stop blocks or jigs, use the scribe for rapid alignment.
It’s not a replacement for precision tools, but it saves time on tasks that don’t require ultra-tight tolerances.
A Few Things to Keep in Mind
There are cases where this technique might not apply perfectly. For example:
- Aggressive rip blades or extra-wide tooth profiles may cut slightly off the line.
- Improperly mounted blades or poor saw alignment can introduce more error than the kerf difference.
- Calibrated joinery work may still benefit from a test cut, especially if using new blades or unfamiliar material.
But in most shops, for 90% of tasks, the time savings and repeatability are well worth it.
Alternatives if You Don’t Want a Permanent Line
If marking the saw top isn’t for you, there are other ways to get the benefit:
- Use a clamp-on reference bar you can remove.
- Create a blade-edge jig that rides in the miter slot.
- Rely on stop blocks and setup blocks to position your work consistently.
Each of these has its pros and cons, but none offer the immediate visual feedback of a permanent scribe.
Final Thoughts
Jodee’s experiments show that the left-edge scribe line is more consistent across blades than many woodworkers assume.
The actual difference between thin- and full-kerf blades at the plate edge is tiny—and unlikely to throw off most cuts.
For repetitive trimming, duplication, and quick layout alignment, this is a five-minute upgrade that pays off every day in the shop.
Support Jodee by visiting his online store here: https://inspirewoodcraft.com/collections/all.

Matt’s Take
These are my personal thoughts and tips based on my own experience in the shop. This section is not written, reviewed, or endorsed by the original creator of this project.
This scribe line technique is one of those simple shop tricks that makes you wonder why you didn’t think of it sooner. The key insight here — marking to the blade plate rather than the teeth — is what makes it work so consistently. Most woodworkers instinctively think about kerf width when they hear “blade difference,” but the plate positioning is what really matters for this application.
From a safety perspective, having that visual reference can actually reduce the need to lean over and peer directly at the blade while positioning stock. You’re working with a clear line on the table surface instead of trying to eyeball alignment with spinning carbide teeth. Just remember that this technique works best for through-cuts where you’re establishing the starting position — it’s not meant for stopped cuts or precise joinery work.
The testing methodology here is solid too. Rather than getting caught up in theoretical measurements, actually cutting test pieces and comparing results gives you real-world data. That few-thousandths difference between blade types falls well within normal shop tolerances. For context, most of us are dealing with seasonal wood movement that’s 10-20 times larger than this blade variation.
If you’re hesitant about marking your saw top permanently, try it first with a piece of painter’s tape. You’ll quickly see how often you reference that line during a typical shop session, and then you can decide if the permanent version is worth it.