This project was built and designed by Clinton from Specific Love Creations.
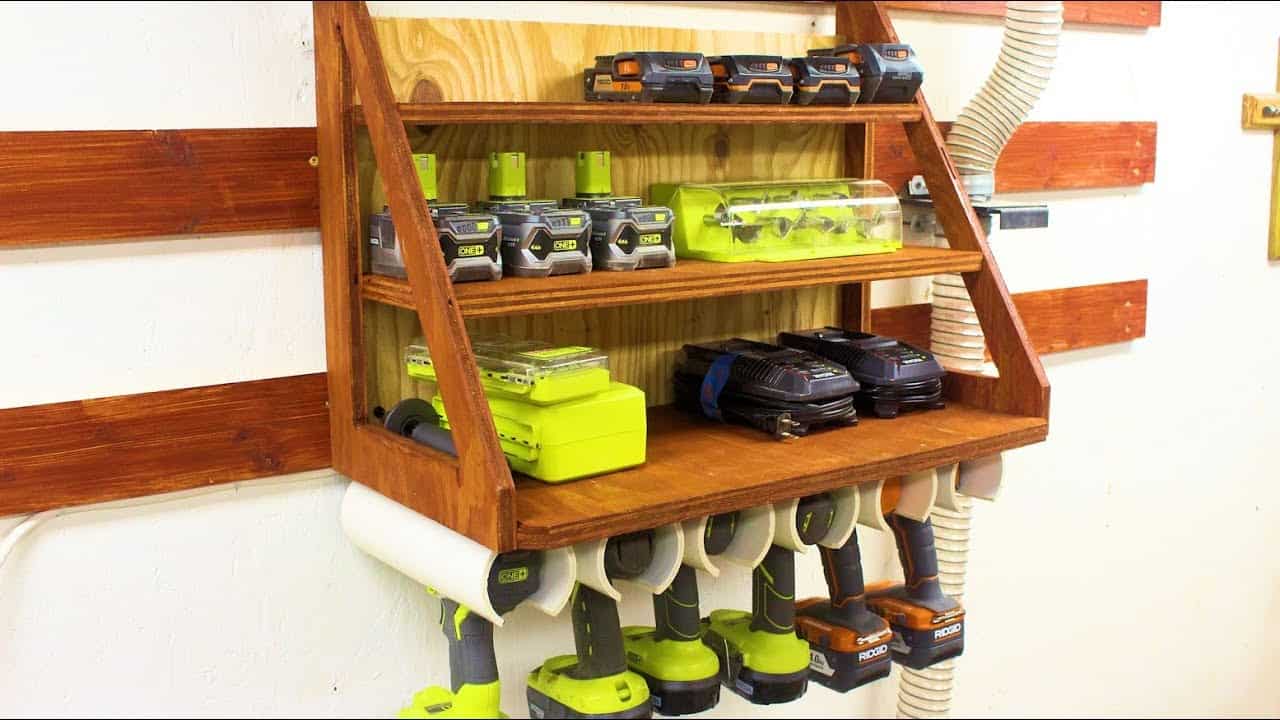
It’s a wall-mounted charging station and storage rack designed to clear up clutter and organize cordless drills, chargers, and batteries.
The build attaches to a French cleat wall, making it removable and repositionable while keeping the workbench clear. With room for multiple chargers, drill holders, and storage shelves, it’s a smart upgrade for any shop setup.
Watch the full video and subscribe to Clinton’s channel:
Why a Charging Station Makes Sense
Cordless tools are convenient, but their chargers and batteries quickly take over work surfaces.
Clinton built this unit to reclaim his bench space and keep everything organized, visible, and off the floor.
By mounting the system on a French cleat wall, it stays secure yet removable. The layout makes it easy to grab the right battery or tool mid-project without digging through drawers.
Materials and Design Overview
The charging station is made from plywood, PVC pipe, and standard hardware. The interior layout includes shelf cutouts for chargers, vertical holders for drills, and open space behind the shelves for cord management.
PVC sleeves hold drills upright and tolerate wear well. Cutouts are sized to keep chargers stable while leaving room to remove batteries easily.
Building the PVC Drill Holders
PVC pipe is cut into short lengths to create upright sleeves for each drill.
These are installed through holes drilled in the wooden shelf using a Forstner bit or step-drilling technique.
To keep the round pipe steady, Clinton uses a V-block made from scrap wood. Tape adds friction if the pipe still shifts while drilling.
Drill slowly and back off if the pipe begins to spin or bind. A safe setup makes cleaner cuts and reduces the chance of tool kickback.
Cutting and Assembling the Frame
The main structure is built from plywood panels cut to fit Clinton’s wall space. The back panel remains natural for contrast, while the shelves are stained to stand out.
Side panels are marked and drilled for the internal shelves and PVC sleeves.
For rounded cutouts, Clinton drills small pilot holes at each corner and uses a jigsaw to finish the opening.
Sharp inside corners are avoided to reduce stress in the plywood. Round edges are not only stronger but also easier to sand and clean.
Shop Safety Reminder
While cutting plywood on the table saw, Clinton had a close call due to a missing splitter. The board tried to kick back but was caught in time.
This moment reinforces the importance of using all safety features on power tools. Always install riving knives, use push sticks, and never rush a cut.
Staining and Prepping for Assembly
Each piece is lightly sanded and then stained to match the shop’s aesthetic.
A light coat keeps the wood grain visible and makes it easier to spot tools or cords against the back panel.
After staining, everything is left to dry fully before final assembly. This prevents smudging and makes the unit easier to handle during construction.
Smart Assembly Techniques
Assembly begins with attaching the sides to the back panel, followed by the top and interior shelves. Clinton uses pocket screws for clean, strong joints.
Pre-drilling into the PVC helps prevent splitting and makes installation smoother. Small shims are added behind the back panel to create space for cords and plugs.
Mounting with French Cleats
Two cleats are used to hang the station securely on the wall. One cleat near the top carries most of the weight, while a second at the bottom adds stability.
Clinton recommends securing the cleats into studs and using temporary nails to hold them in place while driving screws. This helps keep everything level during installation.
Final Touches and Storage Tips
Shelf spacing is measured to allow easy removal of batteries without bumping neighboring units. Internal corners are rounded wherever possible to prevent wear and chipping.
Pocket screws are used throughout for strong connections, and the order of assembly is planned so every joint remains accessible.
This reduces frustration during the final steps.
Optional Modifications
This same design can be adapted for wall-mounting without cleats using lag bolts or cabinet hangers. If you prefer custom drill holders, 3D-printed parts can replace the PVC sleeves.
Cord management can also be improved with routed cable channels or grommets. For those needing portability, handles or quick-release hardware can be added.
A Worthwhile Upgrade for Any Shop
With clutter off the bench and every drill or charger in its place, this project helps streamline workflow and protect your tools.
The French cleat setup makes repositioning easy, and the modular layout keeps everything within reach.
It’s a durable, efficient, and good-looking storage solution that anyone with basic tools and materials can build.
With thoughtful spacing, smart joinery, and visual contrast, Clinton has created a station that performs as well as it looks.
Watch the full video and subscribe to Clinton’s channel:

Matt’s Take
These are my personal thoughts and tips based on my own experience in the shop. This section is not written, reviewed, or endorsed by the original creator of this project.
French cleat systems are fantastic for shop organization because they let you reconfigure your wall storage as your needs change. Once you have the cleats mounted to studs, you can move charging stations, tool holders, and shelves around without putting new holes in the wall. It’s worth investing in quality cleat hardware since these systems will be supporting valuable tools and equipment.
The PVC sleeve approach for drill holders is really clever — it’s cheap, durable, and handles the wear from repeatedly inserting and removing tools. When drilling holes for round stock like PVC, that V-block trick makes a huge difference in getting clean cuts. You can make one in about five minutes from any scrap wood, and it’ll save you from chasing spinning pipe around your drill press.
Cord management is often an afterthought in charging stations, but it’s crucial for both safety and aesthetics. Leaving space behind the back panel for cords and plugs is smart planning. Consider adding a power strip to the back of the unit so you only need one wall outlet, and use zip ties or cord clips to keep everything tidy. Nothing ruins a clean shop look like a tangle of charger cables hanging everywhere.
That table saw kickback moment is a good reminder that safety equipment isn’t optional. Riving knives and splitters prevent way more accidents than most people realize. Even experienced woodworkers can get comfortable and skip safety steps, but kickback happens fast and can cause serious injury. Always use your guards and take your time with cuts.