This project was built and designed by Caleb from YouCanMakeThisToo. It’s a creative and functional craft table featuring a built-in shadow box and seascape design that turns a workspace into a piece of art.
With smart use of plywood, clean joinery, and a customizable decorative top, this project blends practical utility with personal style. It’s a great build for anyone looking to upgrade their creative space.
Watch the full video and subscribe to Caleb’s channel:
Starting with Plywood
The entire build begins with plywood panels, chosen for their durability and ease of use. Caleb breaks down the sheets using a track saw for clean cuts, then refines the parts with a table saw and miter saw.
When cutting the tabletop, he plans ahead by accounting for the mitered frame that will wrap around it. Referencing frame pieces directly on the tabletop helps mark accurate cut lines, ensuring the miters meet neatly during assembly.
Edge Banding for a Clean Look
To finish the exposed plywood edges, Caleb uses iron-on edge banding. This detail gives the piece a more polished, furniture-grade appearance and helps protect the corners from chipping.
After applying the banding, he trims the excess with a chisel, preferring that over typical edge banding tools. A quick sanding with 220-grit paper smooths everything out before moving on.
Pocket Holes for Strong Joints
Pocket holes are drilled throughout the project to join panels and cubby sections together securely. Caleb uses a drill/driver and a pocket hole jig, making quick work of the joinery prep.
Pre-assembly of the cubby units begins once the holes are in place. Starting with these subassemblies gives structure to the piece and speeds up the final build process.
Building the Shadow Box
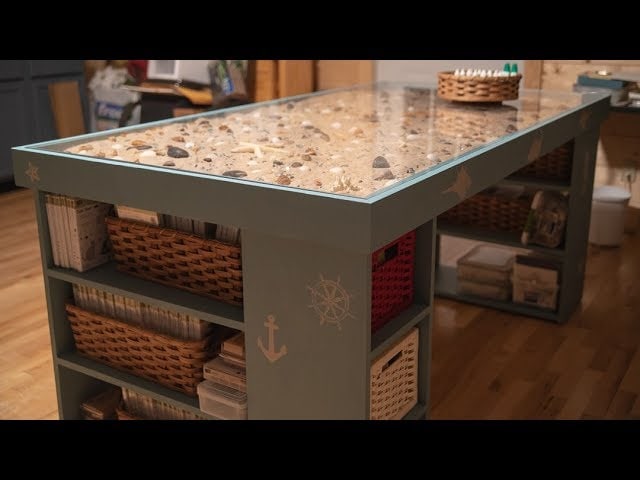
One of the standout features of this craft table is the built-in shadow box top. This decorative element sits just beneath a layer of Plexiglas and can be personalized in endless ways.
To support the Plexiglas, Caleb installs inner rails that sit flush beneath the tabletop surface. A scrap piece of wood cut to the same thickness as the Plexiglas helps with consistent spacing during layout.
Two types of rails are used: mitered outer pieces for framing and flat inner pieces to hold the glass and artwork. These are measured precisely, with small adjustments made to the ends to account for overlapping corners.
Filling Gaps and Prepping for Paint
After the shadow box is in place, any visible seams or gaps are filled with wood filler. This step ensures clean transitions between pieces, especially where miters meet.
Sanding follows once the filler has dried. Caleb uses a wide putty knife and fine-grit paper to smooth over any imperfections and prep the surface for paint.
Painting Before Assembly
Painting before final assembly helps achieve a better finish, especially in tight areas like shelf cubbies. Each piece is coated individually before being joined together, avoiding brush marks in corners.
Caleb starts the assembly with the underside of the table, securing the cubbies, leg panels, and shelf sections using pocket screws. Spacer blocks help keep everything aligned and level during installation.
Final Assembly and Attachment
With the base complete, the shadow box top is secured in place. The fit is tight and flush, creating a seamless connection between the upper and lower sections.
At this point, any seams or joints that were disturbed during assembly are touched up with more filler and sanded one last time. These final steps ensure the table looks just as good as it functions.
Decorating the Seascape
The top of the shadow box is decorated with a beach scene, bringing a relaxing and creative atmosphere to the workspace. This can be painted, stenciled, or filled with various materials depending on the user’s style.
The Plexiglas panel is then placed over the artwork and secured with the surrounding frame. This creates a durable, flat surface that protects the design while still letting it shine through.
Functional and Personalized
This table is a great example of how thoughtful design can turn a basic utility piece into something personal and inspiring. The shadow box element provides space for artwork, collections, or seasonal themes—whatever fuels your creativity.
Best of all, the structure is solid, the materials are easy to source, and the steps are simple enough for intermediate builders to follow. With some patience and creativity, anyone can build a version of this table tailored to their space.
Please support Caleb by visiting his website: https://www.ycmt2.com/.

Matt’s Take
These are my personal thoughts and tips based on my own experience in the shop. This section is not written, reviewed, or endorsed by the original creator of this project.
The shadow box feature really sets this build apart from your typical craft table. Getting those inner rails positioned perfectly is crucial — even small misalignments will show when you drop in the Plexiglas. I appreciate how Caleb uses a spacer piece cut to match the glass thickness. That kind of methodical approach prevents headaches later when everything needs to fit together seamlessly.
Edge banding makes a huge difference on plywood projects like this. It’s one of those details that separates a shop project from furniture-quality work. Iron-on banding is forgiving for beginners, but take your time with the trimming. A sharp chisel works great, but a small block plane can give you even more control if you have one handy.
Painting before final assembly is smart thinking here. Getting a brush into those cubby corners after everything’s screwed together would be a real pain. Just be careful with your pocket screw locations — you don’t want to drill through fresh paint when you’re putting everything together. A little painter’s tape over screw holes during the paint process can save you some touch-up work.
The beauty of this design is how customizable that shadow box becomes. Beach scenes work great, but you could just as easily do seasonal displays, family photos, or even collections of small objects. Just remember that whatever you put in there needs to be relatively flat to avoid creating pressure points against the Plexiglas.