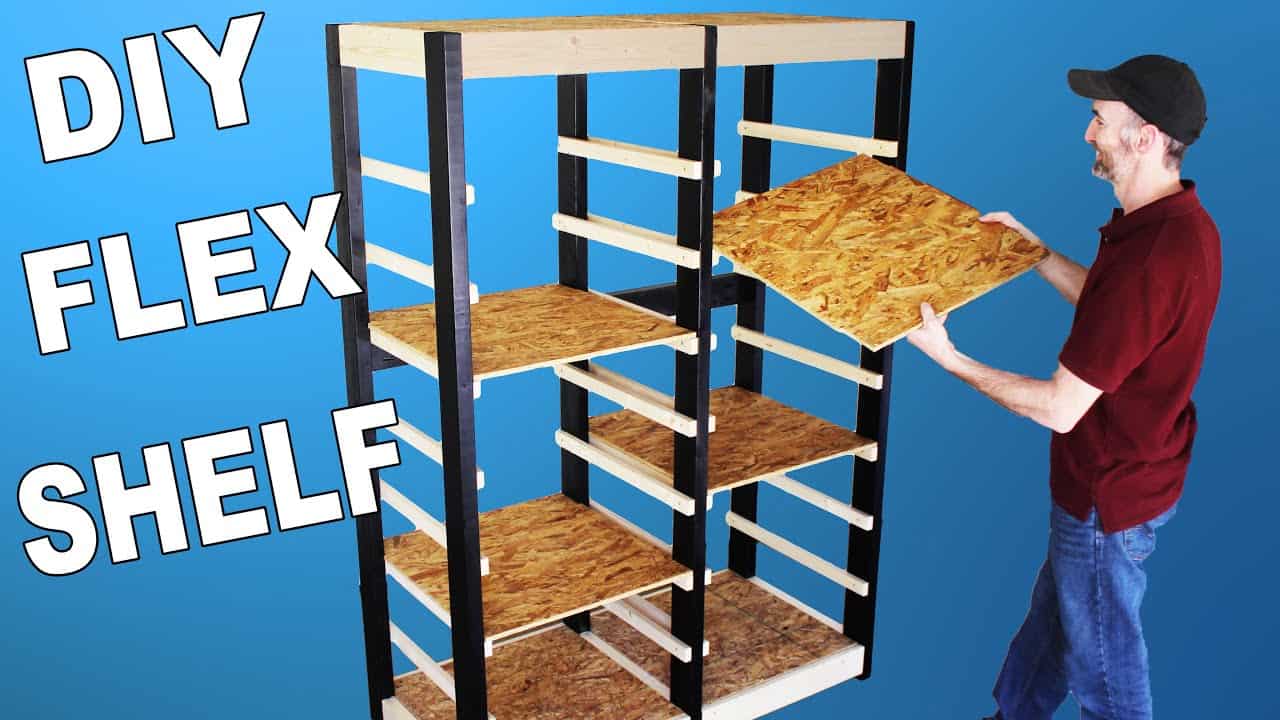
This project was built and designed by Clinton from Specific Love Creations. It’s a practical and cost-effective shelving solution designed to help maximize garage or basement storage without the expense of pre-built units.
These shelves are fully adjustable and customizable, making them perfect for storing everything from tools and totes to pantry items and seasonal gear. The project is beginner-friendly and built using affordable, easy-to-find materials.
Watch the full video and subscribe to Clinton’s channel:
Why Make Your Own Garage Shelves?
Off-the-shelf storage units are often limited in size and adjustability. Many are only three to four feet wide and five to six feet tall, which may not suit every home or workspace.
By building your own shelves, you can control the height, spacing, and width of each section to match exactly what you plan to store. The adjustable design also means you can modify shelf heights in the future as your needs change.
Selecting Materials That Work
For this build, Clinton uses basic 2×4 lumber and OSB sheets—affordable, strong, and readily available at most home improvement stores. These materials provide the structural strength needed for heavy storage without inflating the overall project cost.
Plywood is another option for those seeking a cleaner finish, but OSB remains a budget-friendly favorite for utility shelving. Whichever material you choose, make sure it’s rated for the weight you intend to store.
Cutting and Assembling the Frame
The build begins with preparing the vertical legs of the shelf unit. Clinton cuts these to about six feet in length, though this can be adjusted to fit your ceiling height and available space.
Once the legs are ready, horizontal frame pieces are cut and attached between them. Pocket screws are used for strong, clean joints. These frame pieces serve as the top and bottom rails that hold everything square and stable.
It’s helpful to install the bottom rails slightly inset to allow the shelving unit to sit flat on uneven concrete or garage floors. Keeping the frame level at this stage will save time later when installing shelves.
Installing Shelf Supports
Next, horizontal shelf supports are added between the legs at each level. These can be made from trimmed-down 2x4s or 1×2 furring strips, depending on the look you’re going for.
The spacing between each set of supports is entirely up to you. Clinton leaves room for large bins and smaller compartments by placing the supports at various heights, giving the unit a versatile layout.
Cutting and Fitting the Shelves
Once the supports are installed, it’s time to cut the shelves. OSB is used for the surface itself, cut into sections to match the width and depth of the frame.
To help the shelves sit flush, notches are cut out at each corner to accommodate the vertical legs. This makes the shelves sit snugly in place and helps prevent shifting when items are placed on top.
You may need to sand the edges of OSB panels slightly, as they can be rough or splintery. This not only makes handling safer but improves the look of the finished product.
Optional Bracing and Finishing Touches
To reinforce the shelving unit, Clinton adds mid-height bracing between the legs. This extra layer of support reduces any potential wobble and helps the structure remain rigid under heavy loads.
If appearance matters—especially for basement or utility room installations—you can add a thin veneer or trim piece along the shelf fronts for a more polished look. While optional, these finishing touches help transform a basic storage rack into something much more refined.
Rubber feet or scrap wood pads can be added to the bottom of the legs to raise the shelf slightly off the floor. This protects it from minor moisture exposure and makes leveling easier.
Affordability and Accessibility
The total cost of materials for this project comes in around $50, making it far less expensive than most pre-built shelving kits. The use of OSB and standard 2x4s means no specialty supplies are needed.
All materials can be sourced from local home improvement stores, and the entire project can be completed with just a few common tools—ideal for weekend woodworkers or first-time builders.
What Worked Well (and What Didn’t)
Clinton appreciated how affordable and accessible this project was from start to finish. Being able to adjust shelf spacing made it easy to organize a variety of items without sticking to a fixed layout.
One minor downside was the behavior of OSB during cutting. It tends to splinter, which can leave messy edges or minor hazards. A quick sanding pass solves this issue, though it does add an extra step to the process.
A Flexible Storage Solution for Any Space
This garage shelf project is a perfect example of how simple materials and basic tools can lead to a big improvement in home organization. It’s practical, strong, and can be adjusted as your storage needs evolve.
For anyone tired of digging through clutter or dealing with poorly fitting store-bought units, this DIY option delivers on both function and flexibility.
Watch the full video and subscribe to Clinton’s channel:

Matt’s Take
These are my personal thoughts and tips based on my own experience in the shop. This section is not written, reviewed, or endorsed by the original creator of this project.
Clinton’s shelving system hits that sweet spot of being both budget-friendly and genuinely useful. The adjustable design is smart — you can start with one configuration and change it up later when you inevitably accumulate different sized stuff. That flexibility alone makes this approach worth considering over fixed commercial units.
Working with OSB can be tricky for beginners since it does like to splinter and chip out. A sharp blade in your circular saw helps, and scoring your cut line with a utility knife beforehand can minimize tearout on the top surface. If you’re cutting with a jigsaw, go tape-first on your cut line. Safety glasses are extra important with OSB since those chips can really fly.
The pocket screw approach for the frame joints is solid — they pull tight and create strong connections without complicated joinery. If you don’t have a pocket hole jig yet, this might be the project that justifies getting one. Just remember to drill your pilot holes or you’ll split those 2×4 ends every time.
For anyone thinking about scaling this up or down, the basic principle works at any size. The key is keeping those vertical legs properly spaced for your shelving material and making sure you’ve got adequate support underneath heavier loads.