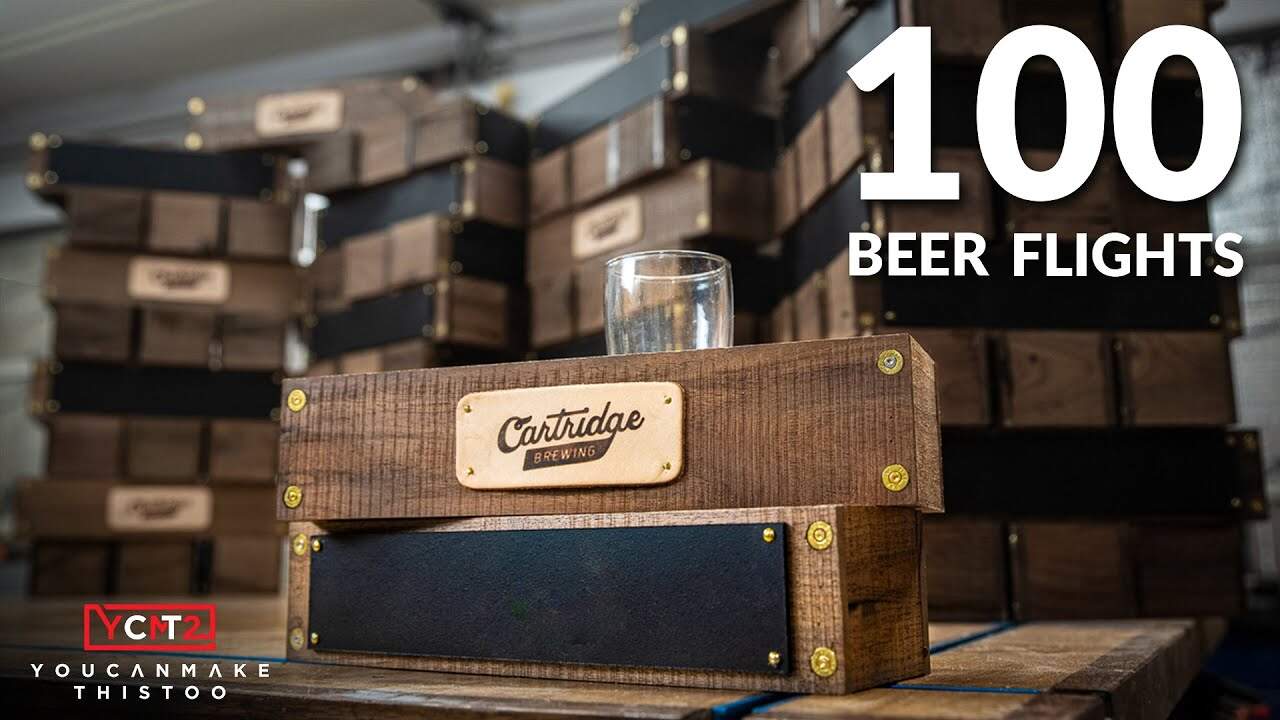
This project was built and designed by Caleb from YouCanMakeThisToo. It’s a unique take on beer flight trays, combining solid walnut, brass accents, leather branding, and chalkboard labeling to create a functional and refined product.
Designed with both aesthetics and durability in mind, these boxes are tailored for brewery use but would look just as good at home. The combination of smart joinery and custom details shows how woodworking can elevate even small builds into something truly memorable.
Watch the full video and subscribe to Caleb’s channel:
Starting with Solid Materials
Caleb chooses solid walnut for this build—a material known for its strength and rich grain. Though the boards are rough and contain some knots, they add character while still offering stability once properly milled.
Before any cutting begins, the boards are skip-planed to remove surface defects and highlight the grain. This step helps identify flaws and ensures each board is ready for layout and cutting.
Breaking Down the Boards
The walnut is cut into manageable lengths using a miter saw. A stop block is used for consistency, ensuring all sides of the box will fit together cleanly.
If a board doesn’t need immediate trimming, Caleb leaves it slightly longer. This provides room for adjustments later and helps avoid waste if slight changes are needed mid-build.
Creating the Blanks
The next step is to prepare blanks for the box sides and bottoms. Each cut is checked for squareness, and any weak spots in the wood are trimmed out.
The inside faces of the blanks are pre-finished using a fast-drying spray finish. This technique speeds up production by allowing multiple coats before assembly, keeping the workflow efficient.
Joinery and Reinforcement
For the box construction, rabbet joints are used to join the sides and bottoms. These joints are easy to batch out and offer plenty of glue surface for strength.
To add a personal touch, each corner is reinforced with once-fired 9mm brass casings. These inserts provide not only a unique visual feature but also added mechanical support.
The joints are glued and reinforced with epoxy before being tacked with pin nails. Jigs help hold the parts square during assembly, and having an extra set of hands helps keep things moving smoothly.
Sanding and Outer Finish
Once the boxes are fully assembled, rough sanding removes any inconsistencies and levels the surfaces. Sanding is reserved for after the glue-up to reduce handling and keep edges aligned.
The same spray finish used earlier is applied to the exterior, providing a durable and consistent topcoat. A sprayer speeds up this process significantly while ensuring full coverage.
Functional Additions
Each beer flight box holds a set of glasses, so recesses are drilled into the bottom to keep the glasses in place. Caleb uses a custom jig to drill these holes accurately and efficiently across multiple boxes.
This small detail turns the box into a truly usable serving piece. It also adds a layer of professionalism that sets it apart from more basic designs.
Branding and Visual Identity
One of the project’s most eye-catching features is the custom leather badge on each box. Caleb uses pre-cut leather blanks and a heated branding iron to imprint the logo.
The badges are carefully aligned and attached, giving each box a polished, branded appearance. It’s a subtle detail that adds personality and reinforces the handmade nature of the product.
Finishing Touches and Chalkboards
Before wrapping up, Caleb adds a chalkboard strip to the front of each box. This allows servers to write the names of each beer in a flight—a simple, practical touch that enhances the user experience.
It also adds a visual balance to the overall design, combining rustic charm with clean lines and utility.
Final Inspection
Each completed box is checked for tight joints, clean finish, and accurate hardware placement. Since these are destined for commercial use, quality control is especially important.
The end result is a small product that feels substantial, both in build and design. Caleb’s attention to detail and efficient workflow make this a great example of combining craftsmanship with practical production.
Please support Caleb by visiting his website: https://www.ycmt2.com/.

Matt’s Take
These are my personal thoughts and tips based on my own experience in the shop. This section is not written, reviewed, or endorsed by the original creator of this project.
What really stands out about this build is how Caleb approaches it like a small production run rather than a one-off project. Pre-finishing the inside faces before assembly is a smart move that saves time and ensures consistent coverage in those hard-to-reach spots. Using jigs for the glass recesses and having all his processes dialed in shows the kind of thinking that separates efficient shops from chaotic ones.
The brass casing reinforcements are a brilliant touch that goes beyond just looking cool. Corner joints take the most stress on boxes like these, especially in commercial use, so adding that mechanical reinforcement makes real sense. The leather branding elevates the whole piece from “nice woodwork” to “professional product” — sometimes it’s those finishing details that make all the difference.
For anyone thinking about similar projects, that chalkboard strip is pure genius. It turns the flight box from just a holder into an interactive serving piece that actually helps the staff do their job. These kinds of functional details are what separate amateur builds from pieces that really work in the real world.