This project was built and designed by Billy from Newton Makes. It’s a modern, layered picture frame that combines function with style, using Maple and Walnut to create bold contrast and visual interest.
Unlike most standard frames, this one features overlapping components and a patterned front detail that gives it a sculptural, one-of-a-kind look. It’s a great weekend project that highlights both precision and creativity in woodworking.
Watch the full video and subscribe to Billy’s channel:
Why This Frame Stands Out
Picture frames are usually straightforward, but Billy wanted something that felt more like a feature piece. This design is made to complement and elevate the artwork it holds, using a mix of light and dark woods for contrast.
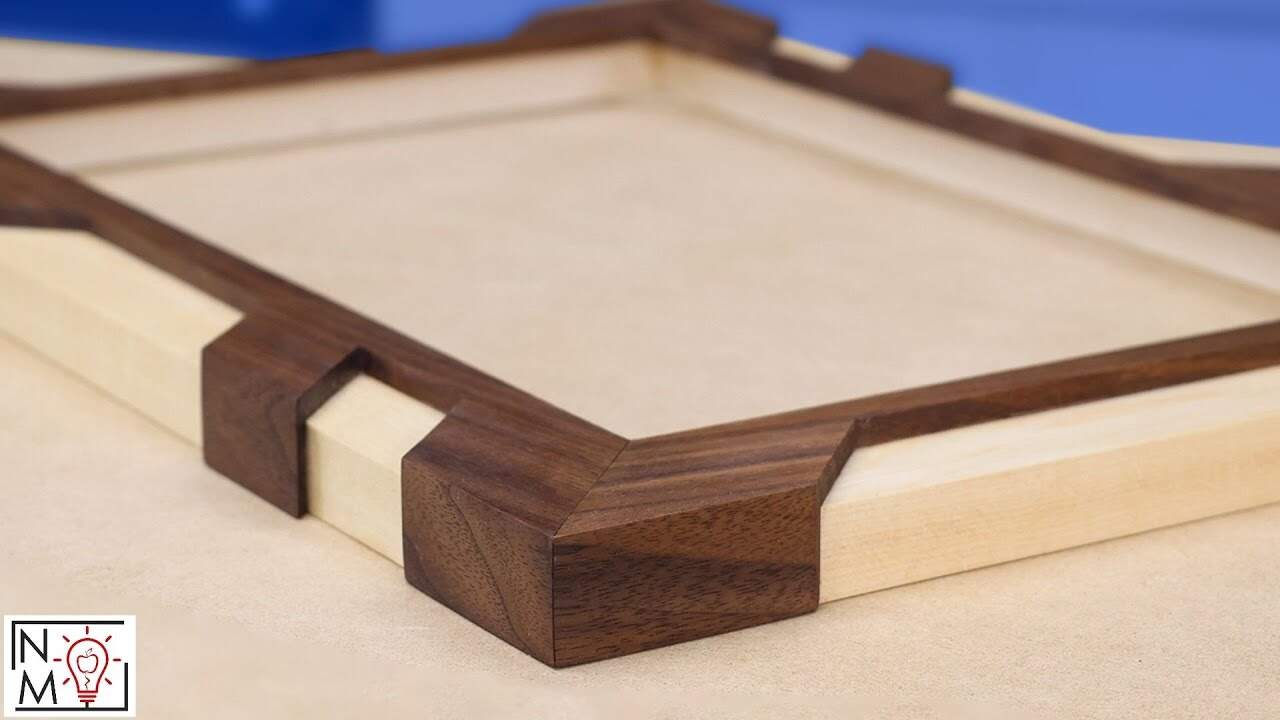
The layered layout and angled cuts give the piece an architectural quality. It’s an example of how even small woodworking projects can offer room for experimentation and craftsmanship.
Choosing Complementary Woods
Billy selects Maple and Walnut for this frame. Maple brings a clean, pale tone with subtle grain, while Walnut provides a rich, dark contrast that anchors the design visually.
Both species are known for their stability and finish quality. Together, they make a striking pairing that feels both modern and timeless.
Milling and Prep Work
The project begins with milling the Maple and Walnut to different thicknesses. Maple is used for the front pieces, while Walnut serves as the backing and support.
Accurate milling is essential for a clean fit later in the build. By ensuring flat, even stock from the start, Billy avoids complications when it’s time to join and glue the pieces.
Cutting to Size
Once the material is prepped, Billy cuts the pieces to width using a table saw. The Maple strips are slightly narrower and thinner than the Walnut ones, which allows them to nest cleanly once the channel is cut.
All pieces are kept consistent with a stop block and careful measuring. Clean edges and uniform width help keep miters tight and corners aligned.
Creating the Channel
To create the overlapping effect, Billy cuts a shallow channel into the Walnut strips. This groove allows the Maple pieces to sit flush while adding dimension to the front of the frame.
The channel is made with a series of passes on the table saw using a ripping blade. Multiple light cuts provide more control and a smoother result.
Adding Design Details
After the channel is cut, Billy uses a combination square to mark a geometric pattern on the Walnut face. These angled cuts break up the straight lines and add visual interest.
Each line is drawn with intent, creating a repeating motif of 45-degree angles and stepped shapes. This added layer of detail transforms the frame into a piece of art itself.
Bandsaw Work and Waste Removal
The marked sections are cut out using a bandsaw. Billy takes his time here to avoid mistakes, clearly labeling waste areas to prevent accidental cuts.
The bandsaw work introduces texture and relief to the frame. These cutouts help it stand out even more once the piece is assembled and finished.
Mitering the Corners
Next, Billy cuts all four corners to a 45-degree miter using the table saw. This creates a clean, framed border that’s ready for assembly.
Before glue-up, a rabbet is added along the back edge to house the artwork and backing. Billy prefers to do this before assembly to keep things stable and easier to control.
Reinforcing the Frame
To ensure strength at the miters, Billy uses dominoes for reinforcement. These hidden joints add serious durability without altering the clean outer profile of the frame.
For woodworkers without a domino joiner, dowels or splines could be substituted. But the dominoes keep things invisible and professional-looking.
Glue-Up and Sanding
The frame is glued and clamped, then left to cure overnight. Once dry, Billy goes over the entire frame with sanding blocks and fine grit to smooth out the joints and design cutouts.
This sanding step is especially important around the patterned areas, where sharp corners and rough edges need to be cleaned up without rounding over the detail.
Final Finish and Assembly
Billy finishes the frame with wipe-on poly, applying multiple thin coats for a consistent, durable finish. The poly brings out the richness of the Walnut and the brightness of the Maple, creating a striking final contrast.
Special care is taken to get into all the small design spaces and coat them evenly. The end result is sleek, smooth, and ready to display artwork in style.
A Picture Frame with Character
This frame proves that small projects don’t have to be boring. With its layered construction, bold design, and contrasting woods, it’s a great example of turning a simple task into something memorable.
Billy’s approach encourages woodworkers to explore creative techniques, even in everyday builds. With basic tools and careful planning, this frame can be customized in countless ways.
Please support Billy by visiting his website here: https://www.newtonmakes.com/shop.

Matt’s Take
These are my personal thoughts and tips based on my own experience in the shop. This section is not written, reviewed, or endorsed by the original creator of this project.
This frame really showcases how thoughtful wood selection can make or break a project. The maple and walnut pairing is a classic for good reason — you get that clean, dramatic contrast without either species fighting for attention. Both woods machine beautifully and take finish consistently, which is crucial when you’re highlighting their differences like this.
The channel-cutting technique Billy uses is smart shop work. Taking multiple light passes on the table saw gives you way more control than trying to hog out material in one go. When you’re working with different wood species like this, that controlled approach helps prevent tearout, especially where the grain changes direction. A sharp blade makes all the difference here too.
Those geometric cutouts really transform what could be a basic frame into something special. The key with bandsaw work like this is taking your time and staying relaxed — rushing those cuts is where mistakes happen. Having clearly marked waste areas is brilliant planning that prevents those heart-stopping moments we’ve all had.
The domino reinforcement is a nice professional touch. Those mitered corners look clean from the outside but get serious strength from hidden joinery. Even with perfect cuts, picture frames see a lot of handling over the years, so that internal support really pays off in longevity.