This tip comes from Jodee at Inspire Woodcraft. It’s a smart, repeatable technique for cutting a tight miter joint at 120°, even when working with two boards of different widths.
Angles greater than 90° often feel intimidating, but this method breaks it down into simple, controlled steps. It’s a practical approach that works with standard tools and gives clean, consistent results—especially useful for tricky corners or custom designs.
Watch the full video and subscribe to Jodee’s channel:
Why These Angles Matter in Woodworking
Miter joints are a staple in many woodworking projects, from furniture and frames to trim and decorative panels. While 45° cuts are common, cutting joints at 120°—or any nonstandard angle—requires extra care.
The challenge comes in matching the angle accurately between two pieces and ensuring they meet without gaps. That gets even trickier when the boards aren’t the same width, which is exactly what Jodee tackles in this video.
Step One: Prepare Your Cut Angles
The process begins by adjusting your miter saw to a 120° setup. Since most saws default to 90°, you’ll rotate the blade an extra 30° to reach the needed angle.
Start with the wider board. After the angle is cut, position the narrow board against that newly cut face. Use the inside edge of the wide board to mark the length on the narrow board so the two pieces will line up correctly when joined.
Jodee emphasizes the importance of making this mark clearly—this reference point guides the rest of the process and keeps the angles working together.
Secure the Workpiece Before Each Cut
Before making your cuts, secure the wide board in place. Jodee suggests clamping it or using double-sided tape to keep it from shifting. This is especially useful when you swing the saw back to make the matching cut on the narrow piece.
Once you’ve used the wide board as your angle reference, it essentially becomes a temporary fence for cutting the second piece. That trick makes it easy to get precise alignment between mismatched boards.
Cutting the Second Piece for a Seamless Fit
Align the narrow board flush against the angled face of the wide board. You’ll be cutting the narrow board at the same angle, using the wide piece as a guide.
Using double-sided tape can help hold the board steady for this part of the cut. Jodee notes that some woodworkers might attempt this freehand, but taking the time to secure the piece makes a noticeable difference in accuracy.
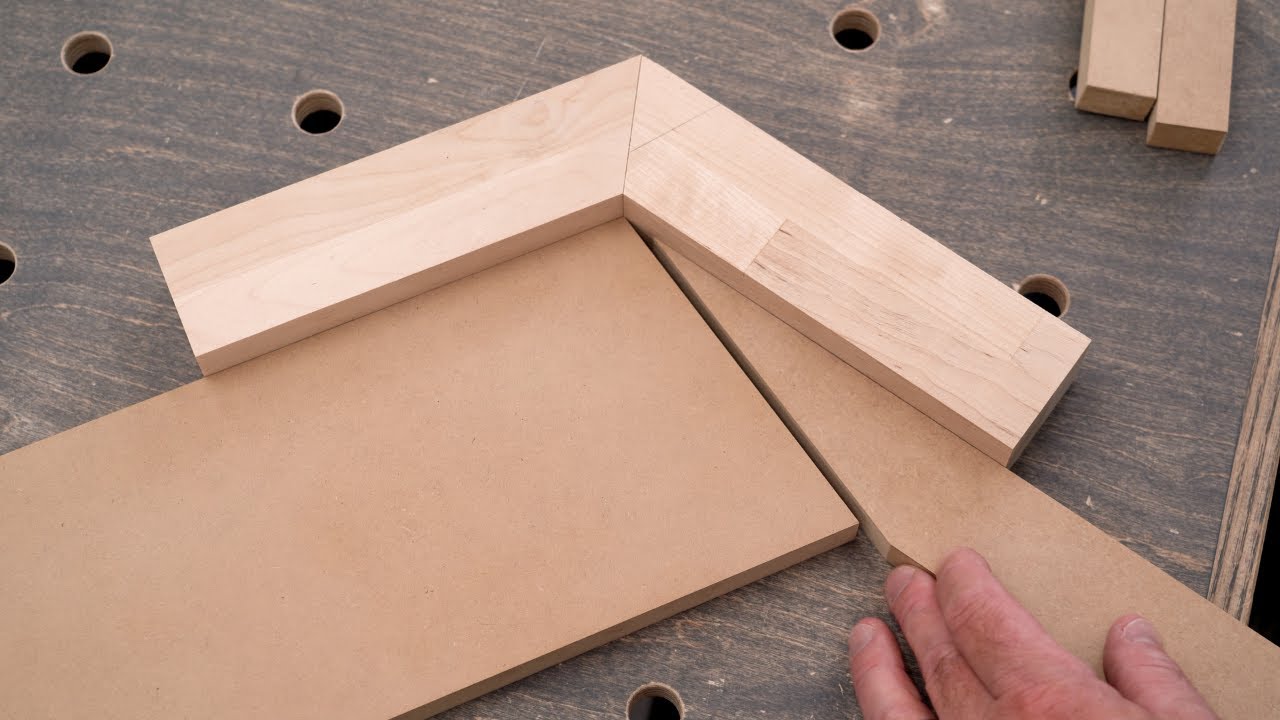
After cutting, flip the narrow board over and place it against the wide board—you should see a tight, clean joint that fits perfectly at a 120° corner. No gaps, no trial-and-error.
Alternative Method and Its Drawbacks
There’s another approach that some might try, and Jodee walks through that as well. In this variation, both boards are cut to the full 120° angle before any layout is done.
The narrow board is then placed on top of the wide board, and a mark is made to match the edge. While this seems like a time-saver, it introduces a few issues.
For one, you end up cutting both boards twice. More importantly, the accuracy depends heavily on how well the boards are positioned during marking—and if the angle exceeds your saw’s cutting range, you may not get a clean cut at all.
Material and Face Orientation Tips
When working with boards that have distinct front and back faces—like pre-finished or directional grain pieces—it’s important to think about layout.
Flipping a board after a miter cut can change the face orientation, so Jodee recommends planning ahead. Depending on your project, you may need to flip or rotate pieces to keep the faces aligned consistently.
This is especially true in decorative builds, where grain continuity or symmetry matters.
Why This Method Works So Well
What makes this tip stand out is its flexibility. Using the wider board as a cutting guide not only improves accuracy, but it also solves the issue of working with pieces that your saw can’t cut cleanly on their own.
This method eliminates guesswork and reduces the need for jigs or trial cuts. It’s a fast way to get clean results—even with limited equipment—making it a go-to solution for angled corners.
A Smart Tip for Framing, Furniture, and More
Whether you’re installing decorative trim, framing a custom structure, or just experimenting with unique angles, this approach helps ensure tight joints every time.
By walking through both the process and the pitfalls, Jodee shows how a little preparation can lead to a much smoother build. It’s a practical trick that’s easy to remember and works across a variety of projects.
Support Jodee by visiting his online store here: https://inspirewoodcraft.com/collections/all.

Matt’s Take
These are my personal thoughts and tips based on my own experience in the shop. This section is not written, reviewed, or endorsed by the original creator of this project.
This technique really showcases how thinking through the setup can make all the difference with tricky angles. What I appreciate about Jodee’s approach is how it turns the wider board into a built-in reference guide — it’s one of those “why didn’t I think of that” moments that makes perfect sense once you see it.
The double-sided tape tip is solid gold for holding pieces during angled cuts. I keep a roll in my shop specifically for situations like this where clamps would get in the way or when you need that extra security on smaller pieces. Just make sure you’re using tape that won’t leave residue on your finished surfaces.
One thing worth keeping in mind with any miter work is that even small variations in your saw’s accuracy get magnified at these odd angles. A degree or two off on a 45° cut is noticeable, but at 120° it can really throw off the joint. Taking the time to dial in your setup — and using that first cut as your reference like Jodee does — helps keep everything consistent.
This method is particularly handy for custom frames or architectural details where you’re dealing with non-standard angles. It’s the kind of technique that once you use it a few times, it becomes second nature for any complex miter work.