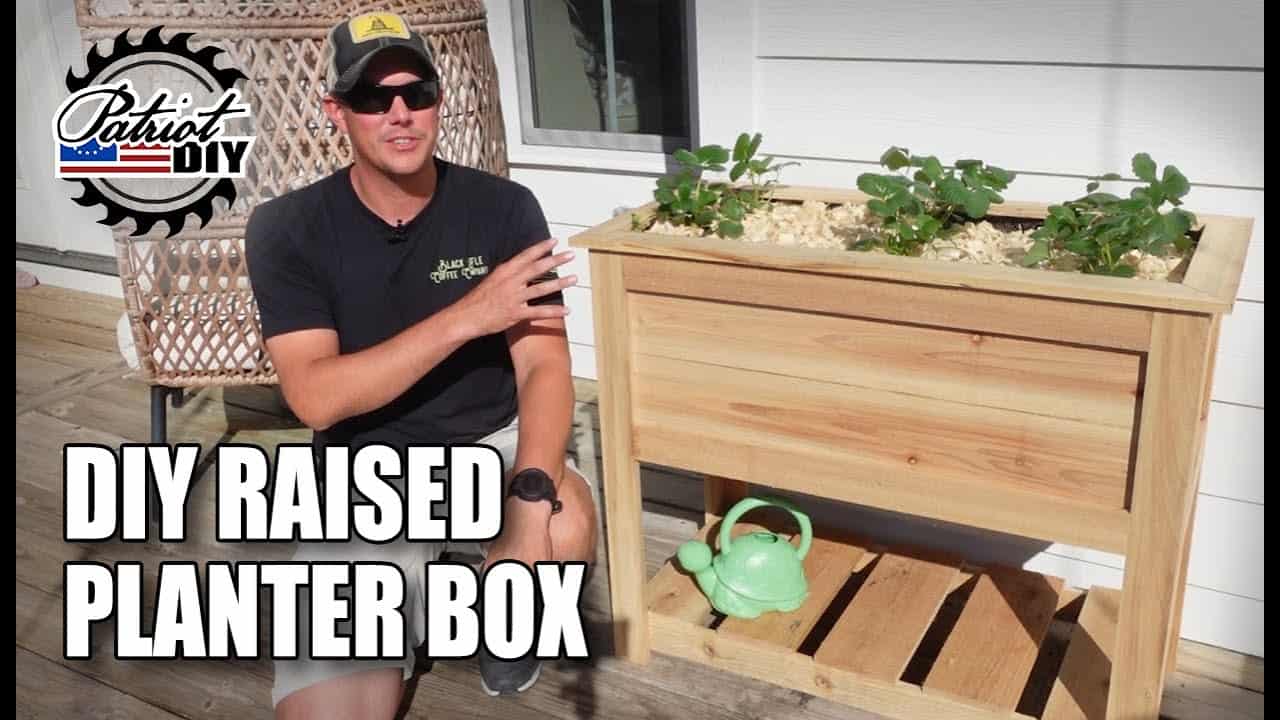
This project was built and designed by Jason from PatriotDIY. It’s a simple raised planter box designed for outdoor use, ideal for strawberries, herbs, or flowers, and it’s a perfect project for beginners looking to add a personal touch to their gardening space.
Built from cedar fence pickets, this planter offers durability, functionality, and a clean design that fits nicely on porches, patios, or garden edges. Jason walks through the full process with beginner-friendly steps and straightforward joinery that can be completed with basic tools.
Watch the full video and subscribe to Jason’s channel:
Why Build a Raised Planter?
Raised planter boxes are a great option for gardeners who want a compact growing space with easy maintenance. They offer better drainage, reduce weed growth, and are easier on the back for those who have trouble kneeling or bending.
In this build, Jason designs the planter to be just the right height and size for casual gardeners. It’s especially well-suited for growing strawberries, but the design works just as well for flowers, lettuce, or small herbs.
Choosing the Right Material
Jason uses cedar fence pickets for the build, which are naturally rot-resistant and ideal for outdoor use. Cedar is lightweight, easy to work with, and holds up well to weather without requiring heavy sealing or treatment.
While the full material list isn’t specified, the project uses common hardware like brad nails, pocket screws, wood glue, and optional landscape fabric for soil containment.
Step-by-Step Construction Overview
The project is broken into clear stages, beginning with cutting all the wood pieces to size. Jason emphasizes the importance of accurate measuring and repeatable cuts, which help keep everything aligned during assembly.
A miter saw is used for most of the cuts, but a circular saw could be substituted with a guide. Clean, square edges help ensure tight joints when assembling the panels.
Building the Frame Sides
The side panels begin with ripping down pickets for leg and stretcher components. Pocket hole joinery is used for strength, allowing for a solid framework without visible screws on the exterior.
Jason uses wood glue along each joint before clamping and driving the pocket screws. This combination provides a strong bond while keeping the build clean and easy to manage.
Attaching the Outer Panels
Once the frame is assembled, Jason adds overlapping cedar pickets to the outside of each panel. These are attached with brad nails and aligned evenly to maintain a consistent look on all four sides.
He repeats the process for the long sides and the shorter ends, completing all four walls of the box before bringing them together for the full planter assembly.
Assembling the Planter Box
The four sides are brought together using glue and brad nails, with clamps holding everything square during fastening. Jason attaches one corner at a time, ensuring the box remains square as he works his way around.
With the frame upright and secure, it’s flipped over to prepare for the base installation.
Installing the Bottom Slats
For drainage and soil support, Jason installs evenly spaced cedar slats along the bottom of the box. These are fastened with wood screws and are spaced apart to let excess water drain through, which is important for plant health and soil longevity.
Slat spacing can be adjusted depending on what’s being planted, but Jason’s layout works well for general garden soil and shallow-rooted plants.
Optional Lower Shelf for Storage
One helpful addition is an optional lower shelf, which can be used to store watering cans, small tools, or extra soil. This is done by adding cleats along the lower frame and attaching slats similar to the bottom of the planter.
It’s a smart use of space and adds even more utility to an already functional build.
Preparing the Interior
Before adding soil, Jason lines the inside of the planter with landscape fabric. This helps contain the soil, prevents it from leaking out the drainage slats, and still allows water to pass through.
The fabric is trimmed to size and stapled in place along the inside walls of the planter. It’s a simple step that makes maintenance much easier over time.
Finishing the Top Frame
To complete the look, Jason adds a top frame with 45-degree mitered corners. These cap pieces help hide the top edges of the panels and provide a smooth rim for a cleaner, more polished appearance.
The top frame is attached with glue and staples, locking everything together and finishing off the box with a professional touch.
Ready to Plant
With the frame built, the top installed, and the interior lined, the planter is ready for soil and plants. Jason’s version is filled with strawberries, but the design is flexible enough for any small plant varieties.
It’s a great introduction to both woodworking and raised bed gardening, and it adds a custom feature to your porch or yard that’s practical and attractive.
Please support Jason by visiting his Etsy Store: https://www.etsy.com/shop/patriotdiy.

Matt’s Take
These are my personal thoughts and tips based on my own experience in the shop. This section is not written, reviewed, or endorsed by the original creator of this project.
Cedar fence pickets are a smart material choice for outdoor projects like this. They’re affordable, readily available at most home centers, and the natural oils in cedar provide excellent rot resistance without needing chemical treatments. When working with fence pickets, I always check each board for warping or splitting before starting cuts — they can vary in quality, so it’s worth picking through the stack.
The pocket screw and brad nail combination Jason uses is solid for this type of project. Pocket screws handle the structural load while brad nails keep things aligned during assembly. One thing to keep in mind with outdoor projects is moisture movement — cedar will expand and contract with seasonal changes, so leaving small gaps between boards (like the drainage slats) actually helps accommodate this movement.
That landscape fabric step is crucial and often overlooked. Without it, soil will eventually work its way through the drainage gaps, creating a mess and reducing soil volume over time. When stapling fabric to cedar, I like to use stainless steel staples if possible — they won’t rust and stain the wood like regular staples might after a few seasons of weather.
The mitered top frame really does make a difference in the final appearance. Those clean corner joints elevate the whole project from “functional” to “furniture-grade.” For beginners, taking time to get accurate 45-degree cuts pays off in the overall look of the finished piece.