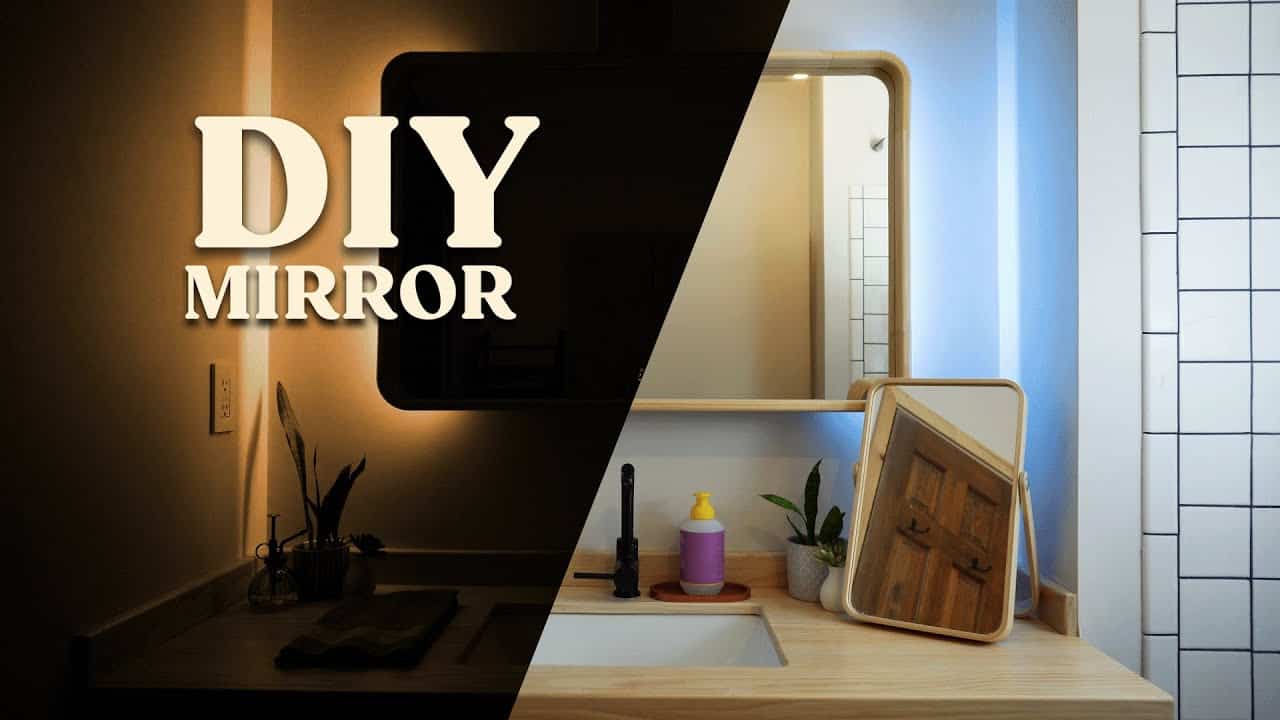
This project was built and designed by Danny from ModernRemade. He created a sleek, modern bathroom mirror with a curved wooden frame and integrated LED lighting—combining smart home tech with stylish woodworking.
With a total cost of around $100, this project offers a budget-friendly way to upgrade a bathroom while adding character and functionality. Danny’s clever use of kerf bending and lighting integration makes it a standout piece in any space.
Watch the full video and subscribe to Danny’s channel:
Why Build a Mirror?
Standard bathroom mirrors are often plain and lacking in personality. Danny set out to build something that not only fits the space but also elevates it, incorporating both custom woodworking and LED smart lighting.
This mirror project showcases a unique blend of design and utility. From the gentle curve of the wooden frame to the dimmable lighting controlled by app or voice command, it’s built to be both attractive and functional.
Getting Started and Gathering Materials
Danny doesn’t give an exact cut list, but the main materials include pine boards, LED strips, aluminum diffuser channels, and a basic mirror. The wood is chosen for its flexibility and affordability, making it ideal for a kerf-bending project like this.
To support the LED functionality, Danny also uses a polycrylic finish to seal the wood and ensure good adhesion for the light strips. Additional components include wood glue, wood filler, and mounting hardware like a French cleat.
Kerf Bending the Frame
Kerf bending is used to form the curved top and bottom of the mirror frame. This method involves cutting evenly spaced notches into the back of the wood so it can flex into a smooth arc without breaking.
Danny uses a simple kerf spacing template to keep each cut consistent. Once the wood is flexible, he applies glue sparingly and clamps it into place, letting the natural tension of the bend hold the curve while drying.
This technique results in a visually clean bend that feels far more advanced than it is. It’s a great example of using a simple shop technique for an elegant result.
Creating the Box Frame
The mirror is framed with box joints for strength and visual appeal. Using a jig and a router, Danny cuts each finger joint so that they fit together with clean lines and minimal gaps.
He emphasizes accurate measuring throughout, ensuring the mirror groove fits snugly without binding. This step is especially important, as even a small miscalculation can lead to fitting issues later in the project.
Facing Challenges and Rebuilding
Despite the planning, Danny encounters a problem when the mirror doesn’t fit into the first frame. The groove for the mirror is too narrow, and expanding it leads to additional alignment issues.
Rather than force a fix, Danny decides to rebuild the frame from scratch—this time with updated measurements and extra attention to the groove width. The experience underscores the importance of patience and flexibility in woodworking.
Final Shaping and Sanding
Once the new frame is assembled, Danny uses wood filler to close up any minor gaps and sands all surfaces smooth. A round-over bit is used to soften the outer edges, which adds both comfort and polish to the final piece.
This shaping step makes a big difference in the final look and feel of the mirror. Clean edges and a smooth finish elevate the project from a basic DIY to a truly custom furniture-grade piece.
Installing the LED System
One of the most impressive elements is the integrated LED lighting. Danny cuts a groove into the inside of the mounting frame to fit the aluminum LED diffuser channels. These grooves keep the strips hidden while providing even light distribution.
To improve the bond between the LED strips and the frame, Danny applies polycrylic to seal the surface. The LED strips are then pressed into the channels, and the diffuser covers are added to soften the light.
The result is a smart lighting system that can be controlled via phone app or voice assistant, allowing for adjustable color temperature and brightness.
Smart Design for Future Repairs
Anticipating possible future wear, Danny 3D-prints small clips that allow for easy replacement of the mirror or LEDs if needed. This thoughtful touch ensures the mirror can be maintained over time without needing to be rebuilt.
It’s a great example of combining modern tools like a 3D printer with traditional woodworking to improve usability and longevity.
Mounting and Final Reveal
The mirror is mounted using a French cleat, providing both strength and ease of installation. Once on the wall, the frame sits flush and lights up beautifully—turning what was once a plain bathroom mirror into a stylish and functional centerpiece.
Danny’s attention to detail and problem-solving throughout the build really pays off. The curved frame, sleek finish, and glowing backlight make the final piece feel like a high-end designer item.
Watch the full video and subscribe to Danny’s channel:

Matt’s Take
These are my personal thoughts and tips based on my own experience in the shop. This section is not written, reviewed, or endorsed by the original creator of this project.
Kerf bending is one of those techniques that looks intimidating but is actually pretty forgiving once you understand the basics. The key is getting your kerf spacing right — too far apart and you’ll get flat spots in your curve, too close and you risk weakening the wood too much. A simple spacing jig like Danny used makes all the difference in getting consistent results.
That decision to rebuild the frame when the mirror didn’t fit is exactly the kind of call that separates good work from rushed work. We’ve all been there — you can either force something that’s not quite right or take the time to do it properly. The extra hour or two of work always pays off in the final result, and honestly, the second time through usually goes faster since you’ve worked out all the kinks.
The LED integration here is really clever, especially cutting those grooves for the aluminum channels. Those diffuser strips make a huge difference in light quality — without them, you’d see individual LED dots instead of that smooth, even glow. And thinking ahead with those 3D printed clips for future maintenance? That’s the kind of forward thinking that turns a weekend project into something that’ll actually last and be repairable years down the road.