This woodworking project was built and designed by Drew Fisher from Fisher’s Shop. If you’re looking for practical ways to improve organization in your home, Drew’s YouTube channel offers many helpful and creative woodworking ideas.
Watch the full video and subscribe to Drew’s channel:
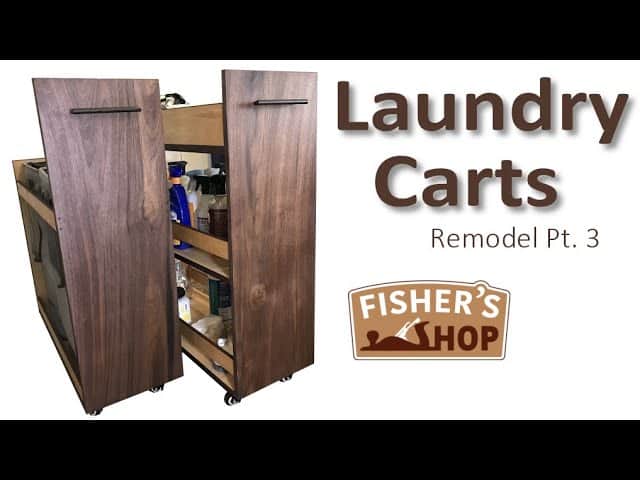
Why Build Narrow Laundry Room Carts?
Laundry rooms often have awkward spaces or gaps that aren’t easily utilized. Drew solved this common issue by designing narrow carts that fit neatly beside his washer and dryer, maximizing previously unused space.
These carts provide dedicated storage for laundry hampers, cleaning supplies, and other essentials. They’re mobile and compact, significantly enhancing convenience and organization in any laundry area.
Drew’s Design Approach
Drew began by measuring the narrow gaps beside his laundry appliances, then created detailed plans using Fusion 360. His design focused on simplicity, functionality, and aesthetics, incorporating plywood for strength and walnut for a stylish appearance.
To match the room’s decor, Drew specifically chose walnut for the fronts of the carts, giving the final piece a refined look. He also made walnut edge banding to hide plywood edges, resulting in a professional, finished appearance.
Preparing the Materials
Drew started by milling the walnut boards, ensuring each piece was flat and straight. He carefully worked through each stage—flattening the boards at the jointer, trimming them down with the table saw, and cutting them to length on the miter saw.
After facing a minor challenge with twisted boards, Drew used a planer sled to achieve perfect flatness. He then brought the wood to its final thickness, making sure all pieces were uniform for easy assembly.
Cutting and Assembling the Carts
Once all materials were ready, Drew cut the plywood pieces to create the sides, bottoms, and shelves. Using consistent measurement techniques, he ensured each part would fit precisely during assembly.
Assembly began by carefully fitting shelves into dados, reinforcing the structure with glue and clamps. Drew’s use of right-angle braces and careful clamping ensured the carts were strong, stable, and square once completed.
Applying Walnut Edge Banding
To achieve a polished look, Drew applied custom-cut walnut edge banding to the plywood edges. He carefully glued each strip into place, clamping them securely to ensure a tight fit.
After the glue dried, Drew used a flush trim router bit to neatly remove excess banding, resulting in clean, professional edges. This attention to detail greatly enhanced the visual appeal and durability of the finished carts.
Adding Functional Features and Finishes
To finish the carts, Drew sanded all surfaces smooth, creating a pleasant and professional feel. He applied a protective oil finish, enhancing the natural beauty of the walnut and providing long-lasting protection against wear.
Drew installed swivel casters underneath, ensuring the carts could move easily in and out of tight spaces. He also added handles sourced from existing cabinetry, further complementing the design and adding convenience for everyday use.
Installation and Final Adjustments
Upon installing the carts, Drew discovered a slight issue due to appliance hoses obstructing one side. Quickly adapting, he trimmed the cart with a track saw, then re-applied walnut banding to cover the adjustment seamlessly.
This quick modification demonstrated the flexibility and practicality of Drew’s design, ensuring the carts perfectly fit their intended space. The final result greatly improved functionality and organization in the laundry room.
Why You Should Consider Building These Carts
Building these narrow laundry room carts provides an ideal solution for organizing cluttered or underutilized spaces. They offer practical storage, easy accessibility, and mobility, making everyday tasks more convenient.
Additionally, this woodworking project can be tailored to fit your unique space and decor preferences. Drew’s straightforward design makes this an approachable and rewarding build for woodworkers at various skill levels.
Ready to See Drew’s Complete Build?

Matt’s Take
These are my personal thoughts and tips based on my own experience in the shop. This section is not written, reviewed, or endorsed by the original creator of this project.
The combination of plywood and walnut that Drew chose here is really smart for a utility project like this. Walnut gives you that premium look, but using it strategically as banding and fronts keeps costs reasonable while plywood handles the structural work. When you’re making edge banding from solid wood, cutting it slightly oversized and using a flush trim bit afterward is the way to go — it’s much more forgiving than trying to get perfect width strips right off the saw.
Those swivel casters make all the difference on a cart like this. The ability to pull it out completely when you need to access something in back, then roll it right back into that narrow gap, is what makes this design truly functional. When selecting casters for a project like this, look for ones rated well above your expected load — laundry supplies and wet clothes can add up quickly.
Drew’s quick adaptation when the appliance hoses interfered shows good problem-solving. Having a track saw for situations like this is incredibly handy, but a circular saw with a straight edge guide would work too. The key is being ready to adjust when real-world installation doesn’t match shop measurements — it happens more often than we’d like to admit, especially in tight spaces like laundry rooms.