Keeping garbage cans out in the open can be an eyesore, especially when they’re near the road or in a visible spot. A cedar slat enclosure is a great way to hide them while adding a stylish touch to your outdoor space.
This project is inspired by Zach from Bear Mountain Builds, who designed a functional and visually appealing garbage can enclosure. If you’re looking for a clean and durable way to store your bins, be sure to check out Zach’s work.
Watch the full video and subscribe to Zach’s channel:
Why Build a Garbage Can Enclosure?
Aside from improving curb appeal, an enclosure keeps trash bins secure and contained. It helps prevent animals from getting into the garbage while providing an organized space that blends with your yard. Cedar is an excellent choice for this build because it’s naturally resistant to rot and insects, making it ideal for outdoor use.
Constructing the Frame
Zach designed this project using a sturdy frame built from pressure-treated lumber, ensuring durability. The first step was cutting the wood to size and assembling the frame using a combination of fasteners and strong joinery techniques. Keeping everything square during assembly was essential to ensure a stable structure.
For added strength, gussets were used at key connection points. These reinforcements help prevent shifting over time, keeping the enclosure secure even with frequent use.
Installing the Cedar Slats
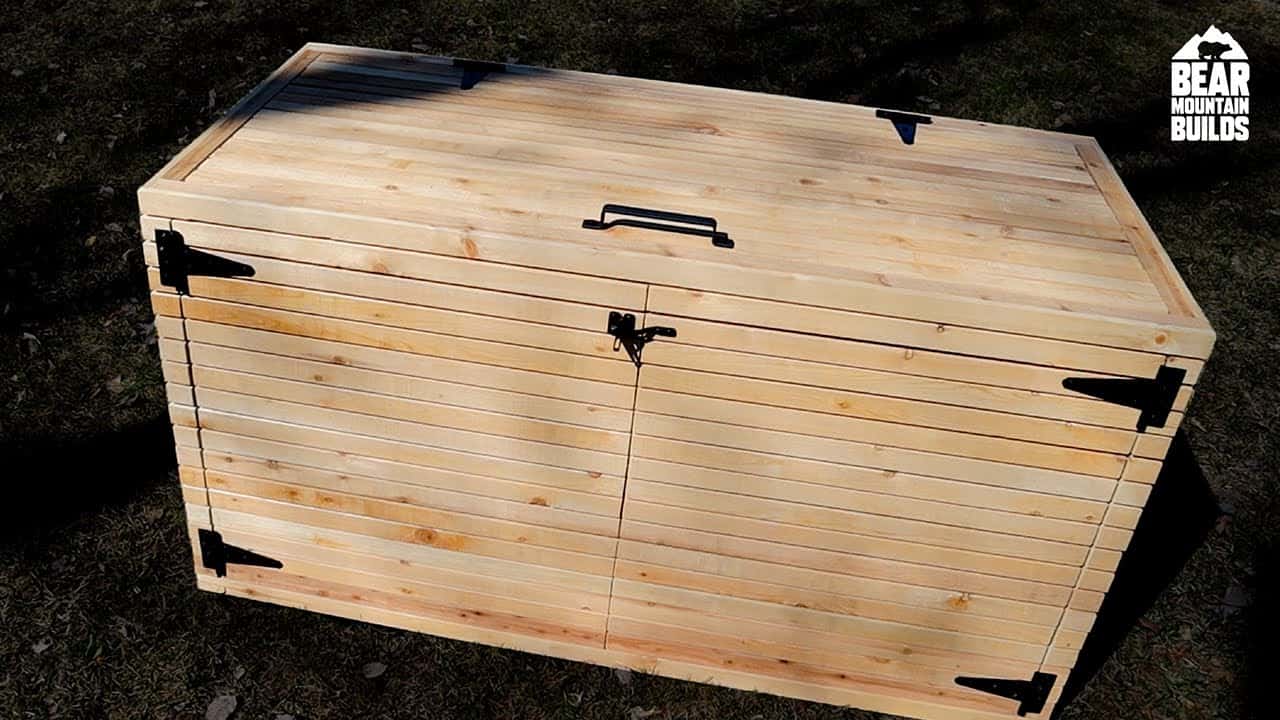
Once the frame was complete, Zach attached cedar slats to enclose the sides. Each slat was carefully cut and spaced evenly to allow for airflow, which helps prevent odors from being trapped inside. Waterproof glue and brad nails were used to secure the slats, ensuring they stayed in place while maintaining a clean, uniform look.
Functional Design Features
This enclosure includes both a lid and a front gate for easy access. The lid allows for quick disposal of trash, while the gate provides full access when it’s time for pickup. The lid was designed to fit snugly, preventing animals from getting inside. A reinforced lip helps keep it in place, reducing the chance of it being lifted by wind or wildlife.
The front gates were built using pressure-treated frames, covered with cedar slats that align with the rest of the enclosure. Attention to detail in aligning the slats gave the structure a polished, professional look.
Finishing Touches
After assembly, the enclosure could be left unfinished or sealed for added longevity. While cedar naturally weathers to a silvery gray over time, applying a protective stain or sealer helps maintain its warm color. Choosing a finish depends on the desired look and how much maintenance you prefer in the long run.
A Functional and Stylish Addition
This cedar slat garbage can enclosure is a practical solution for keeping outdoor spaces tidy. It blends seamlessly into a yard while providing an easy-to-use storage space for trash bins. With its durable construction and thoughtful design, this build is both functional and visually appealing.
Want to see the full build in action? Watch Zach’s video for the complete process and support his channel!

Matt’s Take
These are my personal thoughts and tips based on my own experience in the shop. This section is not written, reviewed, or endorsed by the original creator of this project.
Cedar really shines in outdoor projects like this. The natural oils in the wood provide that rot and insect resistance, but here’s something worth knowing — even cedar benefits from being elevated off the ground. If you’re building something similar, consider adding a small gap between your bottom frame members and the concrete or ground surface. It helps air circulation and prevents moisture from wicking up into the wood.
The airflow aspect Zach incorporated is smart thinking. Trapped moisture and lack of ventilation can turn any enclosed space into a breeding ground for odors and mold. Those gaps between slats aren’t just for looks — they’re doing real work. When spacing slats, I like to use a consistent spacer block to keep everything uniform. A scrap piece of wood works perfectly and speeds up the installation.
One thing I always emphasize with outdoor builds is fastener selection. Stainless steel or galvanized hardware is worth the extra cost when you’re working with cedar. Regular steel fasteners can cause ugly black staining as they react with the tannins in the wood. For a project that’ll be visible from the street, those details matter.
The hinged lid design is particularly clever for this application. Gravity-assist lids make daily use so much easier than having to wrestle with latches every time you take out the trash. Just make sure your hinge hardware is rated for outdoor use — nothing kills a well-built project faster than rusty hinges that bind up after the first rainy season.