This project was built and designed by Anthony from Wood Pack DIY, with helpful supervision from his assistant—Bob Barker, the shop dog. The goal was to create a sleek desk for Anthony’s wife, designed to complement her DJ station and feature a continuous-grain waterfall edge for a bold and elegant look.
Like many ambitious projects, this one didn’t go perfectly—and that’s what makes it worth sharing. From design decisions to unexpected errors, the build is full of real-world lessons and creative problem-solving.
Watch the full video and subscribe to Anthony’s channel:
Breaking Down Materials and Getting Started
The build started with preparing the materials for the cabinet box. Anthony began by rough cutting and sizing the panels that would form the desk’s base, which provided a familiar but critical first step.
Every project begins with high hopes, but it’s also where the potential for mistakes starts to show up. Anthony and Bob Barker took their time in this stage to stay alert for inaccuracies that could throw off the rest of the project.
Constructing the Cabinet Base
The base of the desk was built with practicality in mind. The bottom was made flush to accommodate a toe kick, allowing for more interior space in the drawer section.
To strengthen the rear structure, a rabbet joint was used for the back panel. This joint helped increase rigidity and ensured that everything would stay square once the drawers and face frame were added.
Building and Installing the Face Frame
Poplar boards were selected for the face frame, a reliable and easy-to-work material for detailed joinery. Spacer blocks were used to achieve consistent drawer openings before the frame was assembled.
The joints were glued and secured with screws, and a flush trim bit was used to clean up the edges. The result was a sharp, seamless face frame ready to receive the drawer boxes and hardware.
Creating the Toe Kick and Desktop
For the toe kick, Anthony cut 45-degree miters and assembled the pieces like a small box. Painter’s tape came in handy as a clamping solution during glue-up, keeping the angles tight and aligned while drying.
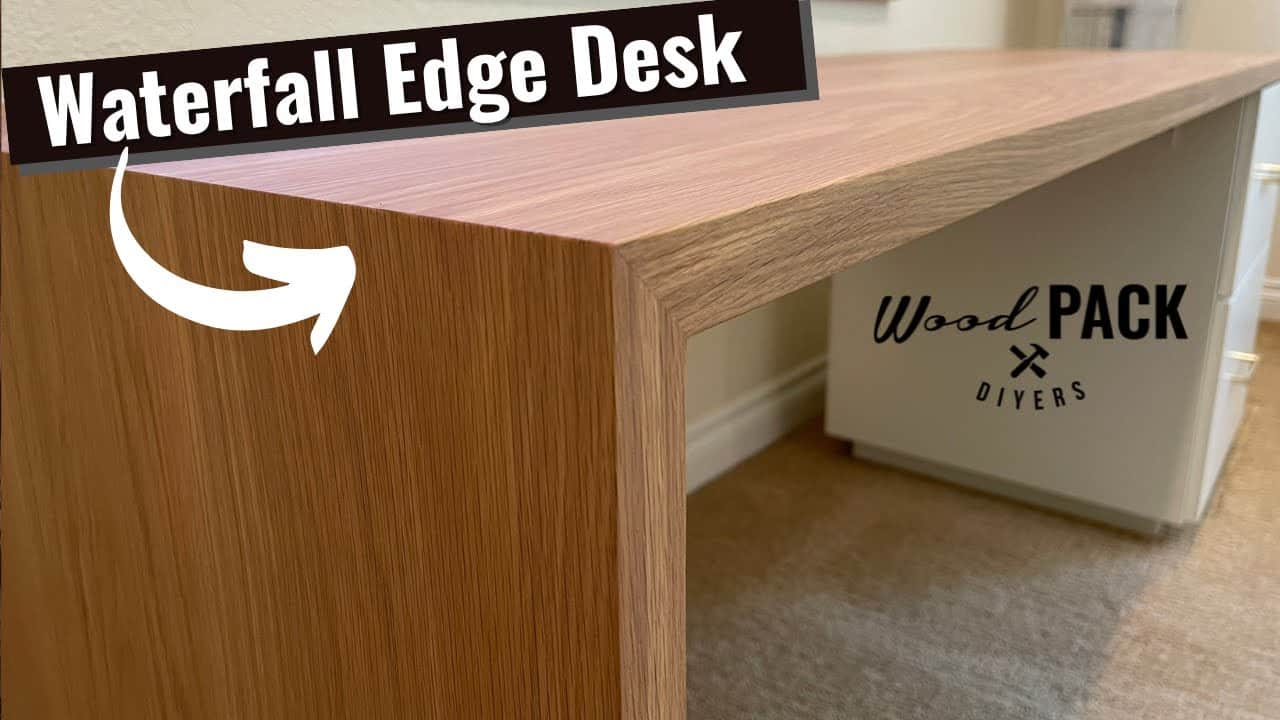
The desktop was made from solid white oak—a stunning hardwood known for its strength and visual appeal. The plan was to create a waterfall edge, which requires perfectly mitered ends to carry the grain pattern down the sides.
Facing the Unexpected
Things took a turn during the glue-up and cutting process. After assembling the desktop panels, Anthony encountered wobble and misaligned cuts that threw off the clean look he was after.
It was a frustrating moment in the shop, but instead of scrapping the idea, Anthony explored his options. With Bob Barker faithfully standing by, he chose to call in backup from a fellow woodworker in the area.
This collaboration not only saved the project but also opened the door to new woodworking friendships and resources—reminding us that asking for help can be one of the smartest moves in the shop.
Regrouping and Finishing the Top
After the rough spots, Anthony proceeded with a second glue-up, this time with the benefit of better tools and extra hands. With careful clamping, the oak boards aligned properly, and the surface was smooth and level after drying.
The finish was a combination of Rubio Monocoat in bourbon and smoke, which gave the wood a rich, modern color. This blended beautifully with the rest of the desk design, highlighting the continuous grain pattern that flows through the mitered edges.
Building Custom Drawers
Once the main structure and top were complete, Anthony moved on to drawer construction. These weren’t ordinary drawers—they had to house files and even a small printer, so interior measurements were critical.
Despite careful planning, mistakes still happened. A few errors in size meant redoing some parts, adding more time to the build. But each correction was part of the learning process, and the final fit was clean and functional.
Assembly, Hardware, and Final Touches
With drawer boxes in place and slides installed, it was time for the finishing steps. Hardware was mounted, final adjustments were made, and the completed desk came together beautifully.
The desk now sits proudly in Anthony’s home, serving not only as a workspace but also as a reminder of what it takes to complete a project like this. Bob Barker likely considers it another successful mission accomplished.
More Than Just a Desk
This build wasn’t just about joinery and finishing—it was about dealing with setbacks, learning from mistakes, and finding new ways to keep going when things don’t go as expected. It’s a great example of how woodworking often mirrors life: you plan, you adapt, and you keep building.
Please support Anthony (and Bob Barker) by visiting their website (he sells awesome plans): https://www.woodpackdiy.com/.

Matt’s Take
These are my personal thoughts and tips based on my own experience in the shop. This section is not written, reviewed, or endorsed by the original creator of this project.
Anthony’s waterfall desk build really highlights something we all face in the shop — projects rarely go exactly as planned, and that’s often where the best learning happens. The combination of solid white oak for the desktop with a poplar face frame is a smart choice that balances cost with visual impact where it matters most.
That moment when the desktop glue-up didn’t go perfectly is so relatable. We’ve all been there, staring at a wonky panel wondering if we should start over or push through. Anthony’s decision to reach out for help from another woodworker is actually brilliant — it’s easy to get tunnel vision when you’re frustrated, but fresh eyes and better tools can save a project. Plus, building those connections in the woodworking community is invaluable.
The waterfall edge technique is definitely ambitious for good reason. Getting those miters perfect so the grain flows continuously requires precision at every step, from the initial glue-up through the final cuts. Even small errors compound quickly with this style. When you’re attempting something like this, having your material selection dialed in from the start — consistent grain, flat boards, proper moisture content — makes all the difference.
Rubio Monocoat in bourbon and smoke is a fantastic finish choice for white oak. It really brings out the grain character while giving that rich, contemporary look that works so well with modern designs. The fact that this desk serves double duty for DJ equipment and regular office work shows how custom furniture can solve specific problems that off-the-shelf pieces just can’t handle.