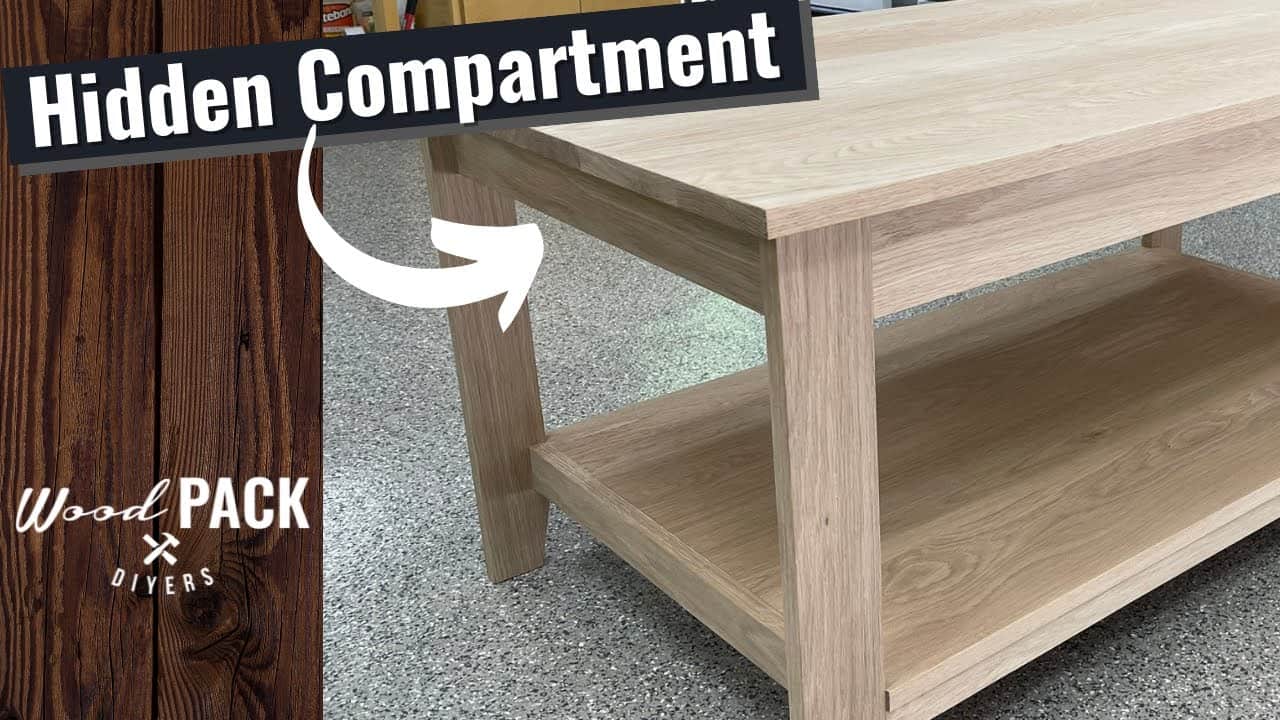
This project was built and designed by Anthony from Wood Pack DIY, with his ever-watchful assistant Bob Barker keeping tabs on the build. It’s a modern coffee table made from white oak and features a concealed compartment designed for both practicality and subtlety.
Unlike many similar projects, Anthony focuses on keeping the hidden compartment truly discreet—blending seamlessly into the table’s clean design. The result is a stylish piece of furniture that serves more than one purpose.
Watch the full video and subscribe to Anthony’s channel:
Breaking Down the Materials
The build begins with selecting and preparing the white oak, chosen for its strength, grain, and durability. Using a miter saw and table saw, Anthony cuts the boards to rough length and width to get the material ready for shaping.
White oak can be tough to work with, but its hardness and finish quality make it ideal for a high-traffic item like a coffee table. Bob Barker keeps a close eye on the shop floor, making sure no scraps are left behind.
Creating Consistent Angled Legs
One of the standout elements of this table is the angled leg design. To get perfect symmetry, Anthony uses a simple jig made from scrap wood to stabilize each leg during the cut.
Domino joinery is used to assemble the legs, though he points out that pocket hole screws or dowels would work just as well. The focus is on a strong and repeatable joint, with clean transitions between all parts.
Building the Frame Structure
Once the legs are ready, the rest of the frame is cut and glued in place. The overall style is minimal and modern, allowing the joinery and material quality to speak for themselves.
Glue-ups are done with care to avoid excess squeeze-out. Any remaining glue is wiped clean before it dries, saving time and sanding effort later in the finishing stages.
Constructing the Top and Bottom Shelf
Both the tabletop and lower shelf are made from the same batch of white oak. Since Anthony doesn’t use a jointer, he turns to a track saw to achieve straight edges for panel glue-ups.
To avoid warping, he alternates the grain direction of the boards as they’re aligned and glued together. This method keeps the surfaces flat and strong—especially important for the top, which will be hinged to reveal the compartment underneath.
Planning for Wood Movement
Because solid wood is used throughout the build, Anthony accounts for natural expansion and contraction. He installs figure eight fasteners to allow the tabletop and shelf to shift slightly without cracking or pulling against the base.
This detail may be easy to overlook but makes a big difference in the long-term stability of the project. It’s a smart move that shows Anthony’s experience and care for quality woodworking.
Adding the Concealed Compartment
The star feature of this build is the hidden storage compartment built into the table’s top. Anthony fits a pair of gas struts to help lift and hold the solid oak lid.
The hinges and lift support hardware are chosen to be low-profile, helping the hidden compartment remain unnoticed until opened. It’s perfect for stashing remote controls, books, or anything you want out of sight but within reach.
Finishing With Style and Protection
After the major assemblies are complete, Anthony gives the entire table a thorough sanding. Edges are softened, and the surfaces are smoothed in preparation for finishing.
Rubio Monocoat in Black is applied to give the oak a rich, dark appearance. It not only brings out the grain but also offers long-lasting protection, making the table both stylish and durable.
Final Fit and Assembly
Once the finish is cured, the table is reassembled and all hardware checked for function. The lift-top works smoothly, and the hidden compartment blends cleanly into the overall design.
The final product is a polished, professional-looking coffee table with a smart twist. It’s versatile enough for modern homes and practical enough for daily use.
A Project Worth Trying
This coffee table is a great example of how to combine creative design with solid technique. Anthony’s methodical approach, paired with helpful shop tips and the occasional appearance from Bob Barker, makes the project both informative and fun to follow.
Whether you’re building it for your living room or just want to explore concealed joinery and lift-top mechanisms, this is a rewarding build with functional results. Detailed plans are also available through Anthony’s Etsy shop for anyone ready to take it on.
Please support Anthony (and Bob Barker) by visiting their website (he sells awesome plans): https://www.woodpackdiy.com/.

Matt’s Take
These are my personal thoughts and tips based on my own experience in the shop. This section is not written, reviewed, or endorsed by the original creator of this project.
White oak is an excellent choice for furniture like this – it’s durable enough to handle daily use and takes finish beautifully. That said, it can be demanding to work with since it’s quite hard. Sharp blades are essential, and you’ll want to take lighter passes to avoid burning or tear-out. The track saw approach for edge jointing is smart when you don’t have a jointer, just make sure your track is dead straight and well-clamped.
The figure eight fasteners Anthony used are a woodworking essential that often gets overlooked. Solid wood panels will move seasonally, and without proper allowance for that movement, you’ll end up with cracks or joints failing. These fasteners let the top float while keeping it secure – it’s one of those details that separates furniture that lasts from furniture that doesn’t.
Gas struts for lift-tops can be tricky to size correctly. Too strong and the lid will slam open, too weak and it won’t stay up. Most suppliers have sizing charts based on lid weight and dimensions. Also worth noting – when installing any lift-top hardware, do a test fit before applying finish. Nothing’s worse than discovering alignment issues after you’ve already applied your topcoat.
That Rubio Monocoat finish is fantastic stuff, especially on oak. It penetrates deep and builds protection from within the wood rather than sitting on top like traditional poly. Just remember it cures through oxidation, so thin coats and good ventilation are key to getting the best results.