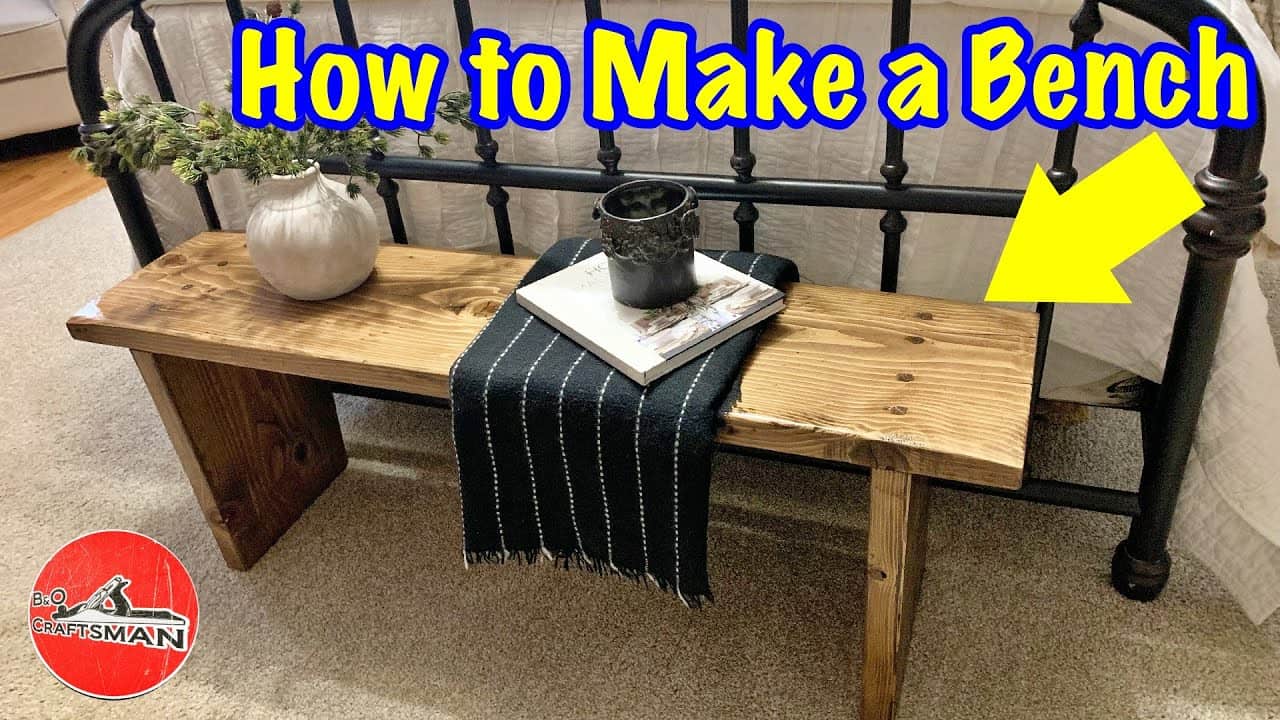
This project was built and designed by Chris from B&O Craftsman. It’s a clean and rustic wooden bench made entirely from one 2×12 board, ideal for use at the end of a bed or as an accent in any room.
The build is straightforward and beginner-friendly, focusing on strong joinery, practical dimensions, and a distressed finish for character. With minimal tools and materials, this bench offers a rewarding result with plenty of charm.
Watch the full video and subscribe to Chris’s channel:
Starting with a Single Board
Chris begins this project with a standard 2×12 board, roughly eight feet long. By cutting it down to four feet, he creates the main seat portion of the bench and sets aside enough material for the legs.
The choice of board doesn’t need to be flawless—this design leans into the imperfections and embraces a slightly aged, worn appearance. A light cleaning and square cuts are enough to get going.
Cutting and Measuring for the Legs
The legs are cut from the same 2×12 material, with each one measuring around 16 inches long. Using a miter saw or circular saw speeds up this part of the process, but a handsaw can work just as well for those with more patience.
To position the legs, Chris marks four inches in from one end and five and a half inches from the opposite edge. This offset design helps with both balance and visual appeal.
Attaching the Legs with Strength and Style
Once the legs are marked and cut, they’re attached using wood glue and clamps to keep everything aligned. After the glue sets, the legs are reinforced with deck screws from the top.
To maintain a clean look, the screw holes are plugged with wooden dowels. These are glued into predrilled holes and tapped into place with a mallet, giving the top a smooth and finished appearance.
Precision Drilling and Doweling
Using a carpenter square, Chris finds the centerlines for the screw placements and drills pilot holes for consistency. A brad tip bit helps start the holes for the dowels, keeping the placement accurate and minimizing tear-out.
Each dowel is coated with glue and driven into the countersunk holes. Once dry, the tops are trimmed flush and sanded smooth to blend seamlessly with the rest of the bench.
Sanding and Distressing the Surface
The sanding process begins with a coarse grit to remove any surface grime or prior stains. Chris works gradually up to a finer grit to smooth out the bench and create a soft, worn surface.
Though this version of the project stops short of distressing, the surface is prepared to accept future finishing touches. Chris mentions that distressing methods will be shown in an upcoming video for those looking to add more character.
Applying the Protective Finish
With the surface prepped, the bench receives a coat of polycrylic for protection. Each layer is sanded between coats using fine-grit sandpaper to keep the finish smooth and even.
Multiple coats are applied to ensure durability, especially since this bench is intended for everyday use. The result is a subtle, clear finish that enhances the grain while protecting the surface from wear.
A Practical and Stylish Final Product
Once complete, the bench is placed at the foot of the bed, where it serves both a decorative and functional role. Its simple design, clean lines, and visible joinery give it a handmade appeal without looking rough or unfinished.
This project is a great example of how one board and a few tools can turn into a useful household piece. It’s approachable for beginners, fast to build, and easy to customize for different spaces.
Please support Chris by visiting his website here: https://bo-craftsman-shop.creator-spring.com/.

Matt’s Take
These are my personal thoughts and tips based on my own experience in the shop. This section is not written, reviewed, or endorsed by the original creator of this project.
What I love about this approach is how Chris maximizes a single board – there’s something satisfying about efficient material use that reduces waste and keeps costs down. That 2×12 dimension gives you plenty of width for a comfortable seat while providing enough leftover material for sturdy legs. When selecting your board, don’t stress too much about finding perfect lumber since this style embraces character marks and natural imperfections.
The dowel plugs are a nice touch that really elevates the finished look. If you’re new to this technique, take your time with the pilot holes – a sharp brad point bit makes all the difference in preventing tear-out. When trimming the dowels flush, a fine-tooth saw works well, but be careful not to scratch the surrounding wood. A sharp chisel can also work for the final cleanup.
The offset leg placement Chris uses is smart design – it creates visual interest while ensuring the bench won’t tip forward when someone sits on the edge. For the finish, multiple thin coats of polycrylic will always beat one thick coat. Light sanding between coats with 220-grit paper helps each layer bond properly and eliminates any brush marks or bubbles.
This type of project is perfect for building confidence with basic joinery techniques. The skills you’ll practice here – measuring, drilling pilot holes, using clamps effectively, and applying finish – transfer to countless other woodworking projects.