This project is inspired by Zach from Bear Mountain Builds, who designed a simple yet sturdy cedar raised planter box.
If you’re looking for an attractive and functional way to enhance your garden, be sure to check out Zach’s YouTube channel for the full build process and more woodworking ideas.
Watch the full video and subscribe to Zach’s channel:
Why Choose a Cedar Planter Box?
Cedar is one of the best choices for outdoor projects because it naturally resists rot and insect damage. This makes it ideal for a planter that will be exposed to moisture and soil over time.
Beyond durability, cedar also looks great in any outdoor space. Its warm color and grain pattern create a natural, rustic feel that complements a garden setting.
Planning the Build
Zach designed this planter using cedar fence boards and sturdy framing material to ensure long-term durability. He kept the design simple, making it an excellent project for both beginner and experienced woodworkers.
Before starting, Zach made sure to have all materials and tools ready. Having a plan in place helps streamline the build and ensures accurate cuts and assembly.
Constructing the Planter Box
The first step was cutting the cedar boards to size, making sure each piece was square for proper alignment. Since cedar is a softer wood, it cuts cleanly, allowing for precise joinery without much tear-out.
Zach assembled the side panels using a combination of fasteners and adhesives to create a solid structure. Keeping everything square during assembly was important to ensure the planter sat level once completed.
Creating a Strong and Functional Base
For proper drainage, Zach designed the bottom with support pieces that hold the base planks slightly raised. This helps prevent standing water from collecting inside the planter, which can lead to root rot.
He carefully notched and fit the bottom planks into place, making sure there were no large gaps while still allowing airflow. A well-supported base helps keep soil from shifting while ensuring excess water can drain efficiently.
Adding Stability and Finishing Touches
To improve the overall stability, Zach added corner trim to reinforce the structure and cover any exposed fasteners. This gave the planter a more finished look while also increasing its durability.
For a clean top edge, he installed a border along the upper rim. This not only added visual appeal but also made the planter easier to handle when moving or adjusting placement.
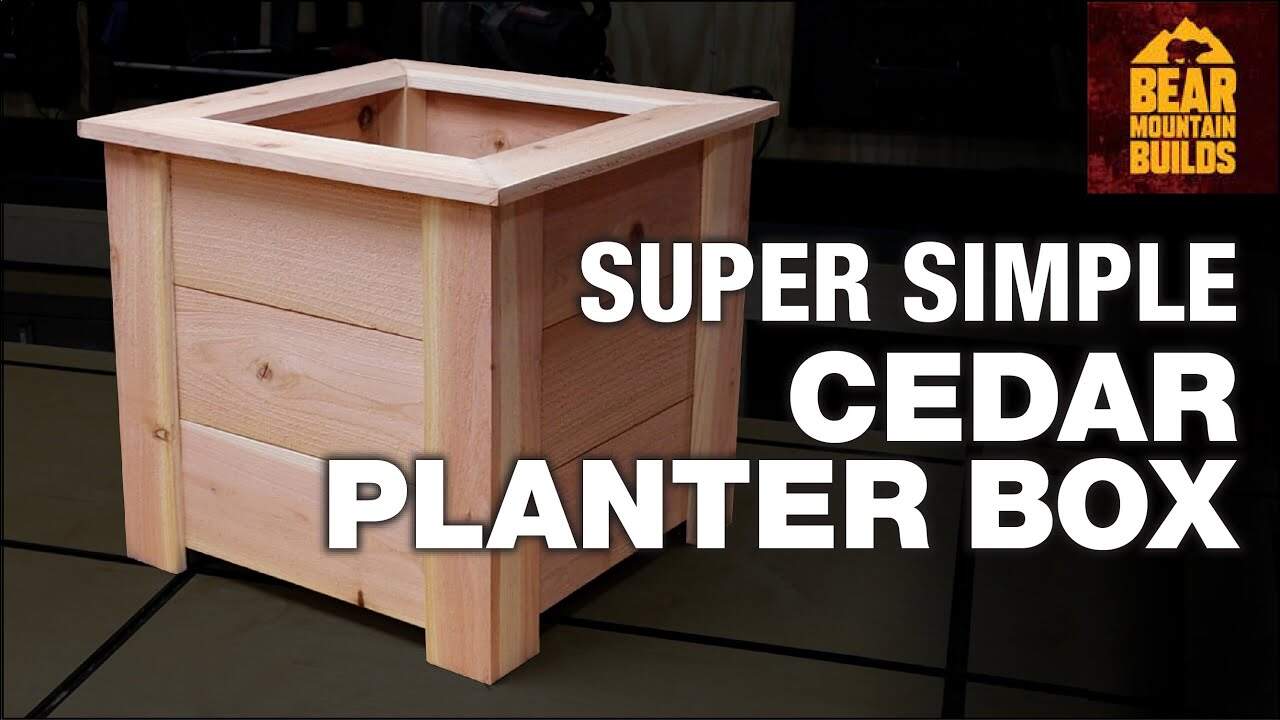
The Finished Planter Box
The final result was a strong, visually appealing planter that provided plenty of space for plants. Its simple yet sturdy design made it a great addition to any garden, patio, or backyard space.
Cedar’s natural properties will help this planter last for years, and over time, it will develop a beautiful silver-gray patina. With minimal maintenance, this project offers long-term value for any gardening enthusiast.
Want to See the Full Build?
If you’re interested in making your own, Zach provides a full video tutorial walking through each step of the process. His detailed explanations make it easy to follow along and build a planter that fits your space.

Matt’s Take
These are my personal thoughts and tips based on my own experience in the shop. This section is not written, reviewed, or endorsed by the original creator of this project.
Cedar really is the gold standard for outdoor planters. What I love about this design is how it balances simplicity with smart construction details. That raised bottom system Zach used is crucial — I’ve seen too many planters fail because water had nowhere to go. The slight elevation keeps your soil from becoming a swampy mess while still providing good drainage.
One thing worth noting about working with cedar fence boards: they can vary quite a bit in moisture content, so give them time to acclimate in your shop if possible. This helps prevent warping after assembly. When cutting cedar, a sharp blade is your friend — it’s soft enough that dull blades can cause fuzzy cuts that don’t look as clean.
The corner trim detail is smart construction. It’s not just about looks — those reinforcements help the planter hold its shape when it’s loaded with heavy, wet soil. If you’re planning to move your planter seasonally, consider adding some simple handles or making the corners a bit more robust. A fully loaded planter can weigh more than you’d expect.
For finishing, many folks like to leave cedar natural to weather to that beautiful gray patina, but a clear penetrating finish can help maintain that fresh cedar color if that’s your preference. Either way, this design should give you years of reliable service.