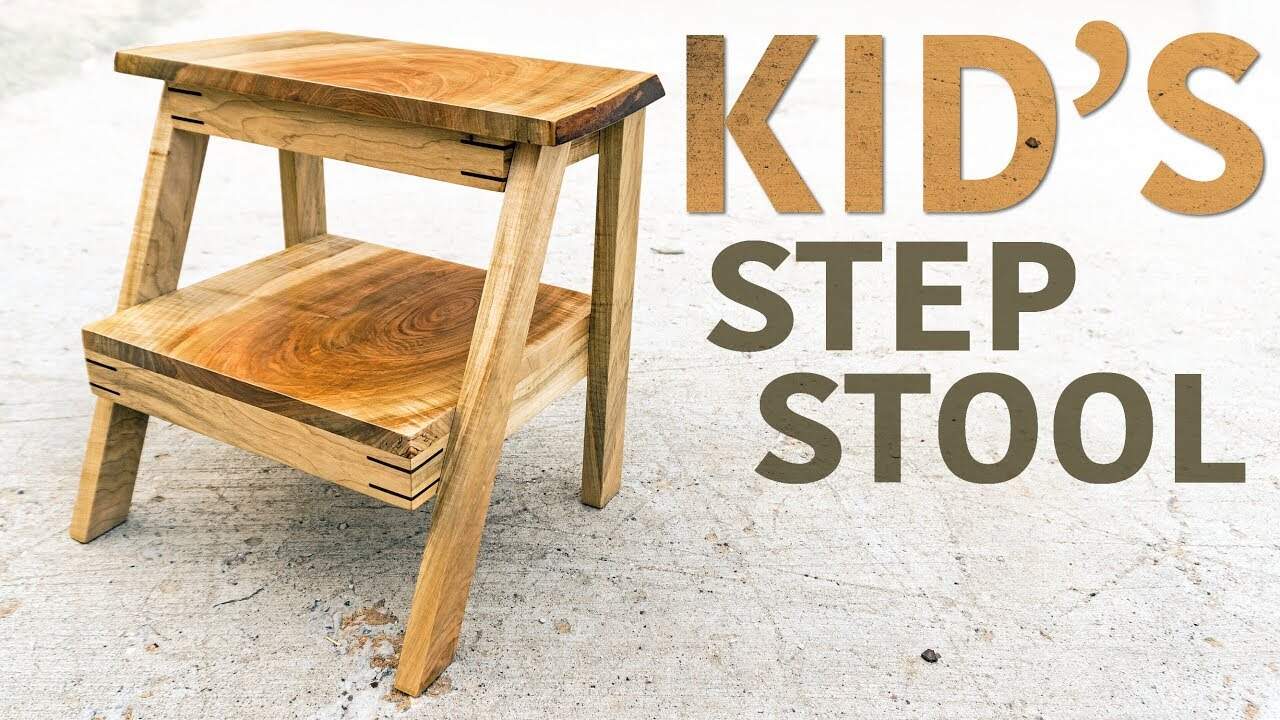
This project was built and designed by Mark from Gunflint Designs. It’s a thoughtfully crafted step stool designed with kids in mind, combining functionality with beautiful woodworking.
Mark’s version is built from maple and designed to last for years of regular use. It’s a great project that balances clean joinery, decorative touches, and safe construction for young children.
Watch the full video and subscribe to Mark’s channel:
Why a Step Stool Matters
As children grow, they often need a small boost to reach sinks, counters, and other high places. A step stool built specifically for their height and safety makes daily routines easier and more enjoyable.
Mark designed this stool for his son, keeping durability, grain orientation, and safety at the forefront. The result is a piece of furniture that’s both practical and personal.
Starting with the Design
Mark began by sketching out the design directly onto a rough-sawn board of maple. The layout included two side panels, four steps, and additional support pieces to tie the structure together.
The design was kept intentionally simple to ensure structural strength and ease of assembly. Clean lines and wide steps made it easier to climb and more stable when in use.
Milling and Preparing the Maple
The maple used in this build had live edges and some cupping, which Mark addressed first. He trimmed off the live edges and ripped the board down the middle to work with more manageable pieces.
By flattening the boards with a jointer and using a planer to bring them to final thickness, Mark preserved as much of the original material as possible. Once flattened and squared, the boards were cut into strips sized for the stool components.
Assembling the Frame
To create the box frame of the stool, Mark cut 45-degree miters using a sled on the table saw. This allowed for tight, clean corners that formed the outside structure.
During glue-up, he used painter’s tape to hold the miters in place, checking for square by measuring corner-to-corner. Once satisfied with the alignment, the frame was left to dry.
Designing the Steps
Mark wanted the grain to flow continuously across all four steps. This required careful layout and a bit of compromise due to minor warping in the wood.
Instead of scrapping the warped pieces, he used a drum sander to gradually flatten them without removing too much material. Preserving the beautiful grain was worth the extra effort.
Reinforcing with Splines
To add strength to the mitered corners, Mark used a spline jig at the table saw. He cut thin kerfs into the joints and inserted walnut splines, which added both durability and contrast.
The dark walnut splines stood out against the maple, creating a subtle but stylish visual detail. Once dry, the splines were trimmed flush and sanded smooth.
Installing the Steps
After the frame was dry and reinforced, Mark began attaching the steps. He drilled countersunk holes and secured the steps with screws from the outside.
To finish the edges cleanly, he used a flush trim bit to remove any overhang from the step boards. The result was a smooth, professional appearance.
Tackling the Legs
Cutting the legs required some ingenuity, since Mark didn’t have a precise digital gauge. He marked the desired angles with tape and made careful cuts to match.
To keep the legs from slipping during glue-up, Mark used a small amount of salt between the surfaces. Once clamped, he made small adjustments until everything was square and stable.
Final Sanding and Finish
With the stool fully assembled, Mark beveled the feet to reduce the chance of splintering. All sharp edges were rounded over using a sander, keeping safety in mind for little hands and feet.
For the finish, Mark applied three coats of Arm-R-Seal. This brought out the grain in the maple and gave the surface long-lasting protection against wear and moisture.
Why This Project Stands Out
This stool isn’t just a handy shop build—it’s a meaningful project built with care. It’s the kind of piece that grows with the family and can be passed down through the years.
Combining clean joinery, custom shaping, and a durable finish, Mark’s design is both functional and timeless. It’s a great example of how woodworking can meet both daily needs and personal values.
Want to See the Full Build?
You can see all of Mark’s plans here: https://www.gunflintdesigns.com/project-plans.

Matt’s Take
These are my personal thoughts and tips based on my own experience in the shop. This section is not written, reviewed, or endorsed by the original creator of this project.
What I really appreciate about Mark’s approach is the thoughtful grain matching across the steps. That continuous flow takes extra planning during layout, but it’s those details that separate furniture-grade work from basic utility builds. The drum sander technique for dealing with warped boards is solid — sometimes the most beautiful pieces of lumber come with challenges that are worth working around.
The walnut spline reinforcement is a smart move that serves double duty. Mitered corners look clean, but they’re not the strongest joint on their own, especially for something that’ll see regular use from kids. Those contrasting splines add both structural support and visual interest without being flashy. It’s the kind of detail that makes people look twice.
Safety-wise, I’m glad to see the rounded edges and beveled feet getting attention in the finish process. Kids have a knack for finding every sharp corner in a room. That Arm-R-Seal finish choice makes sense too — it’s durable enough for daily use but still lets you feel the wood grain, which matters on a piece like this that’s meant to be handled regularly.
The salt trick for preventing slippage during glue-up is an old-timer technique that works great when you need a little extra grip on angled surfaces. Just a pinch between the pieces can save you from having everything slide around while you’re trying to get clamps positioned.