


There’s a stack of 1×6 pine at every home center for less than a movie ticket.
One of those boards, a saw, and an evening in the garage will get you a centerpiece that outlasts every store-bought arrangement you’ve ever hauled home in a plastic sleeve.
And the one-board constraint isn’t a gimmick. It forces decisions. No glue-ups to clamp overnight, no hardwood invoice, no trip back for more material halfway through. You cut what you’ve got and you’re done before the football game ends.
Some of these take twenty minutes. One of them will eat a weekend and teach you more about joinery than a year of watching videos.
Here are 23 Thanksgiving centerpieces you can build from a single board.
1. The Open Trough Centerpiece Box

Start with the lumber math, because it’s where most people get surprised. A 1×6 isn’t six inches wide. It’s 3/4″ by 5-1/2″ — the nominal number refers to the rough-sawn size before drying and planing, which is standard across the industry per UFP Edge.
That’s good news. A box built from 1×6 sides finishes around 5 inches wide and 4 inches tall, which keeps the sightline open across the table.
Rip the board down the middle for the two long sides, crosscut two short ends, and use the full-width remainder as the bottom. Six feet of board, five pieces, one box.
Fill it with gourds and candles and it’s the photo everyone else is copying.
2. Stepped Tea Light Runner From a Single 2×4

Highest payoff per minute on this list. Three feet of stud, a 1-1/2″ Forstner bit, and a drill press turn into a dozen candle wells in about forty-five minutes.
Here’s the move most people miss: vary the depth. Drill some wells 1/2″ deep, some 3/4″, some a full inch. The flames land at staggered heights instead of a flat row of identical dots, and the whole runner stops looking like a muffin tin.
Now the part that matters more than the drilling.
Never set a bare tea light directly into a wood well. Buy the aluminum-cupped ones, or better, drop a loose metal insert cup into each hole so the heat has somewhere to go besides the end grain. The cup also catches the wax, which means cleanup is a thumbnail instead of a heat gun.
A few rules worth burning into your head before you light the first one:
- Keep at least 1/4″ of wood between the bottom of the well and the underside of the board.
- Never run tea lights under a low-hanging greenery garland or dried wheat.
- Snuff them before anyone leaves the room — unattended flame on a wood table is how a nice afternoon becomes an insurance claim.
- Scorched wells are a warning, not a patina. Deepen the hole or go to inserts.
If anyone at the table is under ten or over three glasses of wine, swap in battery tea lights. Nobody will notice from two feet away, and the staggered depths still read beautifully.
3. The Serving Board With a Cut-In Handle

Everyone knows this one. The long hardwood plank that holds cheese and crackers at four o’clock and becomes the centerpiece at five.
Start with a 1×10 or 1×12 in maple, cherry, or walnut. Round one end, lay out the handle cutout about an inch and a half in from the edge, drill two holes at the ends of the slot, then connect them with a jigsaw. Clean the inside with a drum sander or a rolled piece of 120 grit.
Ease every edge with a 1/4″ roundover. Sharp edges on a serving board feel cheap in the hand and that’s exactly what people notice.
Now the finish, which is where this build gets ruined most often. No polyurethane. No lacquer. No stain. Anything that cures into a film will eventually chip into whatever you’re serving.
Use food-grade mineral oil, and use a lot more than you think. Flood the surface, let it soak twenty minutes, wipe the excess, repeat until the wood stops drinking — usually three or four rounds over two days. Howard Products sells it by the pint for a few dollars, and the hardware aisle and Lowe’s both stock equivalents.
Then top it with a board butter: roughly four parts mineral oil to one part beeswax, melted together and cooled into a paste. The wax seals the surface against water so the oil doesn’t wash out the first time it gets rinsed. Weeks Honey Farm breaks the ratio down if you want to mix a batch yourself.
Re-oil it whenever the wood looks chalky. If you want a deeper dive on the whole category, the cutting board design ideas roundup covers patterns well past a plain plank.
4. The Stacked 4×4 Pumpkin Trio

Real pumpkins go soft by the third week of November. These don’t.
Cut three blocks from a 4×4 post at roughly 4, 6, and 8 inches. Knock the four vertical corners off with a belt sander until each block reads round-ish from across the room — you’re not carving, you’re just removing the hard edges.
Drill a 3/8″ hole in the top of each, jam in a twig from the yard, and wrap a few inches of raffia around it.
Paint them orange, or leave them bare and let the grain do the work. Bare cedar with a dark wax looks far more expensive than orange paint ever will.
Ana White’s version of this has been floating around for a decade for a reason. It’s forgiving enough that a first-timer can’t really fail.
5. Kerf-Cut Napkin Rings
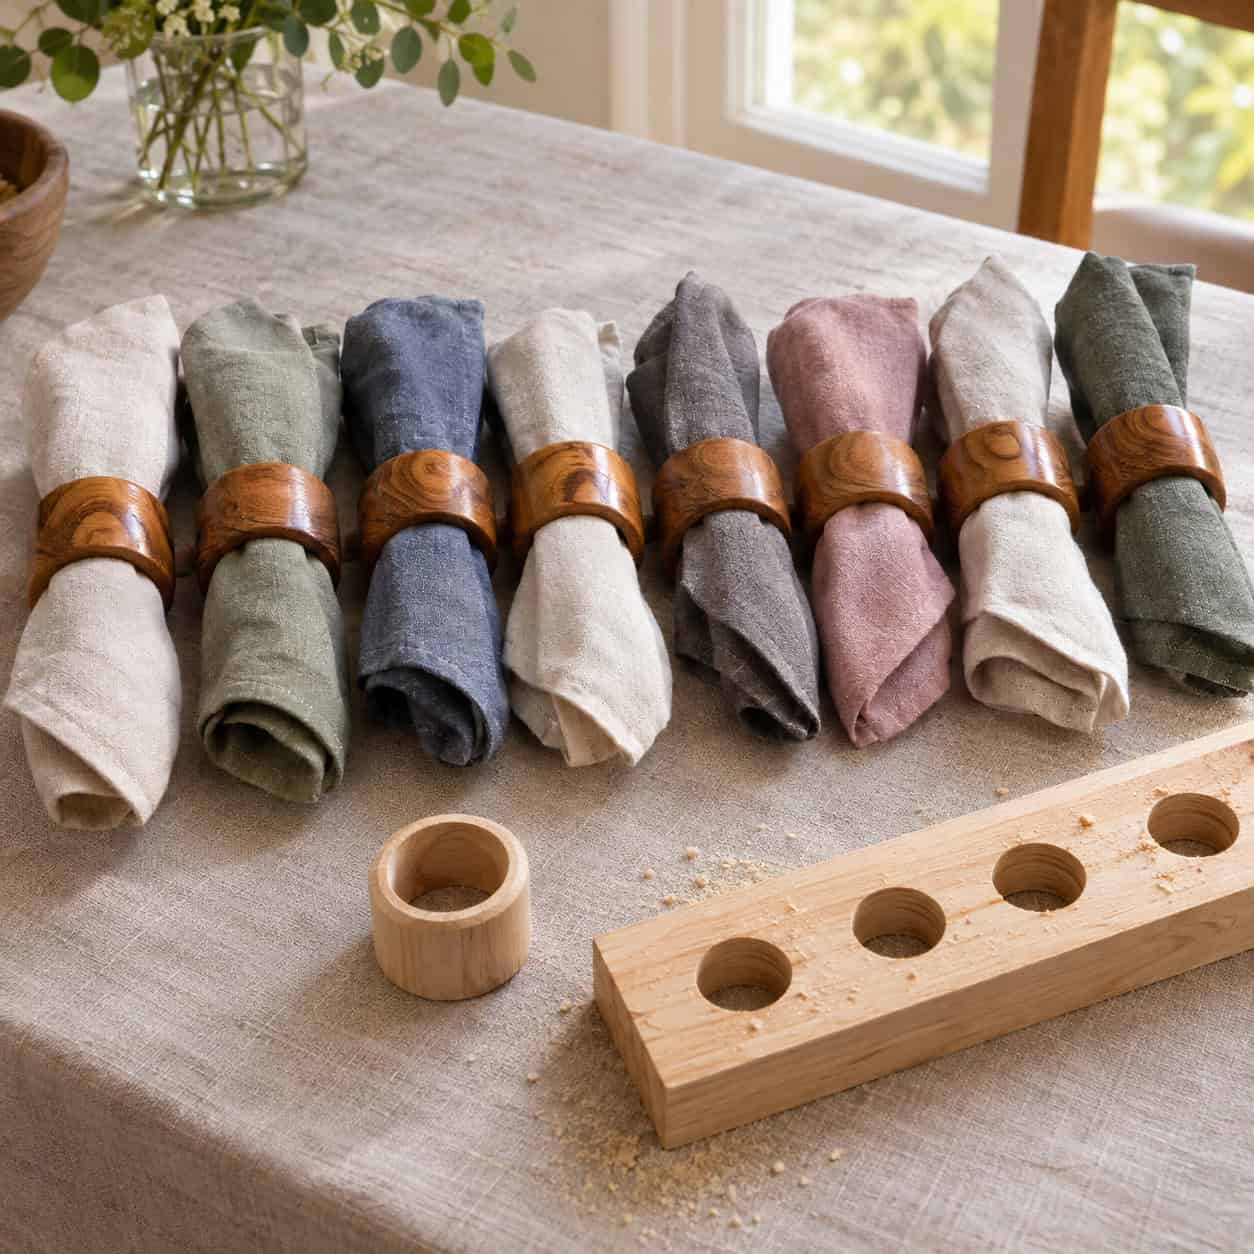
Eight rings from a foot of 1×4. Twenty minutes.
Rip a strip about 1-3/4″ wide, bore a 1-5/8″ Forstner hole down the length at regular intervals, then slice between the holes at the miter saw to free each ring.
Cut the slices with a stop block clamped to the fence and a push stick in hand. Never freehand a small part with your fingers near a spinning blade — a ring that small has no business being held by hand. Review the fundamentals in table saw safety tips if it’s been a while.
Sand, oil, done. Eight matching rings make the table look planned in a way nothing else at this scale does.
6. A Shop-Built Lazy Susan

This one solves an actual problem instead of a decorative one. Six dishes, fourteen people, and a table nobody can reach across.
Glue up a 1×12 into a square panel, mark your circle with a string compass, and cut it with a jigsaw. Clean the edge with a flush-trim bit against a plywood template if you want it dead round.
The sizing rule most posts skip: your bearing should be about one-third the diameter of the top. An 18″ susan wants a 6″ bearing. Go smaller and it rocks when someone loads one side with a gravy boat.
Screw the bearing to the underside, then add four small felt feet so it clears the tablecloth. This is the only build here that genuinely needs store-bought hardware — a $12 ball-bearing turntable from the hardware aisle.
7. The Taper Candle Block Candelabra

Twenty-plus tapers rising out of one weathered stick of 2×4. It photographs better than anything else on this list.
Lay out a grid of 7/8″ holes down a 28-inch length — two or three rows, offset, roughly 2 inches on center. Drill them about 1″ deep with a Forstner bit and a depth stop.
Standard tapers run close to 7/8″ at the base, so they seat with a friction fit. If one wobbles, a wrap of painter’s tape around the base fixes it.
Distress the board first. A wire brush, a chain, a few dents with a screw, then dark wax. The Ponds Farmhouse built a version of this that reads like a $140 catalog piece.
Same flame rules as the tea light runner. Tapers burn down, and a taper burning down into a wood hole is a problem — trim them at the two-inch mark or swap in flameless.
8. The Two-Tier Dessert Tray

By the time pie comes out, the table has no horizontal room left. Go vertical.
Cut two rounds from a 1×8 — one at 12 inches, one at 9. Drill a centered hole through both, run a 3/4″ dowel through as the post, and pin it with glue and a cross dowel at each deck.
Spacing matters more than it sounds. Leave 7 inches between decks or a slice of pie won’t clear the shelf above it.
One board plus a stick. That’s the whole bill.
9. The Bare Oiled Plank Under a Greenery Garland

The anti-project project.
Take one 1×10, run it down the spine of the table, ease the edges with a block plane or sandpaper, and put one coat of oil on it. That’s the build.
Then pile eucalyptus, bittersweet, and a few pinecones down the length of it and set candles in the gaps.
It also saves the tablecloth. Wax drips land on wood you can scrape instead of linen you can’t.
Sometimes the board is the centerpiece.
10. Slotted Place Card Holders

One saw kerf. That’s the entire operation.
Cut 2-inch chunks from a length of 2×2 or ripped 1×4. Tilt the miter saw blade to about 15 degrees and make a single pass across the top of each block, roughly 1/2″ deep.
A standard thin-kerf blade cuts right around 3/32″, which happens to grip cardstock perfectly. No hardware, no glue, no adjustment.
A dozen in ten minutes. They come back every holiday for the rest of your life.
11. The Open-Frame Hurricane Lantern

This is the one that teaches real joinery at a scale cheap enough to fail on.
Build a skeleton box from 1×2 or ripped 1×4 — four vertical posts, four rails top and bottom, eight corners to join. Half-laps are the right answer and they’re forgiving at this size. Pocket screws work if you’re in a hurry and don’t mind seeing them inside.
Size the frame around a glass hurricane chimney or a wide-mouth jar with at least an inch of air gap on every side. That gap is not aesthetic. It’s the whole safety margin.
Here’s the hard truth about this build: it’s the highest fire risk on the list. You’re putting a sustained open flame inside a wooden cage.
So do it right. Glass between the flame and the wood, always — never a pillar candle sitting naked in a wood frame. Set the candle on a metal or ceramic base inside the chimney, not on the wood floor of the lantern. Keep the flame below the top rail so hot air escapes upward without washing across end grain.
And check the wood after the first long burn. If you can smell scorch or see darkening anywhere inside, your gap is too tight. Rebuild it bigger or move to an LED pillar.
Done correctly, it’s the most architectural object you’ll put on a Thanksgiving table. Clean lines, warm light, shadows thrown across the ceiling. Worth getting right.
12. The Drilled Bud Vase Board

Glass test tubes are the trick. They come in packs of two dozen for under fifteen dollars, and a 1×6 bored with matching holes becomes a floral rail.
Most tubes run 20mm or 25mm across — measure yours and drill a hole about 1/32″ oversize so they lift out for refilling.
Space them 3 inches apart down the centerline. Single stems only: dried wheat, mums, bittersweet, a few sprigs of rosemary.
Keep the whole thing under 8 inches tall. Nothing on a Thanksgiving table should break the sightline between two people seated across from each other.
13. The Standing Turkey Silhouette

Time to get a little playful.
Trace a turkey profile onto a 1×10, cut it out with a jigsaw, and sand the edges smooth. Then glue a small foot to the back at about a 12-degree lean so it stands on its own — no separate base, no stand to lose in the attic.
The tail feathers are where a scrap bin earns its keep. Cut each feather from a different species — walnut, maple, cherry, white oak — and glue them into a fanned-out layer.
Suddenly it’s not a craft project. It’s a piece of marquetry wearing a costume.
14. The Slatted Trivet for the Roasting Pan

Brutally practical, and the one build on this list that prevents a permanent mistake.
A roasting pan comes out of the oven at 325 degrees and lands on a table your grandmother finished in 1968. Shellac softens. Polyurethane clouds. Wax prints a white ghost of the pan that never fully leaves.
Build a grid from 1×2 or ripped 1×3 — half-lap the intersections so the top surface stays flat, or just lay cross members under a slatted top. Keep the slats 1/2″ apart so air moves and the heat dissipates instead of pooling.
Species matters here more than anywhere else in this article.
Use hardwood. Hard maple, white oak, cherry, or beech. Pine will scorch under a hot pan, and worse, softwood pitch can liquefy and bleed through the finish — leaving sticky resin on the trivet and sometimes on the table under it. Knotty pine is the worst offender because the knots hold the most pitch.
Raise the grid on four small hardwood feet, 1/2″ tall. That air gap under the trivet is what actually protects the table — contact is what transfers heat.
Finish with oil, never film finish. A polyurethaned trivet will soften and print the pan bottom right into the top. For the broader problem, protecting a wood table from heat marks covers the rest of the hazards.
Build two. Somebody always brings a second casserole.
15. Nesting Pedestal Risers (A Set of Three)

Dessert sprawls. Risers make it step up instead.
Cut three rounds from a 1×8 — say 8″, 6″, and 5″ — and mount each on a block base so the finished heights land at 2, 4, and 6 inches. A simple stack of two or three glued blocks under the smaller tops gets you there without a lathe.
They break apart, store flat, and come back out for the Christmas cookie table in four weeks.
That’s the difference between these and the tiered tray. One is a fixed object. These are a system.
16. The Stave-Built Cornucopia

The show-off build. Set aside a weekend.
Rip your board into tapered staves — narrow at one end, wide at the other — and bevel both long edges of each stave so they close into a cone when wrapped around a form. The bevel angle depends on your stave count: more staves means a shallower bevel and a smoother curve.
Twelve staves is a reasonable target. Cut the bevels at the table saw with the blade tilted, test-fit the whole ring dry, and adjust before any glue touches wood.
Glue it up around a tapered plywood form with hose clamps or a band clamp. Then rasp and sand the outside until the facets soften into a horn.
It’s genuinely advanced work. It’s also the single most on-theme object in American holiday iconography, and nobody who sees it on your table will believe you made it.
17. The Wine Bottle and Glass Caddy

Completely different silhouette from everything else here — tall, carried, useful.
Take a 1×8 for the base and two end uprights, with a dowel running between them as the handle. Bore two holes through the base sized for bottle necks, or build a shallow well that cradles the bottles on their sides.
Cut slots along both long edges of the base for stemware. A 3/8″ slot with a 1″ entry hole at the open end lets a wine glass slide in by its foot and hang upside down.
It carries from kitchen to table to porch. After dinner it goes out by the fire pit still loaded.
18. The Hand-Carved Trencher

There were no plates at the 1621 Plymouth harvest meal. There were trenchers — shallow wooden boards hollowed just enough to hold food, often shared between two people.
Which makes this the oldest Thanksgiving serving vessel in existence, and you can make one in an evening with no power tools at all.
Take a thick board — 8/4 if you can get it, basswood or butternut if you want it easy, cherry if you want it beautiful. Mark an oval about an inch in from the edges. Then go to work with a bowl gouge and a mallet, working across the grain toward the center.
Leave the tool marks. Sanding it glass-smooth kills everything that makes it worth having.
Finish with mineral oil only.
19. The Wood-Burned Menu Plank

A pyrography pen costs about twenty dollars and basswood takes a burn better than any other common species. Poplar works too if the grain is tight and pale.
Sand to 220, transfer your design with graphite paper, and burn slowly — heat does the work, pressure just gouges.
Burn the day’s menu if you want something seasonal. Burn grandmother’s stuffing recipe in her own handwriting if you want something nobody throws away.
Trace it right off the index card. The shaky letters, the crossed-out measurement, the butter stain outline. That’s the whole point.
Lean it against the wall behind the table, and it stops being decor.
20. The Gratitude Card Board

Run one shallow kerf down the length of a long plank — 1/8″ wide, 3/8″ deep, straight down the centerline.
That’s it. That’s the build.
Every guest writes what they’re thankful for on a card and slides it into the groove. The board stands up as a wall of handwriting down the middle of the table.
Then you pull the cards, date them, and put them in an envelope taped to the underside. Next November you add twenty more.
Ten years in, it’s the most valuable object in the house. Nothing you buy appreciates like that.
21. The Flexible Slatted Table Runner

Rip a board into thin strips — 3/4″ wide, 1/4″ thick — then glue them side by side onto two strips of cotton webbing running crosswise underneath.
The result rolls up like a bamboo mat and lies dead flat when unrolled. Gorgeous under candles and plates both.
Fair warning: the webbing makes this a board-plus-textile build, not a pure one-board project. And it does overlap with the bare plank in function.
Build it anyway if you like the look. Just know it’s a different kind of afternoon — mostly glue-up and clamping, very little sawing.
22. Scattered Wooden Oak Leaves
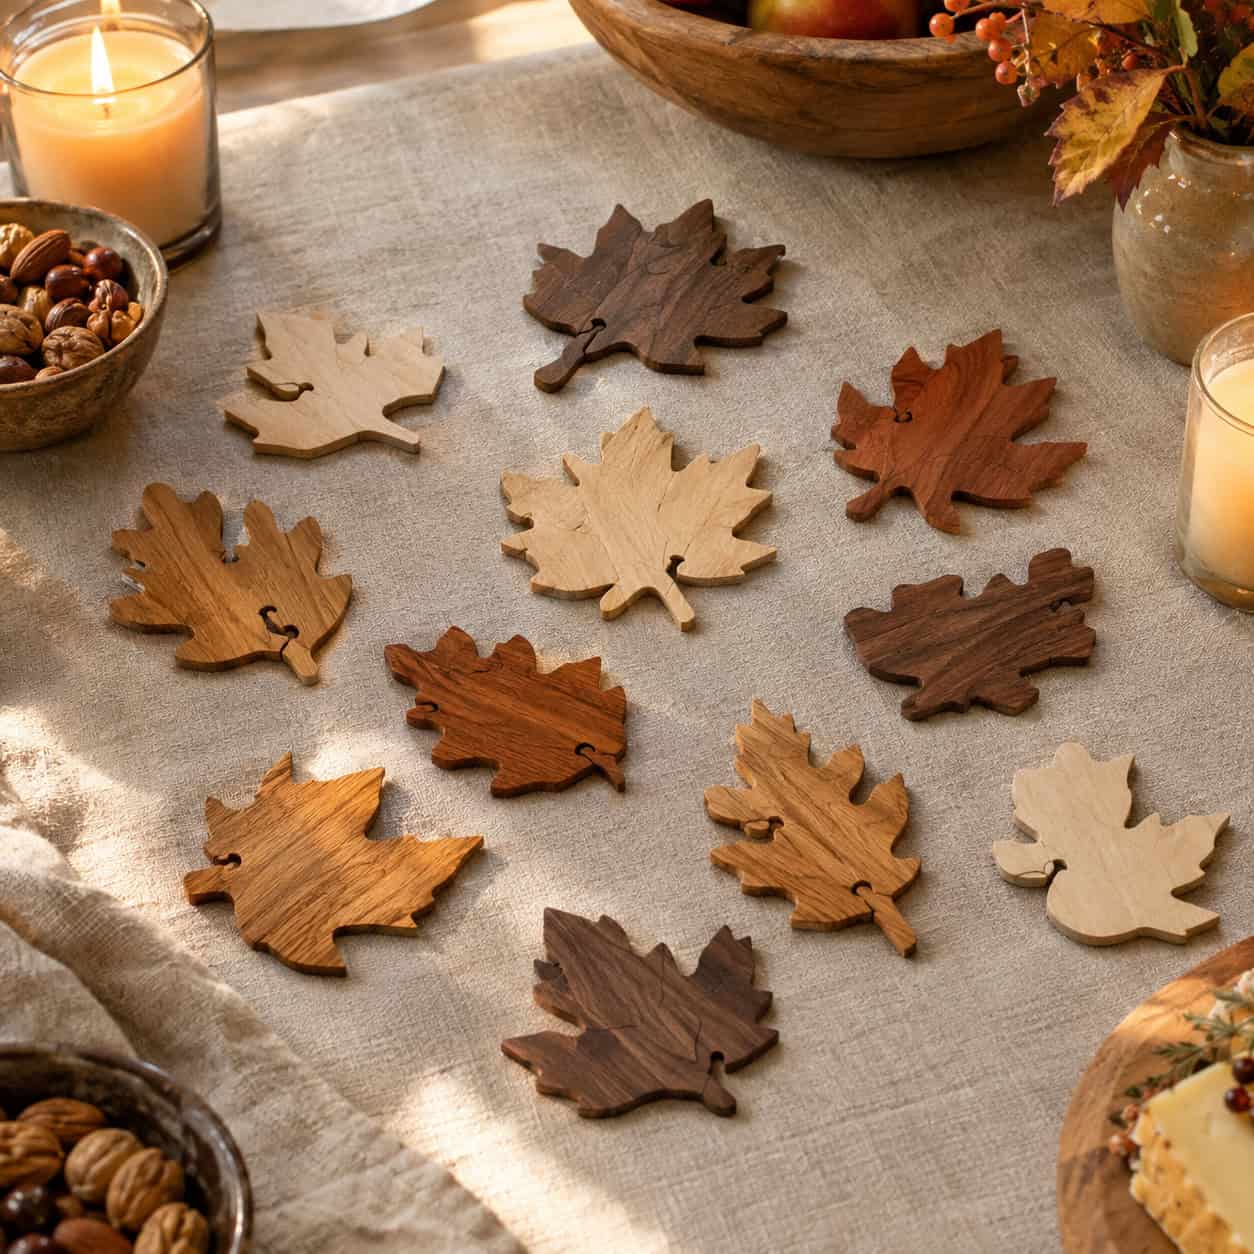
Confetti at furniture scale.
Trace real oak and maple leaves onto a 1×8, cut them out on a scroll saw or jigsaw, and thin the edges with a sander so they don’t read as chunky.
Scatter a dozen down the table between candles and serving bowls.
Mix species if you can — white oak, cherry, and walnut leaves together give you three natural colors with no stain at all.
23. Individual Mini Bread Boards at Each Place Setting

One 1×8 yields six to eight small boards at roughly 5″ x 7″. Round the corners, cut a hanging hole in one end, sand, oil.
Each guest gets one under their roll or their cheese course. Then they take it home.
That’s the real function — it’s a party favor pretending to be a place setting.
Burn initials into them if you’ve already got the pen out from the menu plank.
Before you buy anything, it’s worth knowing which of these actually fit in the time you’ve got.
| Tonight | This Weekend | |
|---|---|---|
| Builds | Napkin rings, place cards, oiled plank | Cornucopia, hurricane lantern, lazy susan |
| Tools | Miter saw, drill, sandpaper | Table saw, jigsaw, clamps |
| Lumber cost | Under $10 | $20 to $60 |
| Skill needed | Straight cuts only | Joinery and glue-ups |
| Finish time | Oil, wipe, done | Multiple coats, overnight cure |
If the holiday is four days out, stay in the left column. Nobody at the table knows how long anything took.
The thing about building your own centerpiece is that it survives the season. The store-bought arrangement gets thrown out December 1st. A wooden pumpkin goes in a bin and comes back out every year until your kids fight over it.
Start with the trough box or the tea light runner. Both are forgiving, both look far more expensive than the lumber receipt, and both will have you eyeing the rest of this list before the dishes are dry.
Pick one board. Make something that’ll still be on the table in 2045.
Looks like several project that I could change a little and sell.